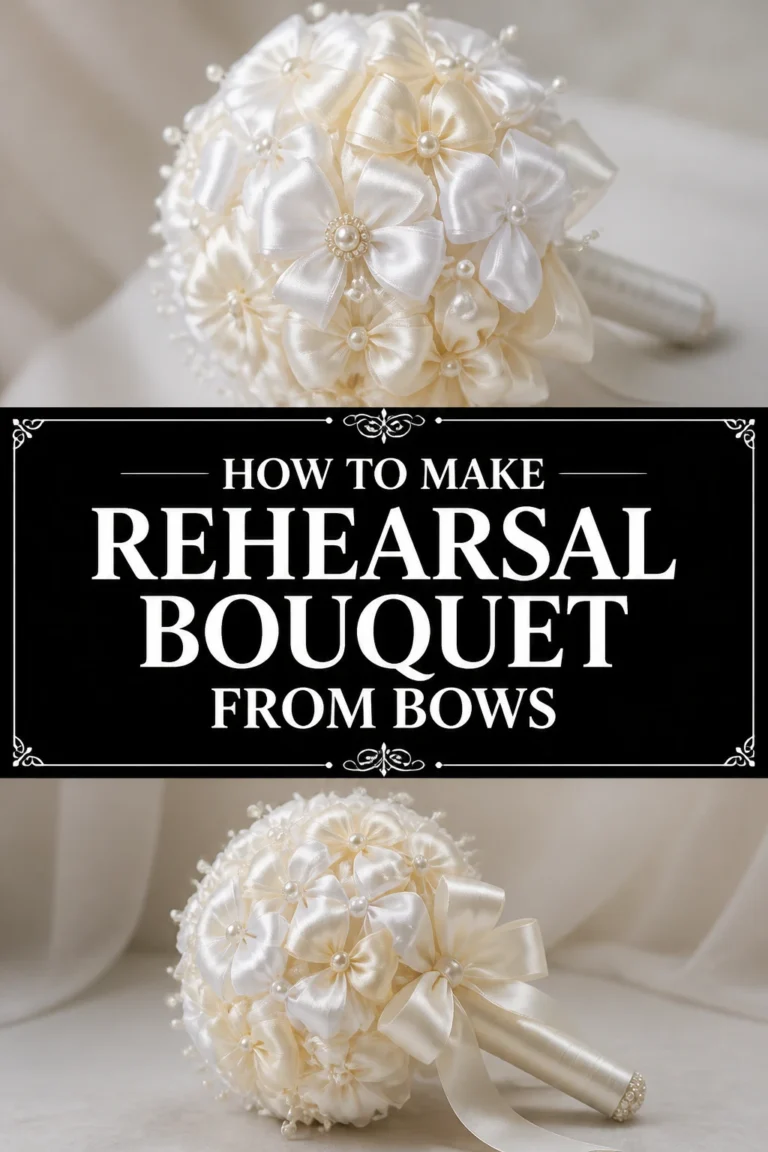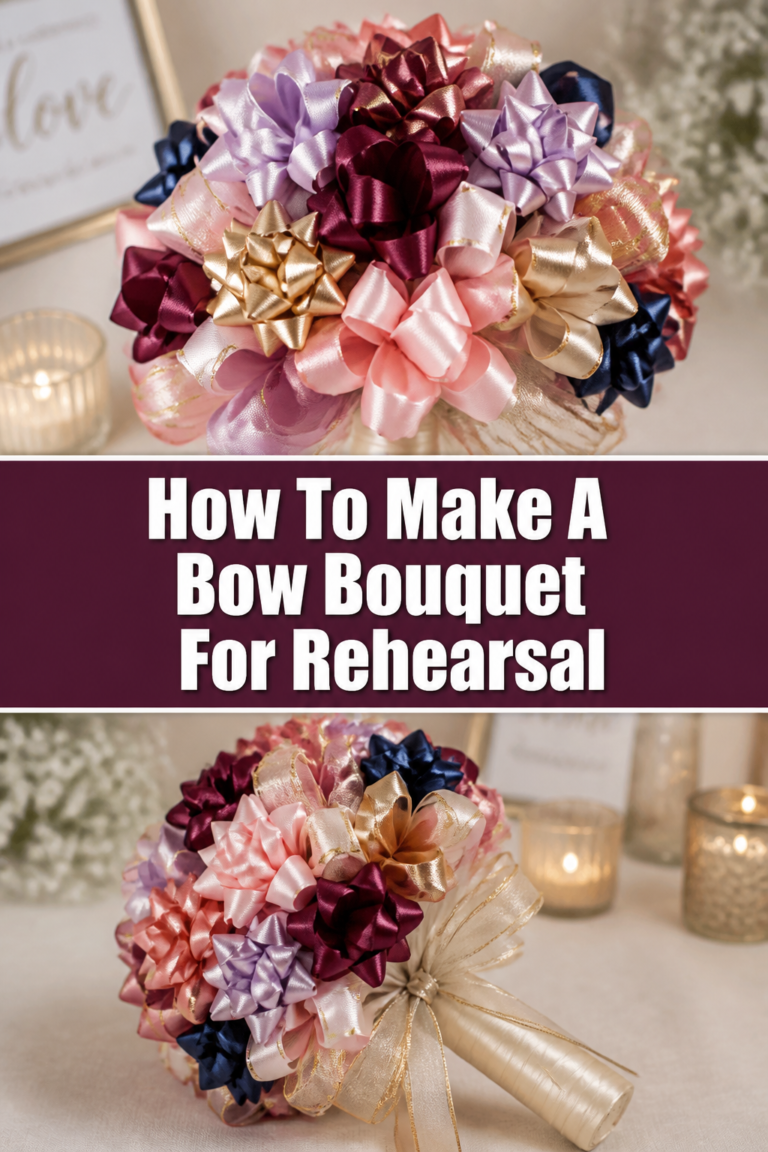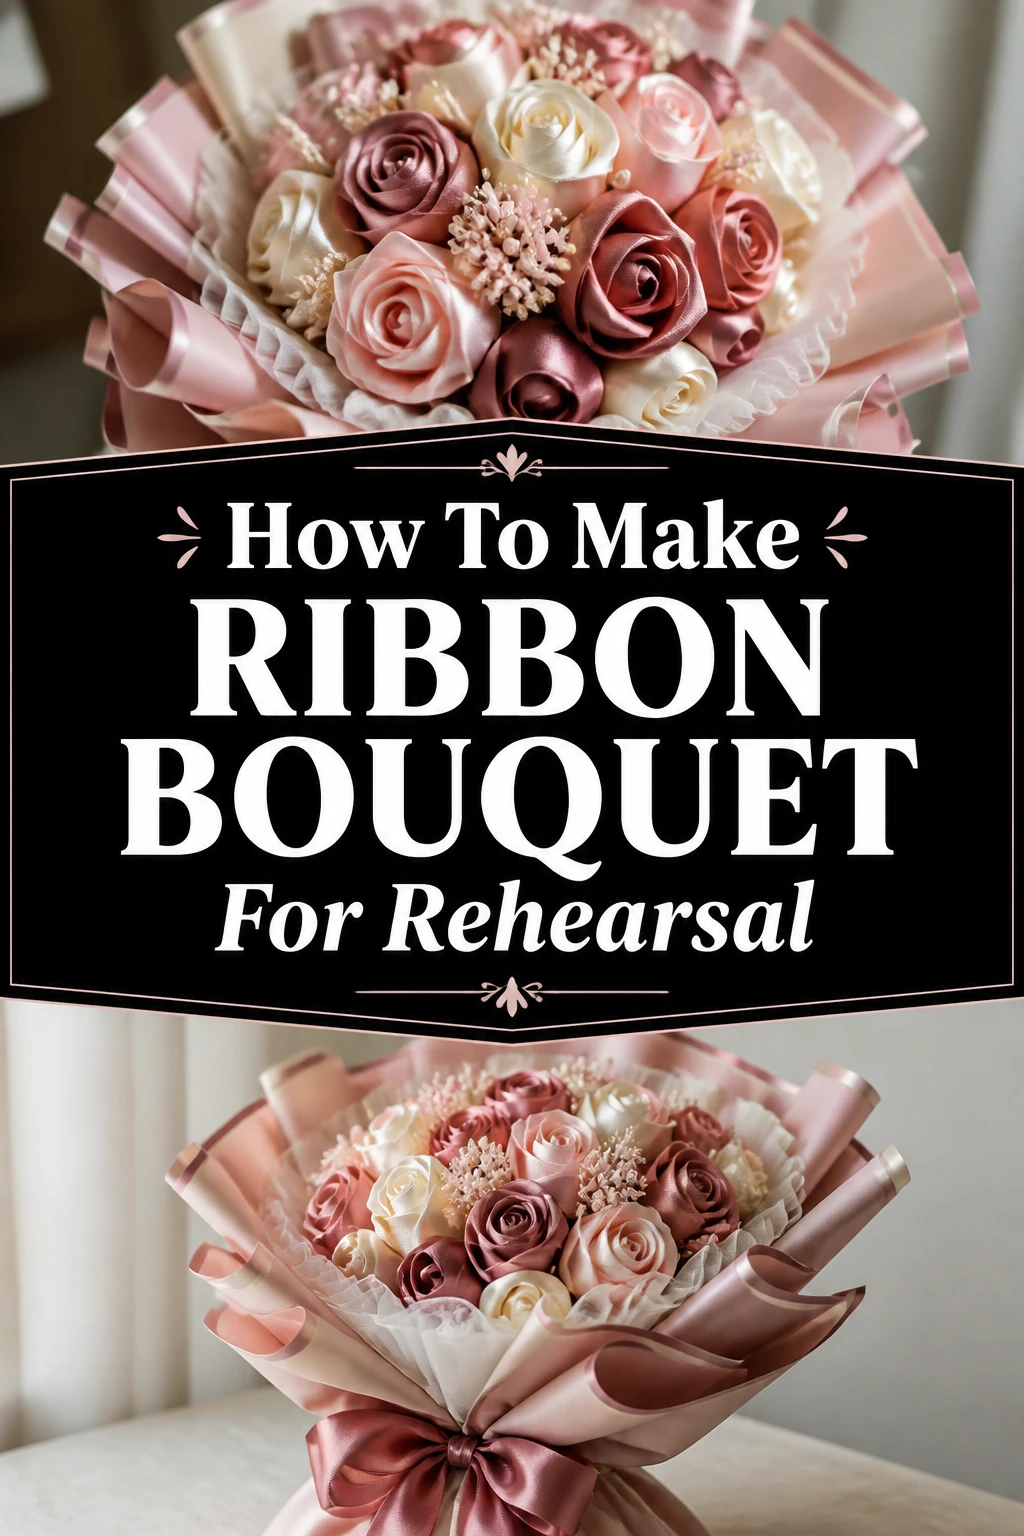
💐 How To Make Ribbon Bouquet For Rehearsal

Wedding Planning
No fluff, no drama. Just easy weekly advice, planning shortcuts, and gentle reminders to help you actually enjoy your engagement.
Planning a rehearsal dinner is an exciting part of your wedding journey, and a special ribbon bouquet adds such a sweet, personal touch.
It’s a charming, lasting alternative to fresh flowers, perfect for tossing without any worry.
Having crafted several of these delightful bouquets myself, I can assure you this guide makes the process simple, enjoyable, and incredibly rewarding.
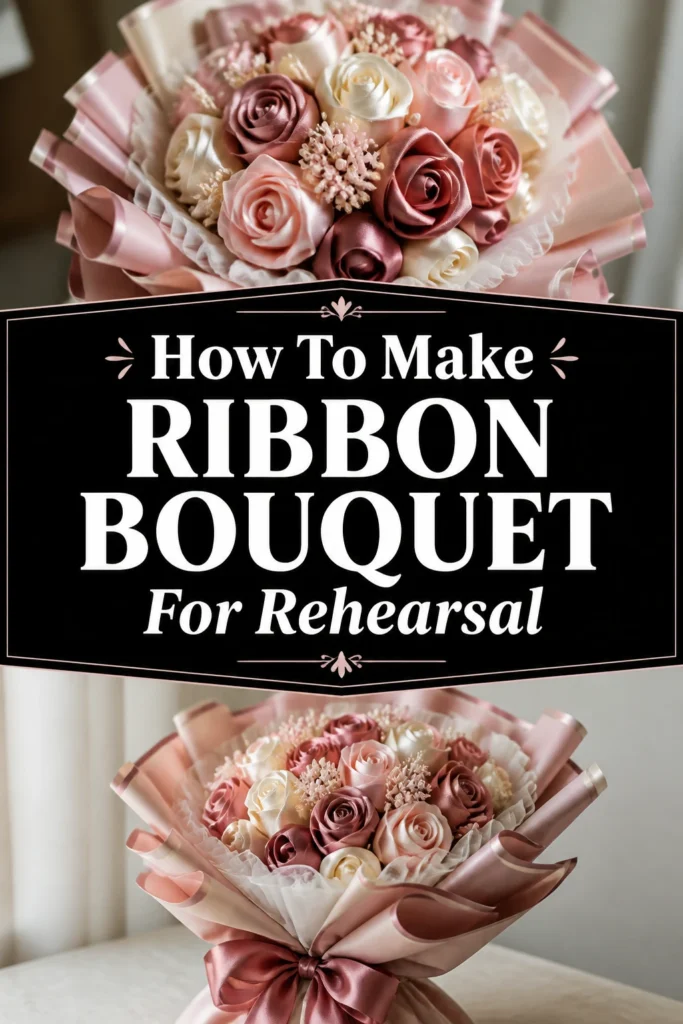
Quick Overview
This guide will walk you through creating a beautiful, lasting ribbon bouquet, perfect for your rehearsal dinner or as a keepsake.
- Time needed: 1-2 hours
- Difficulty: Beginner
- What you’ll need: Various ribbons, floral wire, scissors, floral tape, hot glue gun, and a sturdy stem material.
Step-by-Step Instructions
Step 1: Gather Your Materials
Begin by collecting all the necessary items before you start. This ensures a smooth crafting process without interruptions.
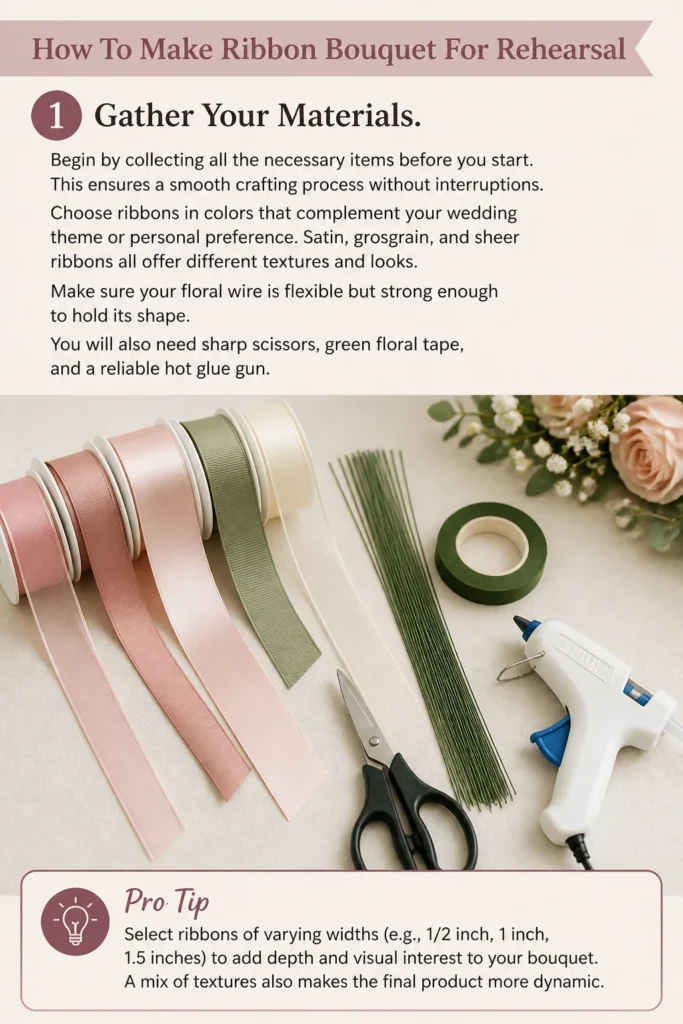
Choose ribbons in colors that complement your wedding theme or personal preference. Satin, grosgrain, and sheer ribbons all offer different textures and looks.
Make sure your floral wire is flexible but strong enough to hold its shape. You will also need sharp scissors, green floral tape, and a reliable hot glue gun.
Pro Tip: Select ribbons of varying widths (e.g., 1/2 inch, 1 inch, 1.5 inches) to add depth and visual interest to your bouquet. A mix of textures also makes the final product more dynamic.
Step 2: Prepare Your Ribbon Strips
Measure and cut your chosen ribbons into strips. For a standard-sized bouquet, aim for lengths between 10 to 15 inches.
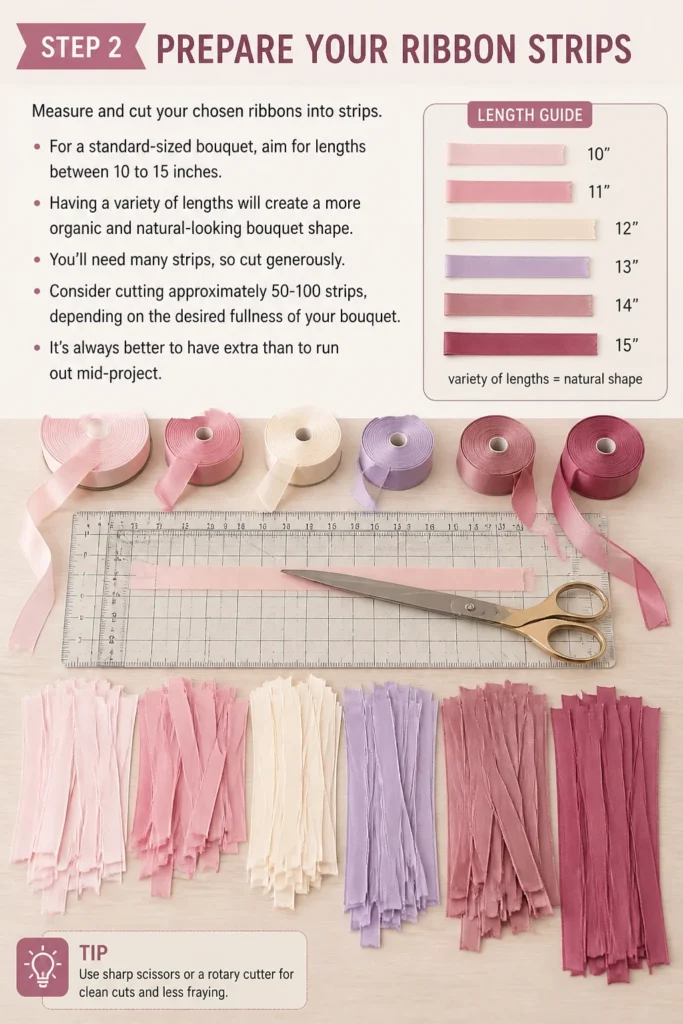
Having a variety of lengths will create a more organic and natural-looking bouquet shape. You’ll need many strips, so cut generously.
Consider cutting approximately 50-100 strips, depending on the desired fullness of your bouquet. It’s always better to have extra than to run out mid-project.
Step 3: Create Individual Ribbon Loops
Take one ribbon strip and fold it in half, then fold the two ends back towards the center to form a loop. The raw ends should meet in the middle.
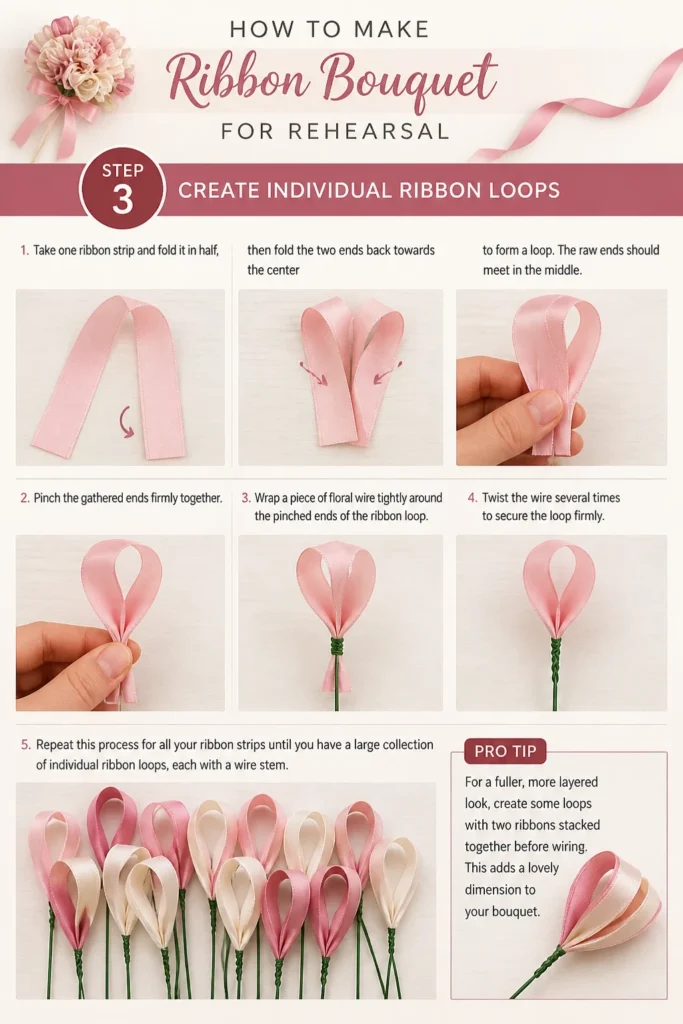
Pinch the gathered ends firmly together. This creates a small, neat base for your ribbon “petal.”
Wrap a piece of floral wire tightly around the pinched ends of the ribbon loop. Twist the wire several times to secure the loop firmly.
Repeat this process for all your ribbon strips until you have a large collection of individual ribbon loops, each with a wire stem.
Pro Tip: For a fuller, more layered look, create some loops with two ribbons stacked together before wiring. This adds a lovely dimension to your bouquet.
Step 4: Assemble the Ribbon Clusters
Group together three to five individual ribbon loops, staggering their heights slightly for a natural appearance. Hold them firmly at their wire bases.
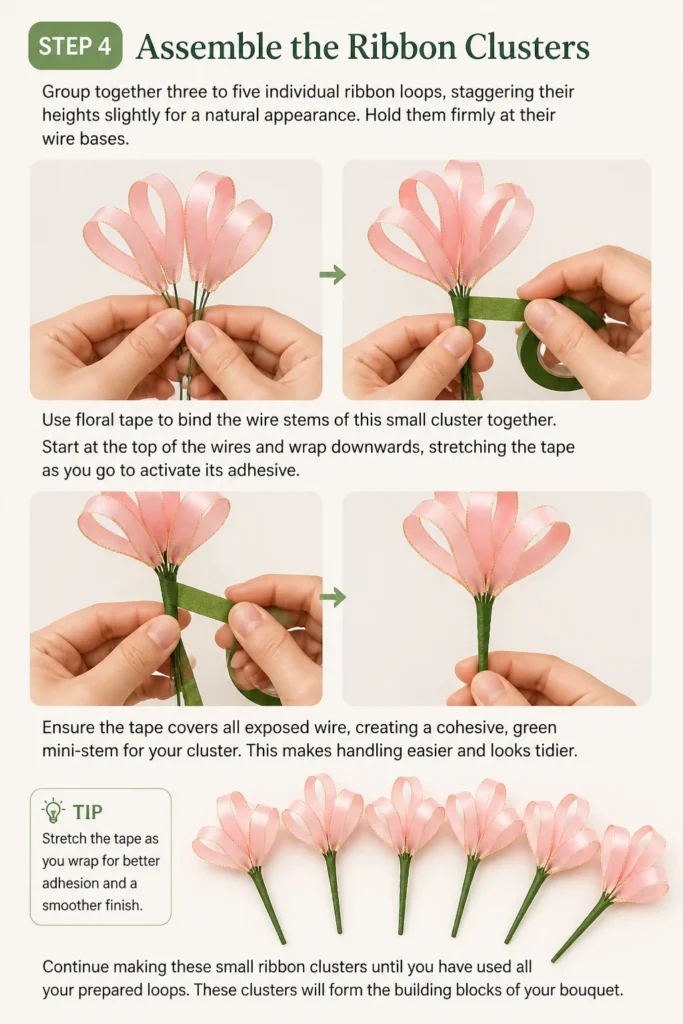
Use floral tape to bind the wire stems of this small cluster together. Start at the top of the wires and wrap downwards, stretching the tape as you go to activate its adhesive.
Ensure the tape covers all exposed wire, creating a cohesive, green “mini-stem” for your cluster. This makes handling easier and looks tidier.
Continue making these small ribbon clusters until you have used all your prepared loops. These clusters will form the building blocks of your bouquet.
Step 5: Form the Bouquet Shape
Select one of your ribbon clusters to be the center of your bouquet. Hold it firmly in one hand.
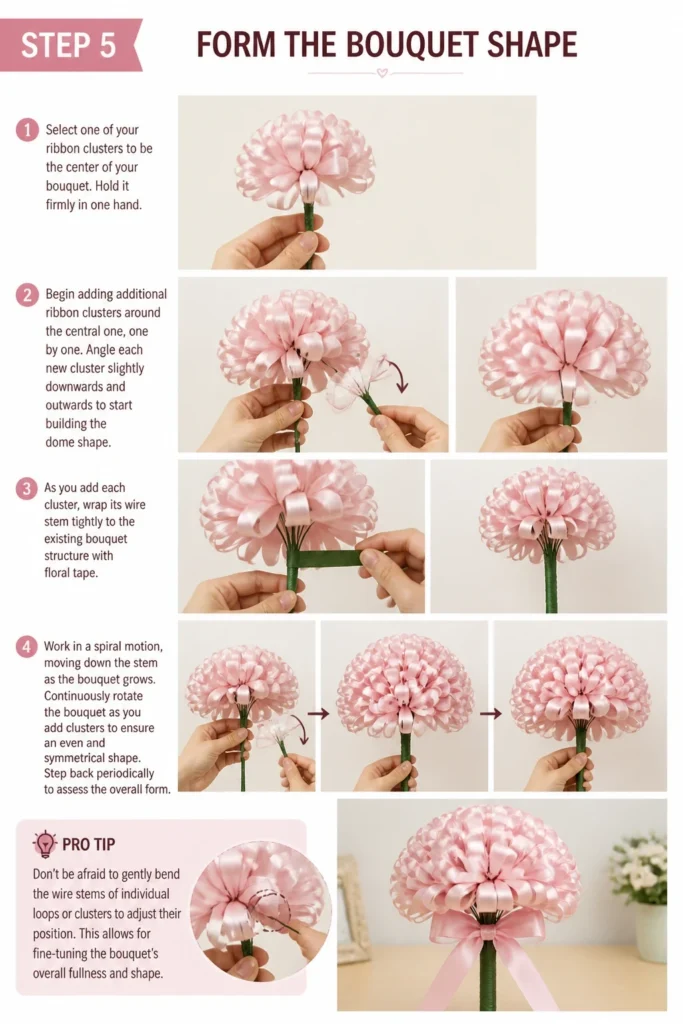
Begin adding additional ribbon clusters around the central one, one by one. Angle each new cluster slightly downwards and outwards to start building the dome shape.
As you add each cluster, wrap its wire stem tightly to the existing bouquet structure with floral tape. Work in a spiral motion, moving down the stem as the bouquet grows.
Continuously rotate the bouquet as you add clusters to ensure an even and symmetrical shape. Step back periodically to assess the overall form.
Pro Tip: Don’t be afraid to gently bend the wire stems of individual loops or clusters to adjust their position. This allows for fine-tuning the bouquet’s overall fullness and shape.
Step 6: Construct the STEM
Once all your ribbon clusters are incorporated and the bouquet has reached your desired size and shape, it’s time to finalize the stem.
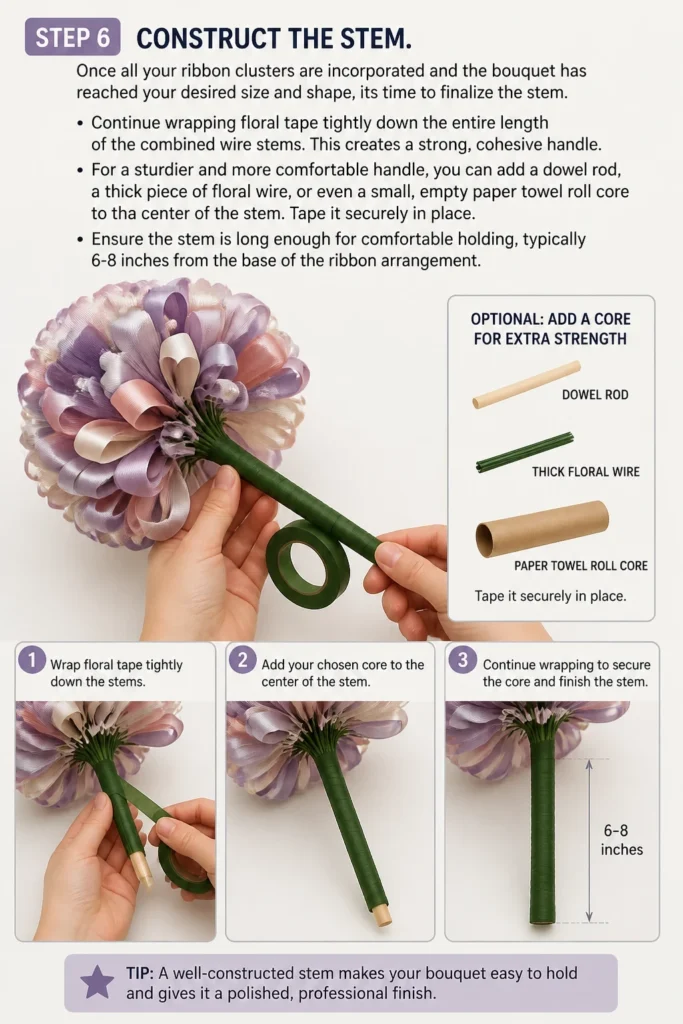
Continue wrapping floral tape tightly down the entire length of the combined wire stems. This creates a strong, cohesive handle.
For a sturdier and more comfortable handle, you can add a dowel rod, a thick piece of floral wire, or even a small, empty paper towel roll core to the center of the stem. Tape it securely in place.
Ensure the stem is long enough for comfortable holding, typically 6-8 inches from the base of the ribbon arrangement.
Step 7: Add Finishing Touches
Once the stem is fully taped and secure, you can cover it with a decorative ribbon for a polished look. Choose a wider ribbon that matches your bouquet colors.
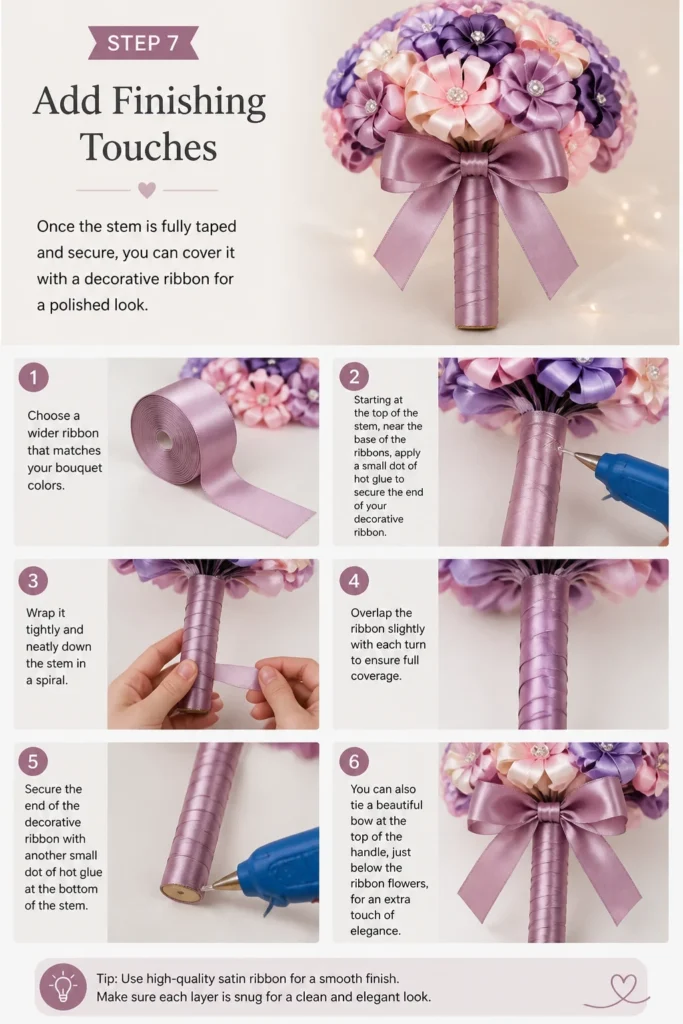
Starting at the top of the stem, near the base of the ribbons, apply a small dot of hot glue to secure the end of your decorative ribbon. Wrap it tightly and neatly down the stem in a spiral.
Overlap the ribbon slightly with each turn to ensure full coverage. Secure the end of the decorative ribbon with another small dot of hot glue at the bottom of the stem.
You can also tie a beautiful bow at the top of the handle, just below the ribbon flowers, for an extra touch of elegance.
Step 8: Personalize and Embellish
Now for the fun part: making your bouquet uniquely yours! Consider adding small embellishments for extra sparkle and charm.
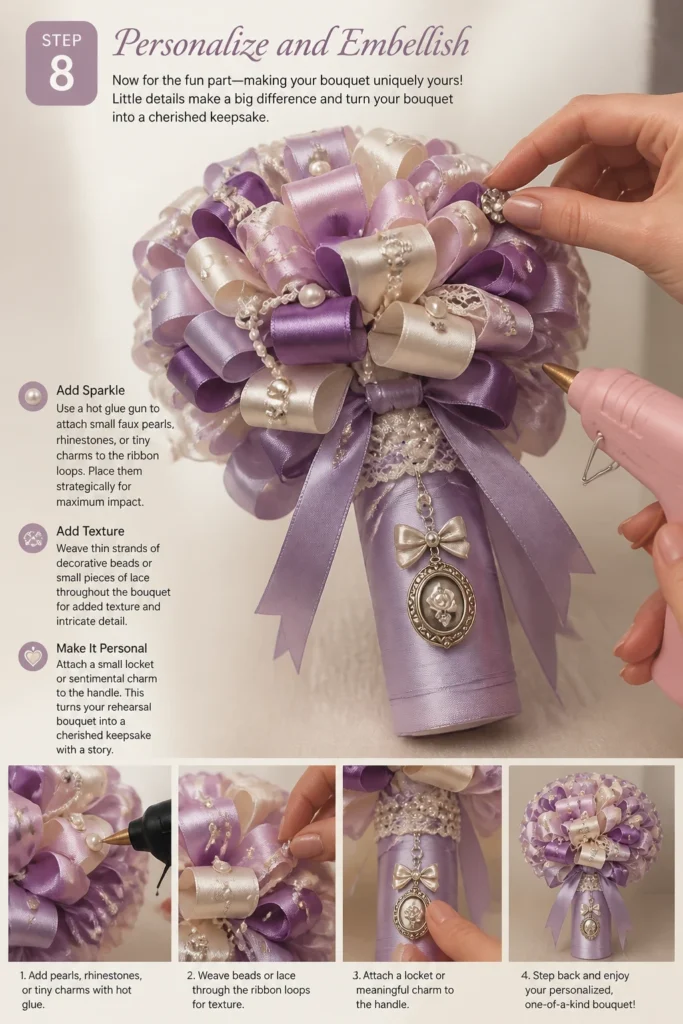
Use a hot glue gun to attach small faux pearls, rhinestones, or tiny charms directly onto some of the ribbon loops. Place them strategically for maximum impact.
You could also weave thin strands of decorative beads or small pieces of lace throughout the bouquet. This adds texture and intricate detail.
Consider attaching a small locket or a sentimental charm to the handle. This turns your rehearsal bouquet into a cherished keepsake with a story.
Common Mistakes to Avoid
Not Using Enough Ribbon
A common pitfall is underestimating the sheer volume of ribbon needed for a full, lush bouquet. Using too few strips results in a sparse, underwhelming appearance.
Always err on the side of having too much ribbon. You can always save extra pieces for other projects, but running out mid-bouquet is frustrating and can interrupt your flow.
Inconsistent Ribbon Lengths or Loops
While some variation in length is good for a natural look, wildly inconsistent loops can make the bouquet appear messy rather than artfully arranged. Each loop should be formed with care.
Try to maintain a general size range for your loops, adjusting only slightly for variety. This creates a cohesive and professional-looking finished product.
Skipping Floral Tape
Some might be tempted to just use wire, but skipping floral tape is a mistake. Floral tape provides crucial grip, cohesion, and a clean finish.
It helps bind the wires together securely, preventing individual loops or clusters from shifting or falling apart. The tape’s slight stickiness, activated by stretching, makes all the difference.
Over-Glued Embellishments
While hot glue is excellent for securing embellishments, using too much can leave visible, hardened glue spots that detract from the bouquet’s beauty. A little goes a long way.
Apply tiny dots of glue, just enough to hold the item in place. Practice on a scrap piece of ribbon first to get a feel for the right amount.
Troubleshooting
Bouquet Feels Flimsy
If your bouquet feels unstable or like it might fall apart, it’s likely due to insufficient taping or loose wire connections. The core structure needs to be very secure.
Go back and reinforce the connections between clusters with more floral tape, stretching it tightly. Ensure all wire stems are bound together firmly, especially where they combine to form the main handle.
Ribbons Unraveling
If the cut edges of your ribbons are fraying or unraveling, it means they weren’t properly sealed. This can make the bouquet look unfinished over time.
For satin or sheer ribbons, you can gently run a lighter flame (quickly!) along the cut edges to melt and seal them, preventing fraying. Practice this technique on a scrap piece first to avoid burning.
Stem Looks Messy
A visible, uneven wire stem can detract from the overall elegance of your bouquet. A clean, smooth handle is essential for a polished look.
Ensure you wrap the floral tape very tightly and evenly down the entire stem, overlapping each turn. Then, cover it completely with a wider, decorative ribbon, securing both ends with hot glue for a neat finish.
Key Takeaways
- Thoughtful Material Selection: Choose a variety of ribbon types, widths, and colors to create a visually rich and textured bouquet.
- Consistent Loop Formation: Aim for uniformity in your ribbon loops and clusters to ensure a cohesive and well-structured final product.
- Secure Floral Taping: Proper and tight application of floral tape is crucial for the bouquet’s stability and durability.
- Layered Assembly: Build your bouquet by gradually adding clusters around a central point, constantly rotating to maintain an even shape.
- Personalized Embellishments: Add unique touches like pearls, charms, or lace to make the bouquet truly reflect your style and personality.
- Polished Finishing: Take time to neatly cover the stem with decorative ribbon, ensuring a professional and comfortable handle.
Frequently Asked Questions
Can I use fabric scraps instead of ribbon?
Absolutely! Fabric scraps can create a wonderfully unique and rustic look. Just ensure they are cut into strips that can be folded and wired, and consider fabrics that don’t fray excessively, or be prepared to seal the edges.
How far in advance can I make this bouquet?
A ribbon bouquet is incredibly durable and can be made weeks or even months in advance. This is one of its biggest advantages over fresh flowers, allowing you to tick one more item off your wedding to-do list early.
How do I store the ribbon bouquet?
Once completed, store your ribbon bouquet in a cool, dry place away from direct sunlight to prevent colors from fading. A sturdy box or a closet shelf is ideal to protect it from dust and being crushed.
Can I make the bouquet larger or smaller?
Yes, the beauty of this DIY project is its complete customizability. To make it larger, simply use more ribbon strips and clusters. For a smaller bouquet, use fewer strips and create a more compact arrangement of loops.
Our Top Recommended Finds
- Assorted Satin Ribbon Pack: Provides a wide range of colors and widths, perfect for creating a diverse and vibrant bouquet.
- Floral Wire and Tape Kit: Essential for sturdy construction, this kit typically includes various gauges of wire and stretchy green floral tape.
- Mini Hot Glue Gun with Glue Sticks: Ideal for precise application when securing embellishments or finishing the stem, preventing excess glue.
Crafting Memories: Your Ribbon Bouquet Journey
Creating your own ribbon bouquet for the rehearsal is more than just a craft project; it’s an opportunity to infuse your wedding celebration with personal charm and love.
This beautiful keepsake will not only serve its purpose on the day but will also be a lasting reminder of your special journey together.
Gather your materials, choose your favorite colors, and start crafting this delightful symbol of your upcoming joy today!
Wedding Planning
No fluff, no drama. Just easy weekly advice, planning shortcuts, and gentle reminders to help you actually enjoy your engagement.