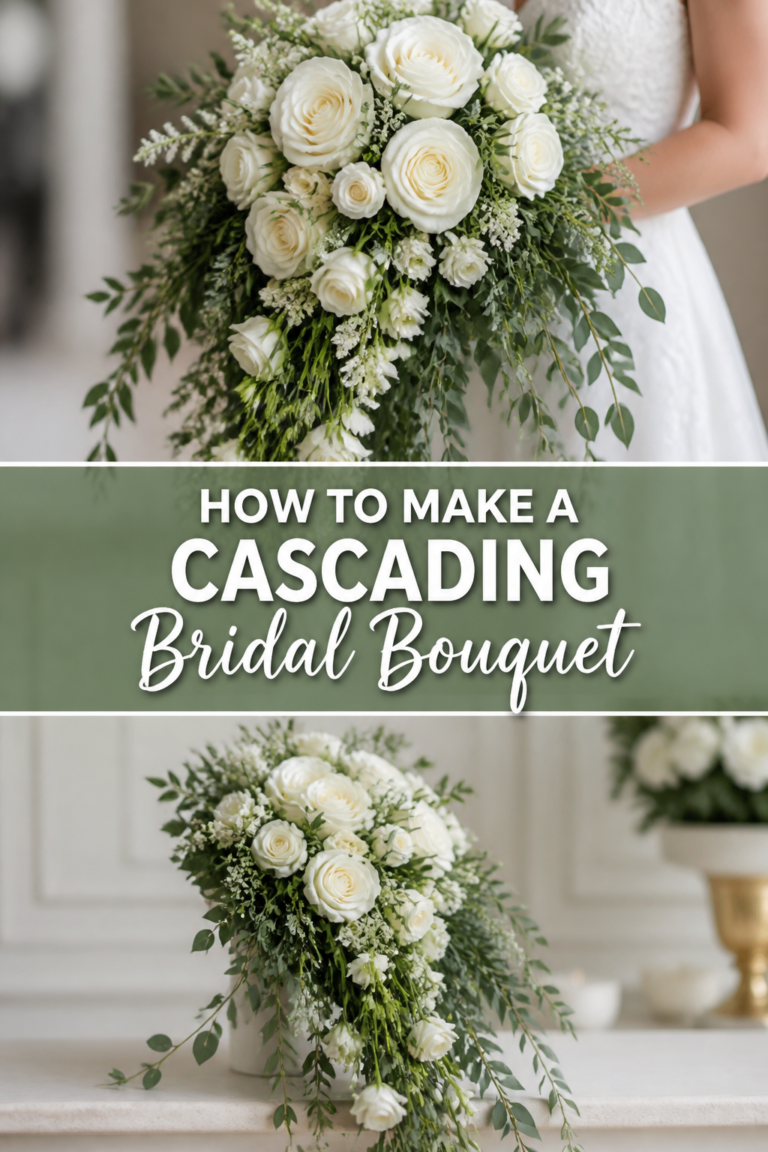
🌸 How To Make A Swag For A Wedding Arch
Creating your own wedding florals adds a deeply personal and sentimental touch to your ceremony space.
I have spent years assisting couples in designing professional-grade arrangements that look high-end without the boutique price tag.
This guide provides the exact steps and techniques I use to build durable, lush swags that stay fresh throughout the entire celebration.

Quick Overview
Building a floral swag is a rewarding project that combines structural engineering with artistic flair.
You will focus on building a sturdy base before layering textures to create a natural, flowing look.
- Time needed: 2 to 3 hours
- Difficulty: Intermediate
- What you’ll need: Floral foam cages, zip ties, floral shears, greenery, focal flowers, filler flowers, and a spray bottle.
Step-by-Step Instructions
Step 1: Select Your Floral Palette
Choose flowers that are hardy enough to withstand being out of water for several hours if you aren’t using a foam base.
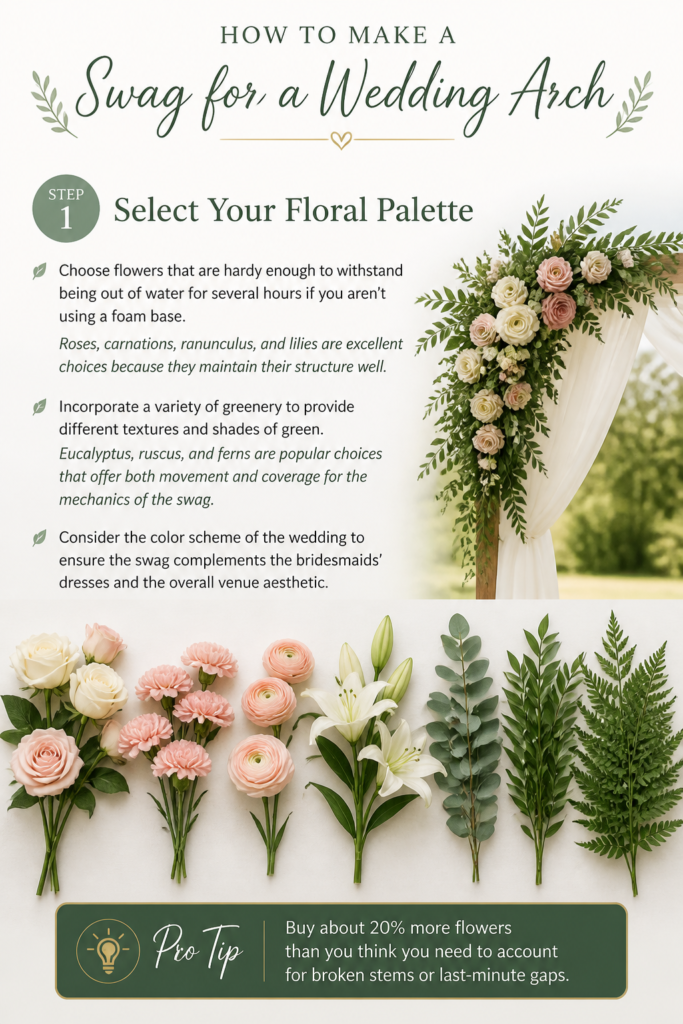
Roses, carnations, ranunculus, and lilies are excellent choices because they maintain their structure well.
Incorporate a variety of greenery to provide different textures and shades of green.
Eucalyptus, ruscus, and ferns are popular choices that offer both movement and coverage for the mechanics of the swag.
Consider the color scheme of the wedding to ensure the swag complements the bridesmaids’ dresses and the overall venue aesthetic.
Pro Tip: Buy about 20% more flowers than you think you need to account for broken stems or last-minute gaps.
Step 2: Prepare the Floral Foam
Soak your floral foam cages in a bucket of water mixed with floral preservative.
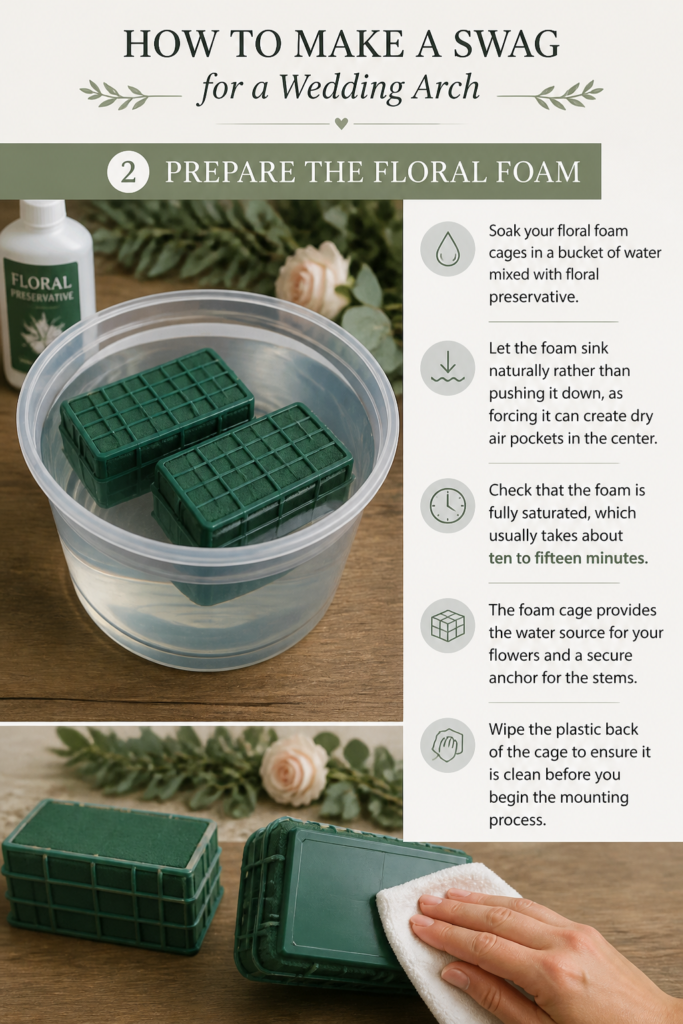
Let the foam sink naturally rather than pushing it down, as forcing it can create dry air pockets in the center.
Check that the foam is fully saturated, which usually takes about ten to fifteen minutes.
The foam cage provides the water source for your flowers and a secure anchor for the stems.
Wipe the plastic back of the cage to ensure it is clean before you begin the mounting process.
Step 3: Establish the Greenery Base
Insert your longest stems of greenery into the ends of the foam cage first.

These pieces define the overall length and shape of the swag, whether you want a symmetrical look or a more organic, trailing design.
Angle the stems so they follow the line of the arch, creating a graceful curve rather than a stiff line.
Use “primary” greenery like silver dollar eucalyptus to cover the majority of the foam and the plastic cage.
Ensure the stems are pushed at least two inches into the foam so they stay hydrated and secure.
Pro Tip: Strip the leaves off the bottom two inches of every stem to make insertion easier and keep the foam clean.
Step 4: Layer in Secondary Foliage
Add a different type of greenery, such as Italian Ruscus or willow eucalyptus, to create depth.
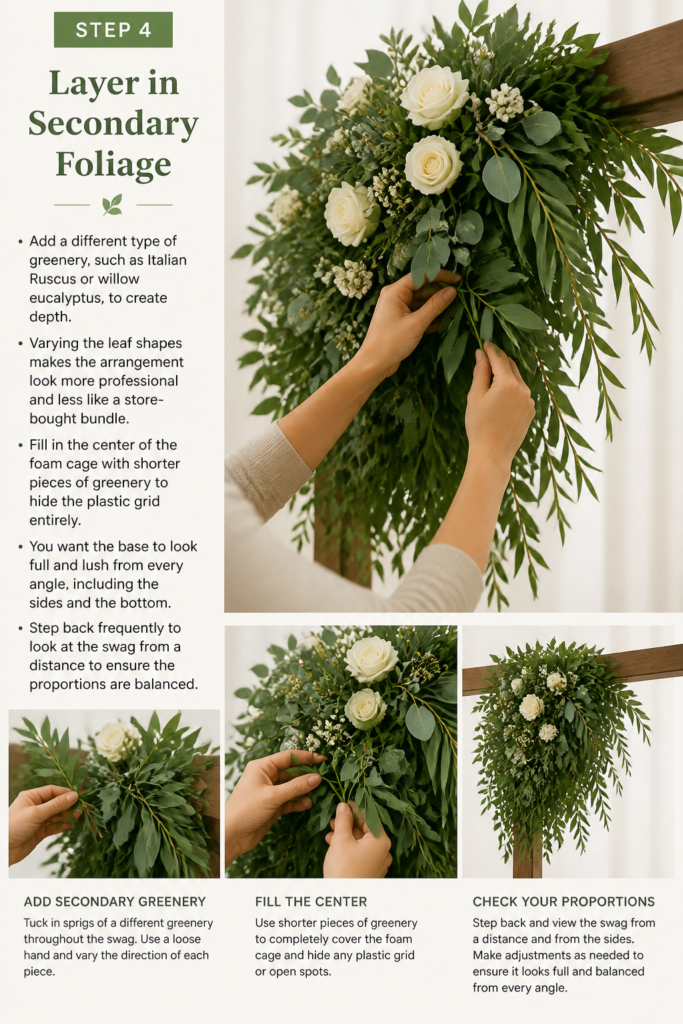
Varying the leaf shapes makes the arrangement look more professional and less like a store-bought bundle.
Fill in the center of the foam cage with shorter pieces of greenery to hide the plastic grid entirely.
You want the base to look full and lush from every angle, including the sides and the bottom.
Step back frequently to look at the swag from a distance to ensure the proportions are balanced.
Step 5: Place Your Focal Flowers
Identify your largest and most beautiful blooms, such as peonies or garden roses.
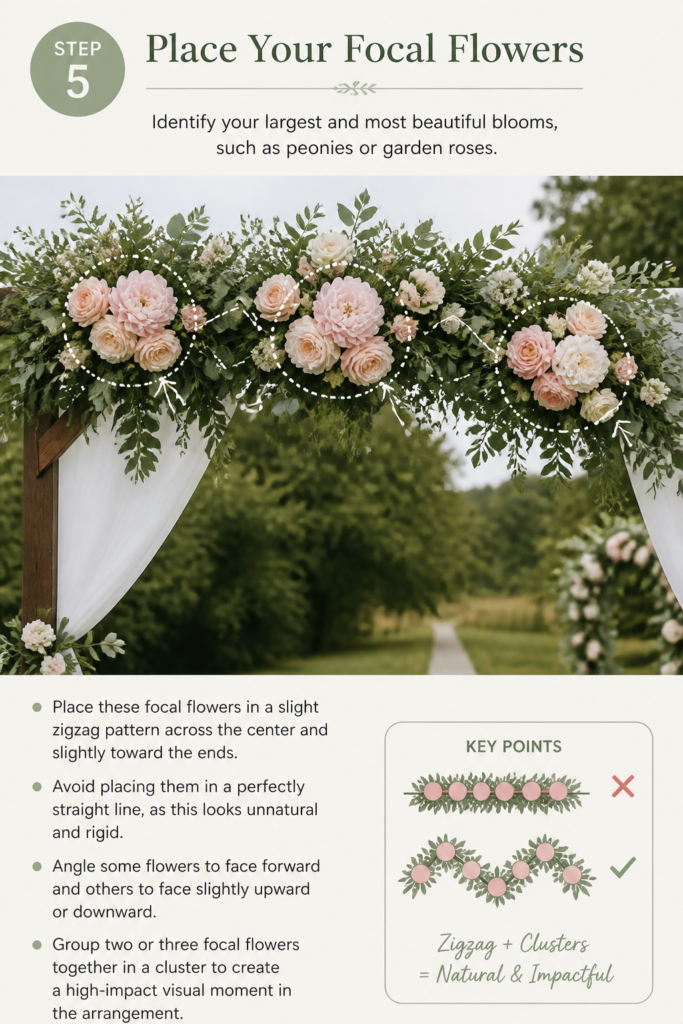
Place these “focal” flowers in a slight zigzag pattern across the center and slightly toward the ends.
Avoid placing them in a perfectly straight line, as this looks unnatural and rigid.
Angle some flowers to face forward and others to face slightly upward or downward.
Group two or three focal flowers together in a cluster to create a high-impact visual “moment” in the arrangement.
Step 6: Integrate Filler Flowers
Insert smaller blooms like spray roses, waxflowers, or baby’s breath into the remaining gaps.
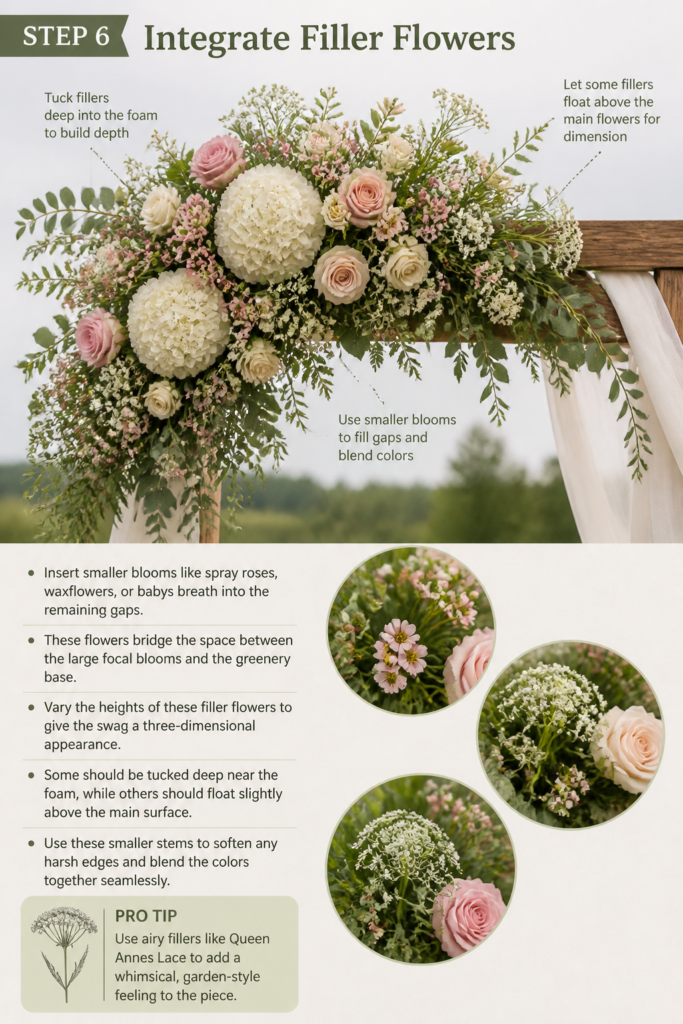
These flowers bridge the space between the large focal blooms and the greenery base.
Vary the heights of these filler flowers to give the swag a three-dimensional appearance.
Some should be tucked deep near the foam, while others should “float” slightly above the main surface.
Use these smaller stems to soften any harsh edges and blend the colors together seamlessly.
Pro Tip: Use “airy” fillers like Queen Anne’s Lace to add a whimsical, garden-style feeling to the piece.
Step 7: Secure the Swag to the Arch
Lift the completed swag carefully, as the wet foam will make it surprisingly heavy.
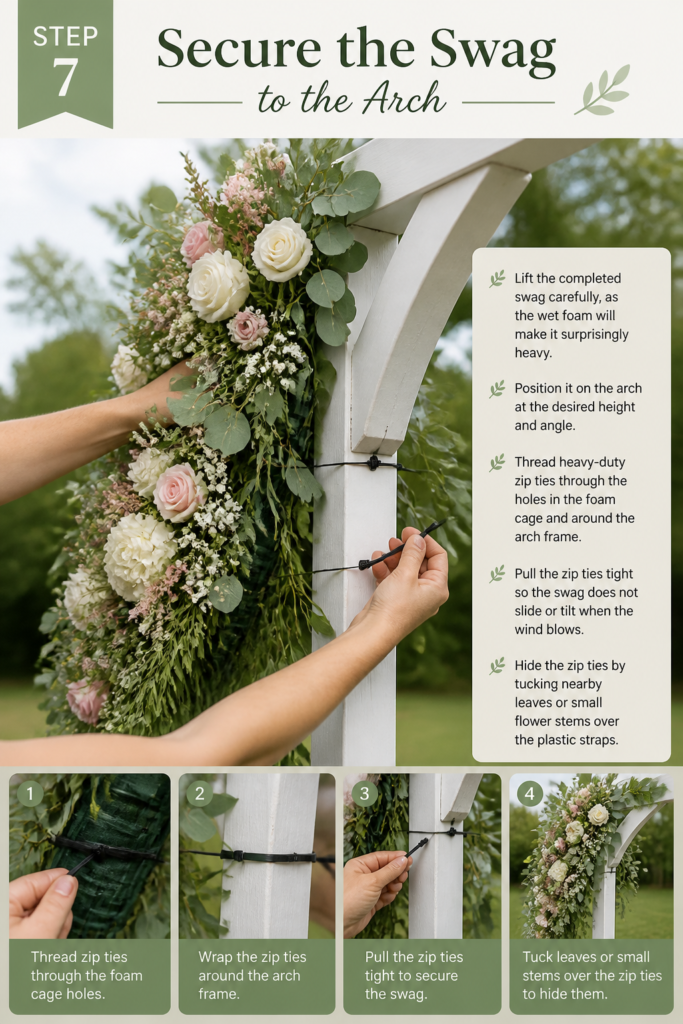
Position it on the arch at the desired height and angle.
Thread heavy-duty zip ties through the holes in the foam cage and around the arch frame.
Pull the zip ties tight so the swag does not slide or tilt when the wind blows.
Hide the zip ties by tucking nearby leaves or small flower stems over the plastic straps.
Step 8: Perform Final Adjustments
Check for any visible foam or plastic cages now that the swag is in its final upright position.
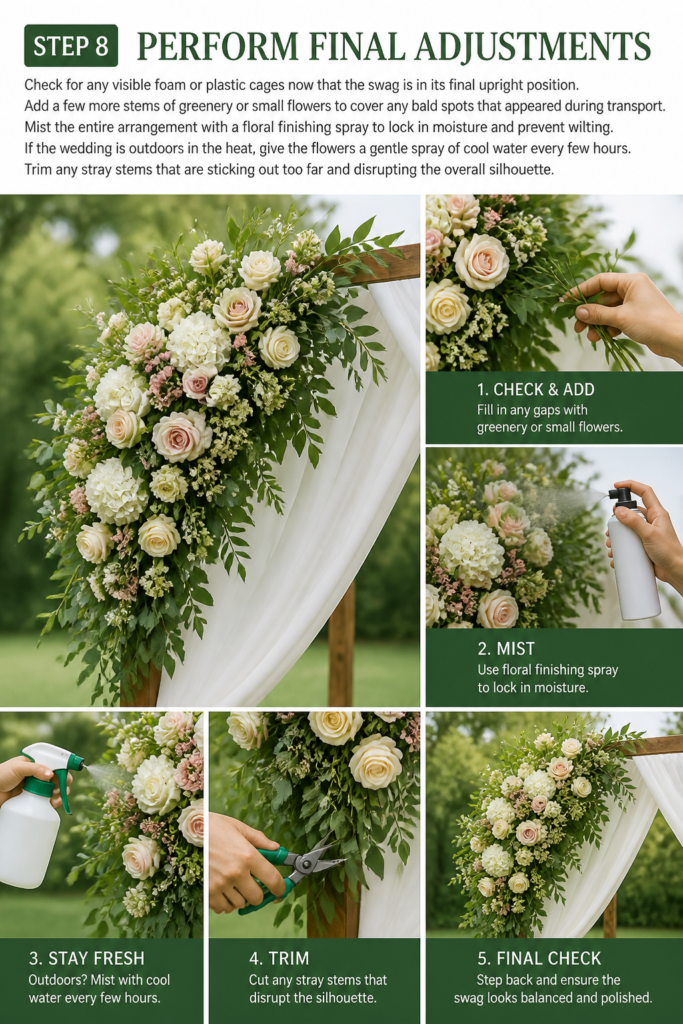
Add a few more stems of greenery or small flowers to cover any “bald” spots that appeared during transport.
Mist the entire arrangement with a floral finishing spray to lock in moisture and prevent wilting.
If the wedding is outdoors in the heat, give the flowers a gentle spray of cool water every few hours.
Trim any stray stems that are sticking out too far and disrupting the overall silhouette.
Common Mistakes to Avoid
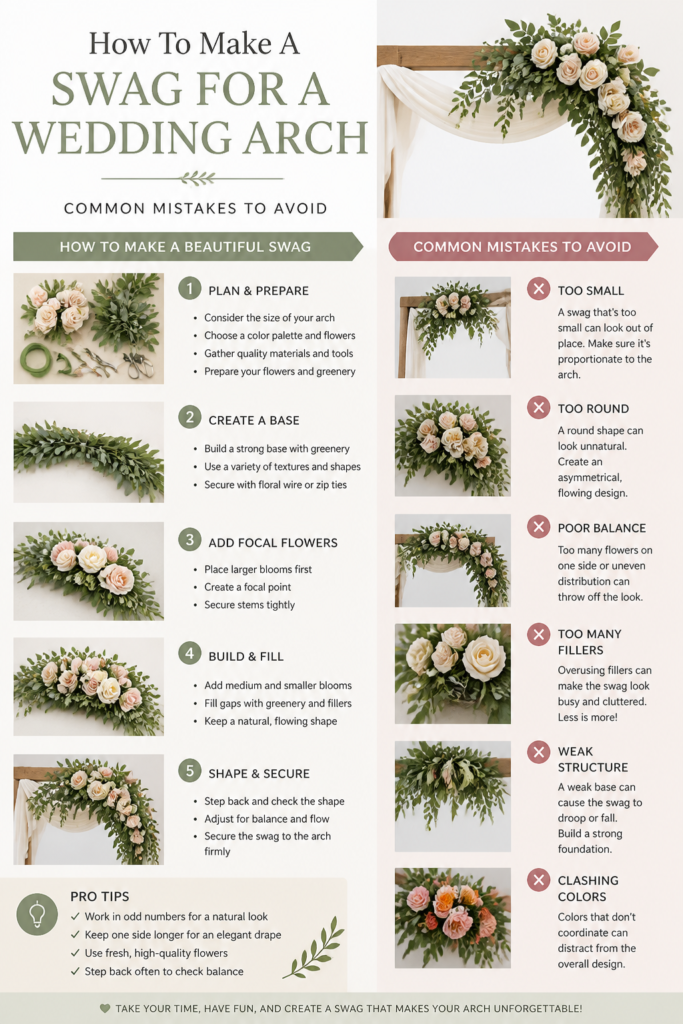
Making the Swag Too Symmetrical
Many beginners try to make both sides of the swag identical, which often results in a look that feels forced and stiff.
Nature is rarely perfectly symmetrical, so allowing one side to be slightly longer or fuller creates a more romantic and high-end aesthetic.
Focus on visual balance rather than exact measurements to achieve a professional result.
Ignoring the Weight of the Water
Wet floral foam is very heavy, and many people underestimate the strength needed to hold it up.
If you use thin string or weak tape, the swag will likely fall off the arch in the middle of the ceremony.
Always use industrial-strength zip ties or floral wire and ensure the arch itself is weighted at the bottom to prevent tipping.
Leaving the Mechanics Visible
Nothing ruins the magic of a wedding arch faster than seeing green plastic cages or white zip ties poking through the blooms.
Take the time to look at the swag from the side and from underneath, as guests will be viewing it from various angles.
Use “filler” greenery to create a dense back layer that hides the structural components completely.
Using Delicate Flowers Too Early
Hydrangeas and other water-loving flowers can wilt within minutes if they aren’t properly hydrated or if the foam dries out.
If you must use delicate blooms, save them for the very last step and ensure they have a deep water source.
Stick to hardy varieties for the bulk of the arrangement to ensure it looks fresh for the photos at the end of the night.
Troubleshooting
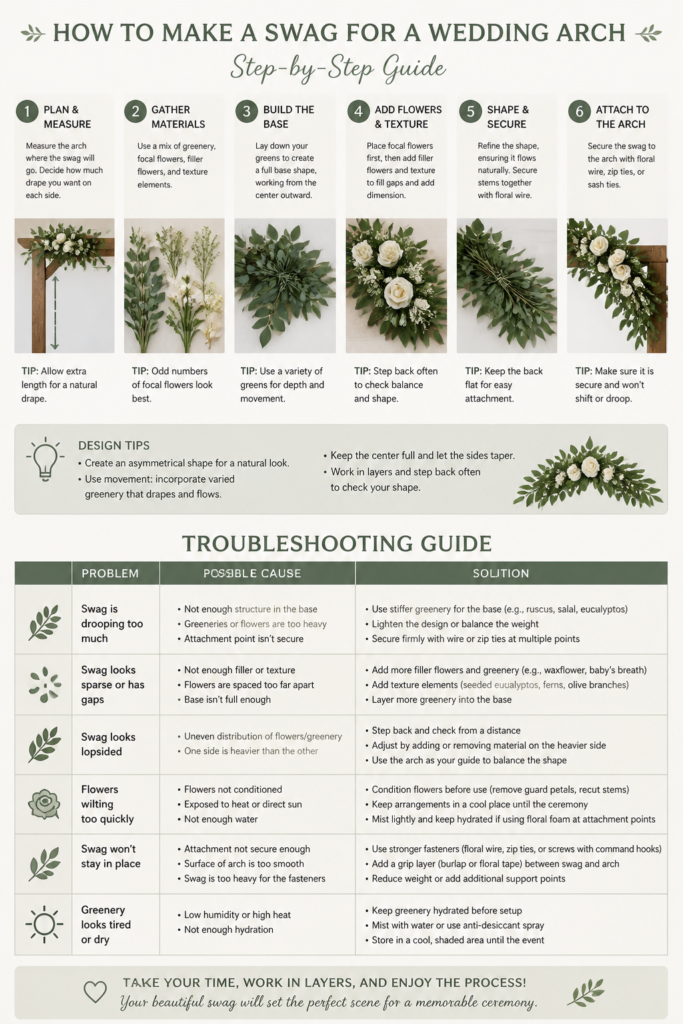
The Swag is Sliding Down the Arch
Smooth metal or wood arches can be slippery, causing the zip ties to slide downward over time.
Wrap a small piece of rubberized shelf liner or a thick rubber band around the arch before attaching the swag.
The extra friction will give the zip ties something to grip onto and keep the arrangement in place.
Flowers are Wilting in the Sun
If your flowers start to droop, they are likely losing moisture faster than the foam can provide it.
Use a floral hydration spray specifically designed to seal the petals and slow down transpiration.
If a specific flower is failing, pull it out and replace it with a fresh stem rather than trying to revive it while it is still in the foam.
The Foam is Crumbling
If you poke too many holes in the same area of the foam, it will eventually lose its structural integrity and fall apart.
Try to aim your stems into fresh sections of the foam rather than reusing the same entry points.
If the foam does break, you can wrap a bit of floral netting or chicken wire around the cage to hold the pieces together.
Key Takeaways
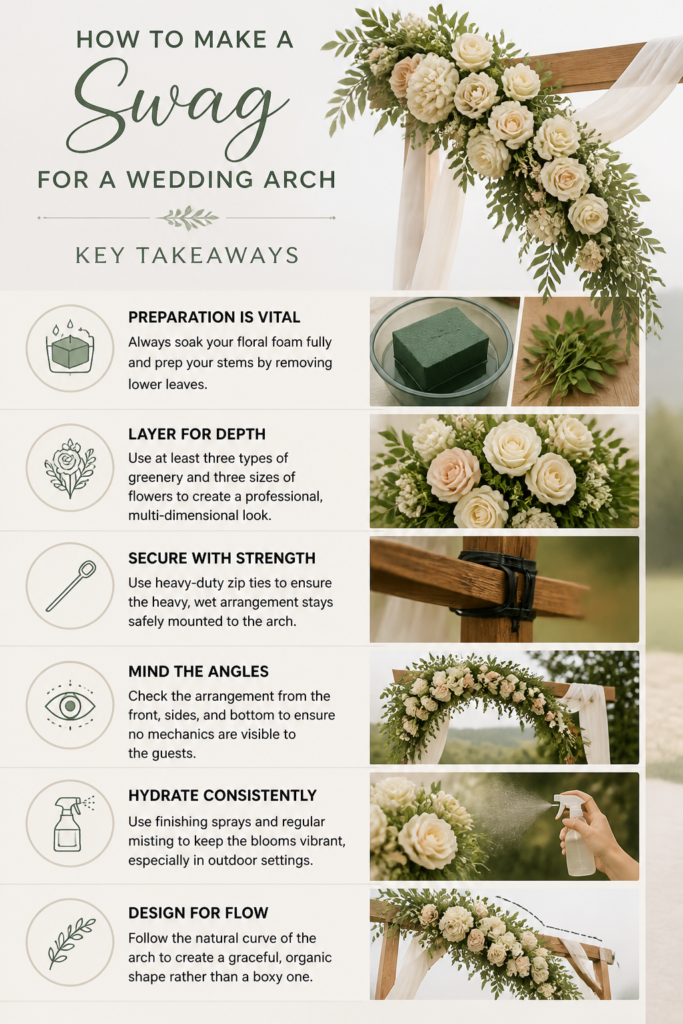
- Preparation is vital: Always soak your floral foam fully and prep your stems by removing lower leaves.
- Layer for depth: Use at least three types of greenery and three sizes of flowers to create a professional, multi-dimensional look.
- Secure with strength: Use heavy-duty zip ties to ensure the heavy, wet arrangement stays safely mounted to the arch.
- Mind the angles: Check the arrangement from the front, sides, and bottom to ensure no mechanics are visible to the guests.
- Hydrate consistently: Use finishing sprays and regular misting to keep the blooms vibrant, especially in outdoor settings.
- Design for flow: Follow the natural curve of the arch to create a graceful, organic shape rather than a boxy one.
Frequently Asked Questions
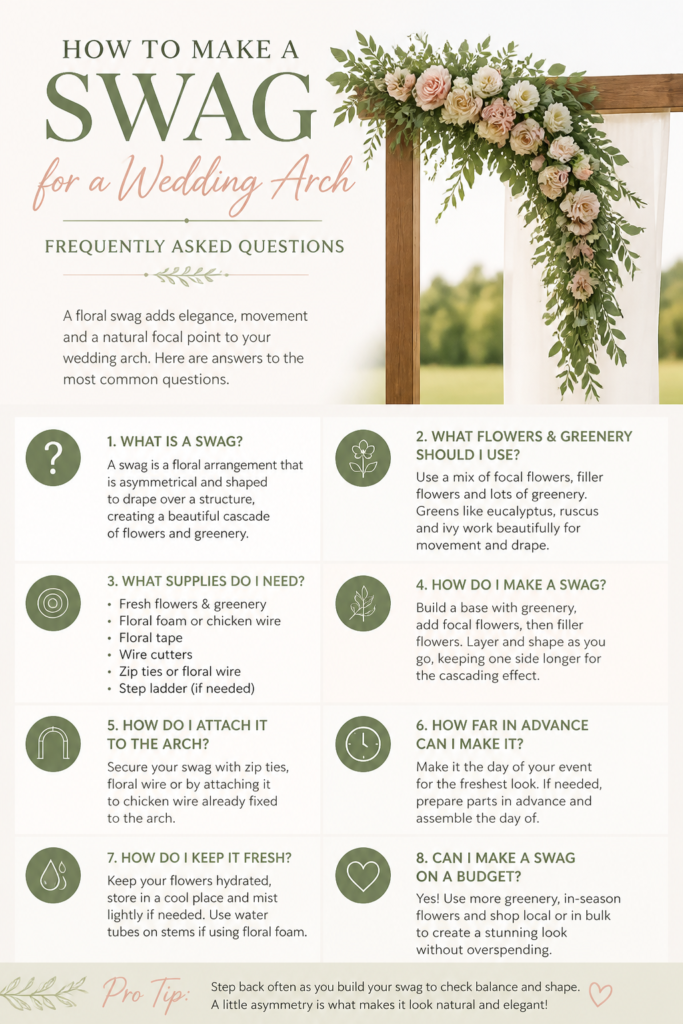
How far in advance can I make the wedding arch swag?
You can typically assemble the swag 24 hours before the wedding if you have a cool, dark place to store it.
If you are using very hardy greens and flowers, it may even last 48 hours, but the morning of the event is always best for peak freshness.
Be sure to keep the foam saturated by adding a little water to the cage each morning.
Can I use silk flowers instead of fresh ones?
Yes, silk flowers are a great option for DIY projects because they are lightweight and won’t wilt in the heat.
You can use the same techniques described here, but you can substitute dry floral foam for the wet version.
Silk swags are also much easier to transport since you don’t have to worry about water spilling or petals bruising.
How do I transport the swag to the venue?
Place the completed swag in a large plastic bin or a cardboard box lined with plastic to catch any drips.
Use rolled-up towels or bubble wrap to cradle the arrangement so the flowers don’t get crushed during the drive.
It is often easiest to attach the swag to the arch once you arrive at the venue to avoid any damage during transit.
What is the best way to hide the floral foam cage?
Start by inserting greenery at a sharp angle so it lays flat against the arch and covers the edges of the cage.
Use “base” greens like moss or flat cedar to fill in the gaps between the larger stems.
Check the “underbelly” of the swag frequently, as this is the part guests will see as they walk through or stand under the arch.
Our Top Recommended Finds
- Floral Foam Cages with Backings: These provide a built-in plastic frame that makes it easy to attach the arrangement to any structure.
- Professional Floral Shears: A sharp pair of shears ensures clean cuts that allow stems to drink water more efficiently than standard scissors.
- Heavy-Duty UV-Resistant Zip Ties: These are essential for securing heavy arrangements outdoors without the risk of the plastic snapping in the sun.
Bringing Your Ceremony Vision To Life
Now that you have the technical knowledge to build a stunning arch swag, you can approach your wedding floral design with confidence.
The key to a beautiful arrangement lies in the layers of texture and the security of the mechanics you build at the start.
Once you master the basic swag, you can apply these same skills to creating table runners, fireplace garlands, or staircase displays.
Take some time today to practice with a few stems of grocery store greenery to get a feel for the foam and the angles.
Your wedding arch will be the backdrop for some of your most cherished photos, and knowing you created it yourself makes those memories even more special.