💐 How To Make Bridal Bouquets Step By Step
I remember the first time I attempted to assemble a bridal bouquet for a close friend’s summer wedding.
The pressure felt immense, but as soon as I started working with the stems, I realized that floral design is more about rhythm and patience than perfection.
This guide is built from years of trial, error, and many early mornings at the flower market to help you create something professional and personal.

Quick Overview
Creating your own bouquet is a rewarding way to add a signature touch to your wedding day while managing your budget.
- Time needed: 45 to 90 minutes (plus prep time)
- Difficulty: Intermediate
- What you’ll need: Fresh flowers, greenery, floral tape, ribbon, heavy-duty shears, and pins.
Step-by-Step Instructions
Step 1: Prepare Your Stems
Strip all the leaves and thorns from the bottom two-thirds of every stem you plan to use.
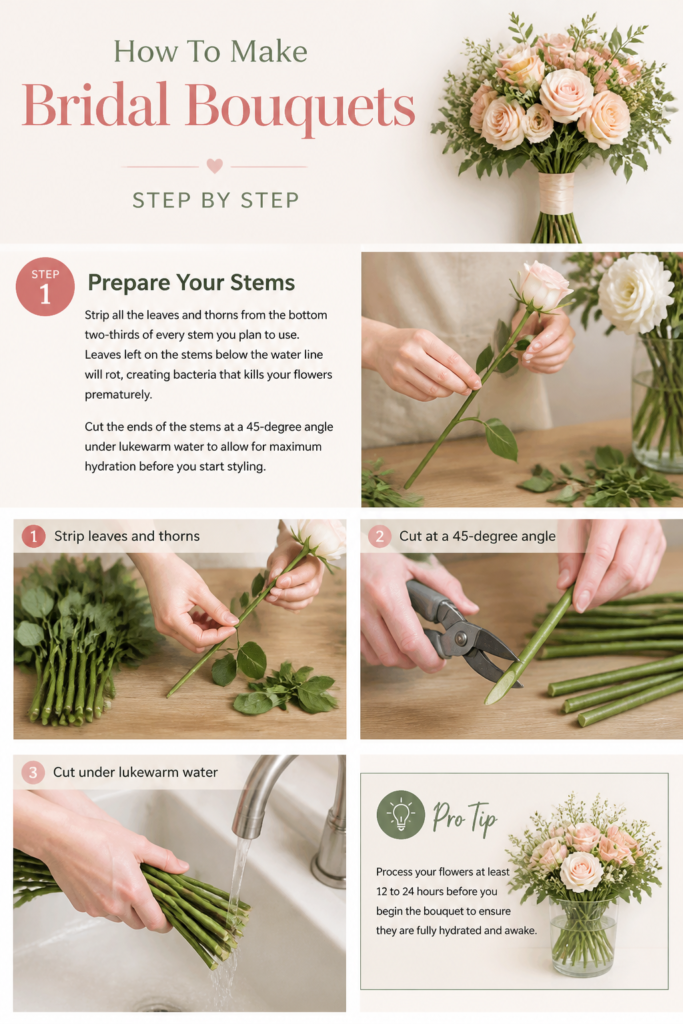
Leaves left on the stems below the water line will rot, creating bacteria that kills your flowers prematurely.
Cut the ends of the stems at a 45-degree angle under lukewarm water to allow for maximum hydration before you start styling.
Pro Tip: Process your flowers at least 12 to 24 hours before you begin the bouquet to ensure they are fully hydrated and “awake.”
Step 2: Select Your Hero Flowers
Choose three to five of your largest, most beautiful blooms to serve as the “hero” or focal point of the arrangement.
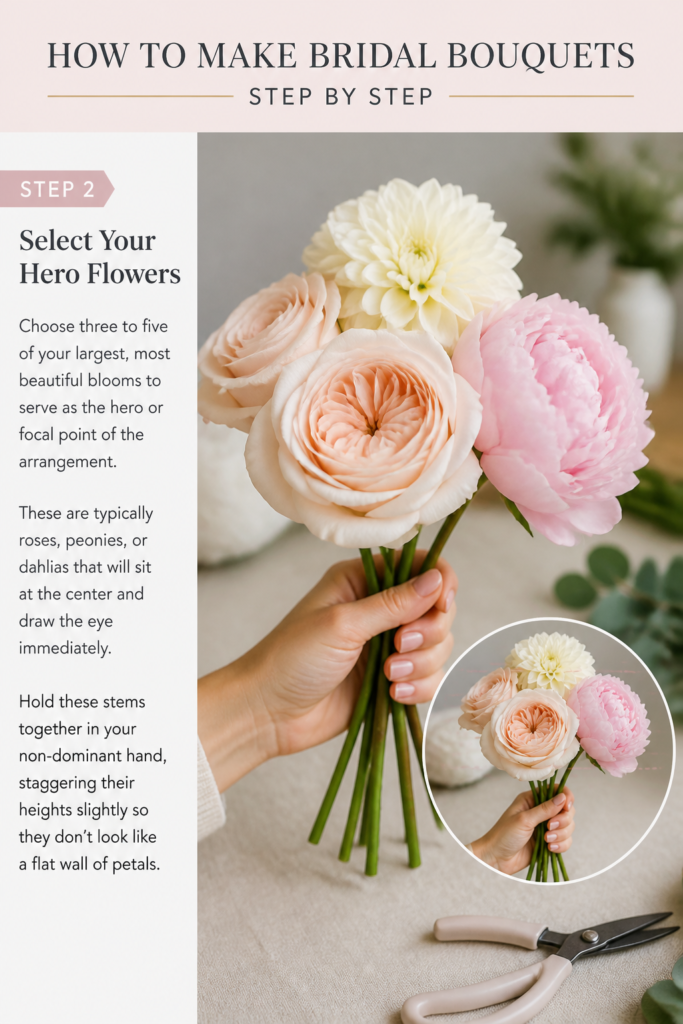
These are typically roses, peonies, or dahlias that will sit at the center and draw the eye immediately.
Hold these stems together in your non-dominant hand, staggering their heights slightly so they don’t look like a flat wall of petals.
Step 3: Build the Foundation with Secondary Blooms
Add smaller flowers around your hero blooms to provide texture and fill in any significant gaps.
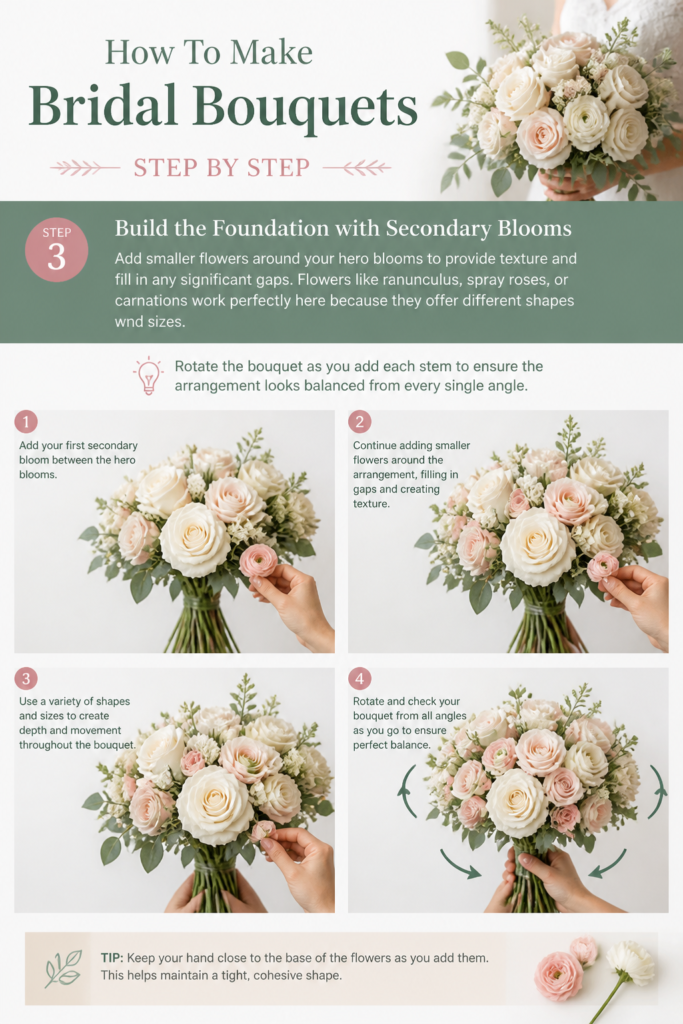
Flowers like ranunculus, spray roses, or carnations work perfectly here because they offer different shapes and sizes.
Rotate the bouquet as you add each stem to ensure the arrangement looks balanced from every single angle.
Step 4: Incorporate Greenery for Framework
Tuck bits of greenery like eucalyptus, ruscus, or ferns between the flowers to create a natural, organic look.
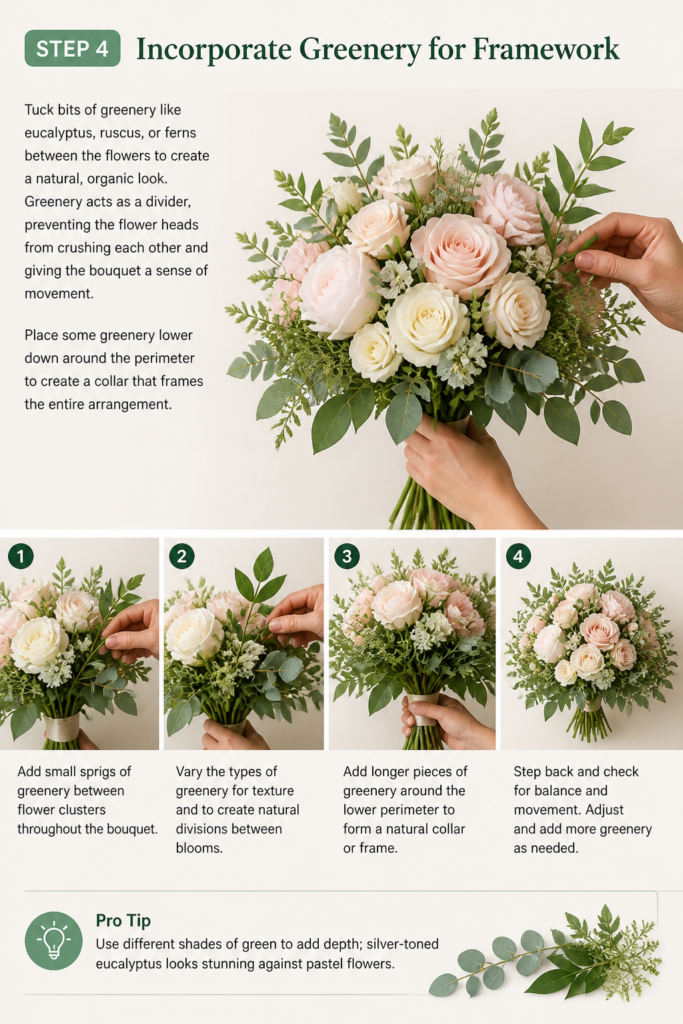
Greenery acts as a divider, preventing the flower heads from crushing each other and giving the bouquet a sense of movement.
Place some greenery lower down around the perimeter to create a “collar” that frames the entire arrangement.
Pro Tip: Use different shades of green to add depth; silver-toned eucalyptus looks stunning against pastel flowers.
Step 5: Apply the Spiral Technique
Angle each new stem you add in the same direction, crossing them over the previous stems at a single point where you are holding them.
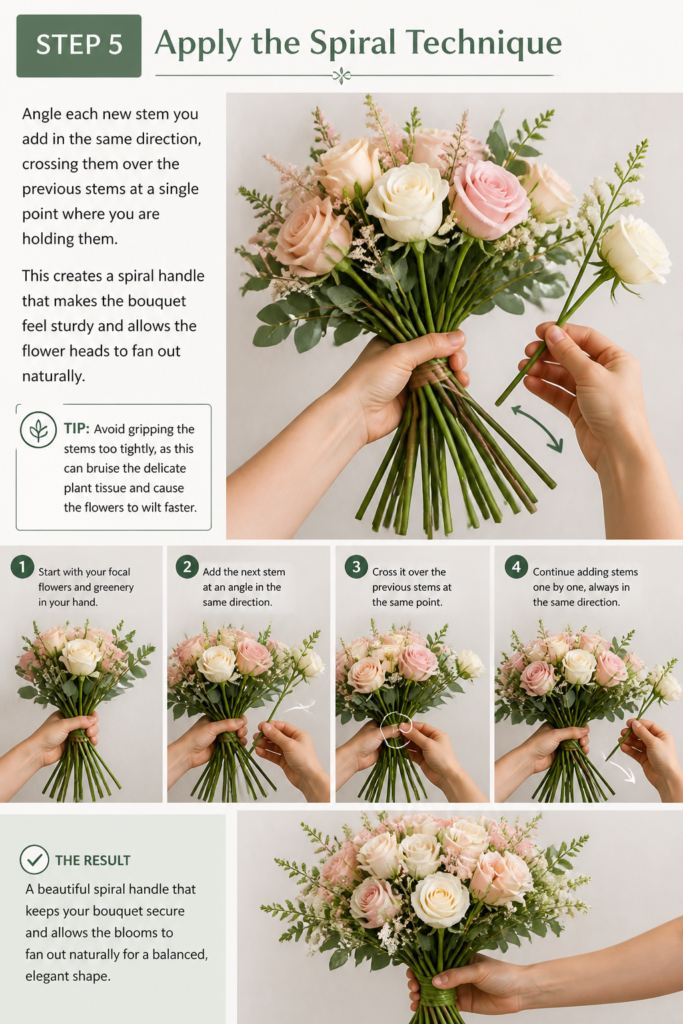
This creates a spiral handle that makes the bouquet feel sturdy and allows the flower heads to fan out naturally.
Avoid gripping the stems too tightly, as this can bruise the delicate plant tissue and cause the flowers to wilt faster.
Step 6: Secure the Bundle
Wrap floral tape tightly around the stems at the highest point of the handle, usually about an inch below the lowest flower head.
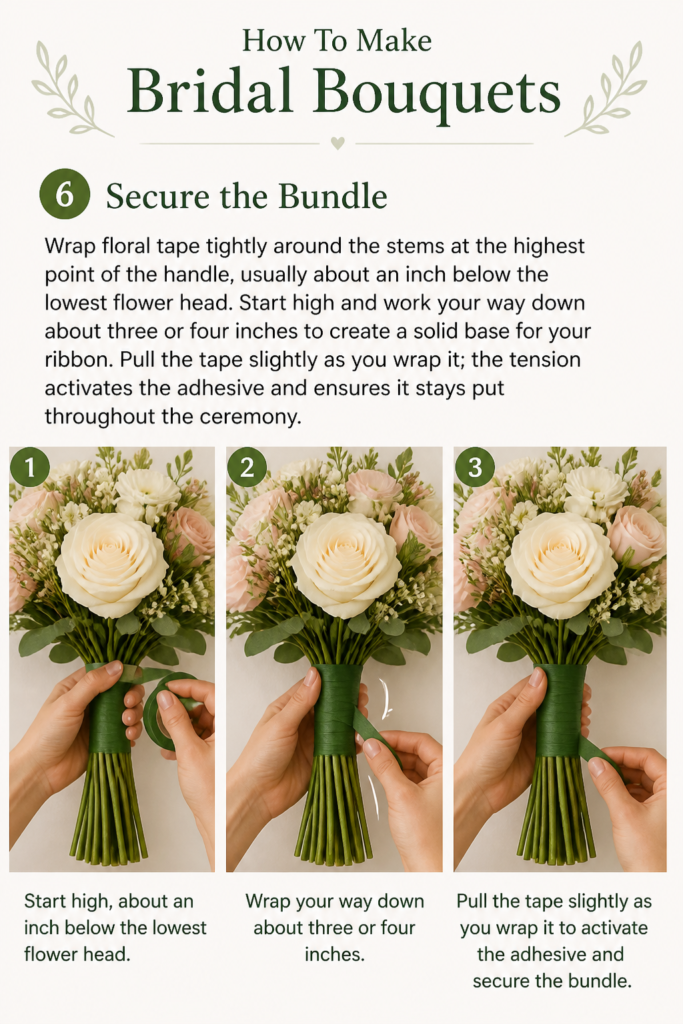
Start high and work your way down about three or four inches to create a solid base for your ribbon.
Pull the tape slightly as you wrap it; the tension activates the adhesive and ensures it stays put throughout the ceremony.
Step 7: Finish with Ribbon
Measure a length of silk or satin ribbon and begin wrapping it over the floral tape to hide the mechanics.
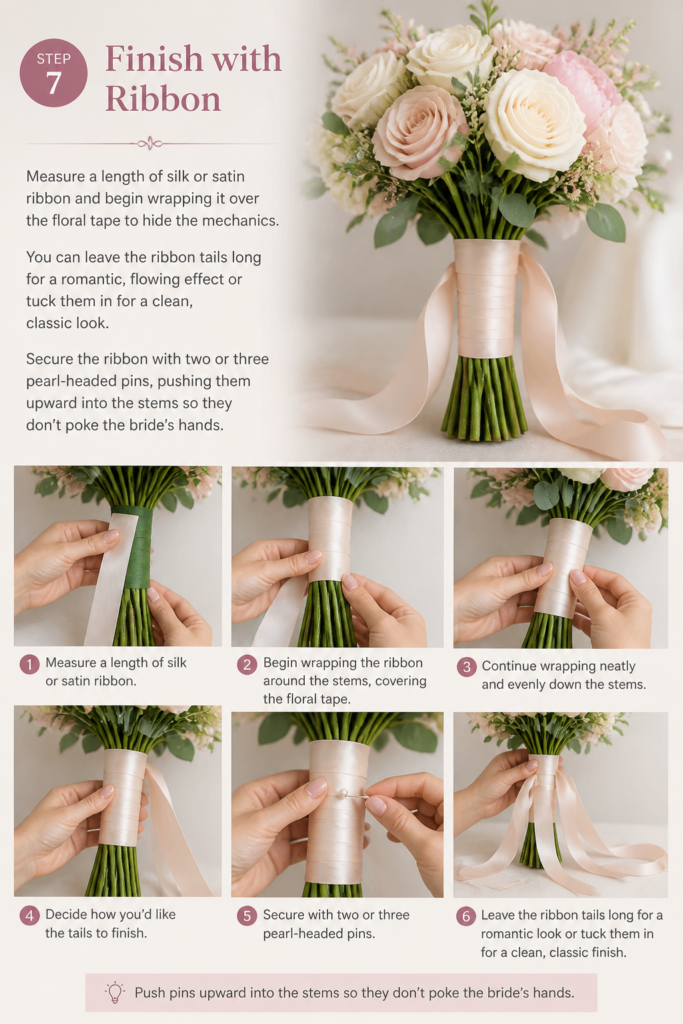
You can leave the ribbon tails long for a romantic, flowing effect or tuck them in for a clean, classic look.
Secure the ribbon with two or three pearl-headed pins, pushing them upward into the stems so they don’t poke the bride’s hands.
Step 8: Final Trim and Storage
Cut the bottom of the stems so they are all the same length, leaving about six to eight inches of handle below the ribbon.
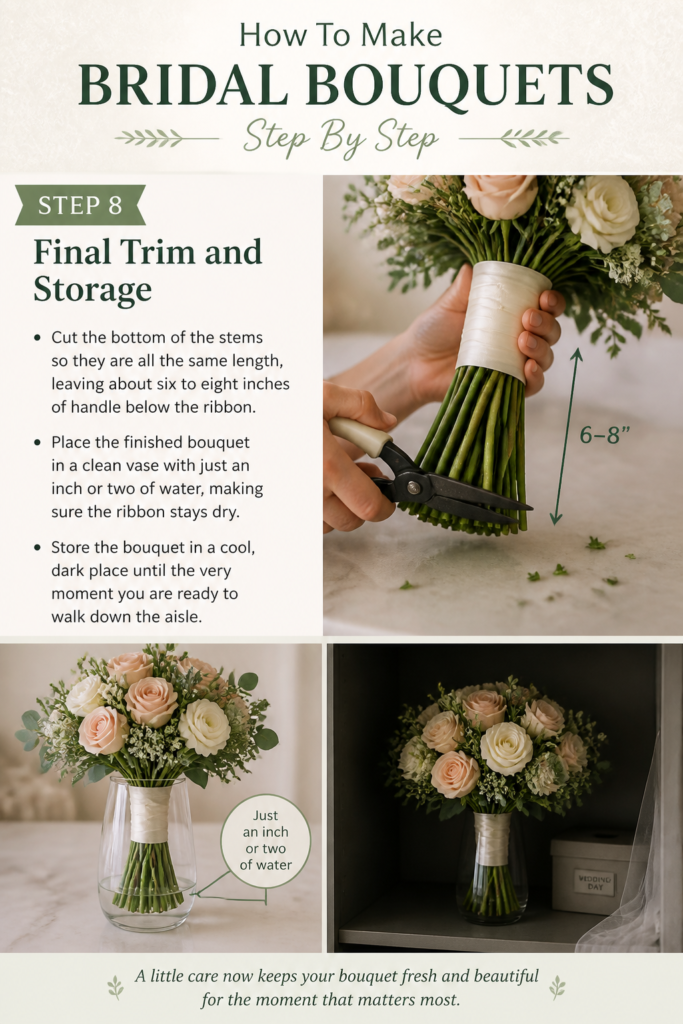
Place the finished bouquet in a clean vase with just an inch or two of water, making sure the ribbon stays dry.
Store the bouquet in a cool, dark place until the very moment you are ready to walk down the aisle.
Common Mistakes to Avoid
The Death Grip
Many beginners hold the stems so tightly that they actually snap the delicate flowers or restrict water flow.
Try to maintain a relaxed hand and let the floral tape do the heavy lifting of keeping everything together.
If your hand starts to cramp, take a break and set the flowers down in a vase for a few minutes.
Ignoring the Weight
A bouquet that is too large or too heavy will become a burden for the bride to carry for several hours.
Test the weight as you build and remember that she will likely be holding this with one hand at various points.
If it feels like a workout to hold, consider removing a few of the heavier stems or dense greenery.
Using Fragile Flowers Alone
Relying solely on flowers that wilt quickly, like hydrangeas or poppies, can lead to a sad-looking bouquet by mid-afternoon.
Always mix delicate blooms with “hardy” flowers like roses or lilies that can survive several hours out of water.
If you must use thirsty flowers, consider using individual water vials hidden within the arrangement.
Forgetting the Back of the Bouquet
Even though the front is what people see most, the bride sees the back and the sides all day long.
Ensure there are no “holes” or exposed tape visible from any side of the arrangement.
A well-finished back makes the bouquet feel high-end and professional.
Troubleshooting
The Bouquet Feels Lopsided
If one side feels heavier than the other, you don’t necessarily need to take it all apart.
Try tucking a few extra pieces of greenery or a large “filler” flower like baby’s breath into the lighter side to restore balance.
Hold the bouquet in front of a mirror to see it from a different perspective; this often reveals where the balance is off.
Stems Are Slipping Out
This usually happens if the stems weren’t angled correctly during the spiral process or if the tape isn’t tight enough.
Add a second layer of floral tape, pulling it even tighter this time to create more friction.
If a specific stem is still moving, you can use a small piece of wire to “anchor” it to a sturdier stem nearby.
Flowers Are Drooping Pre-Ceremony
If a flower starts to head-drop, it likely has an air bubble in the stem or wasn’t hydrated properly.
Give the stem a fresh cut and place it in very warm (not boiling) water for 20 minutes to jumpstart hydration.
If the flower is beyond saving, carefully snip it out and replace it with a fresh bloom using the same insertion angle.
Key Takeaways
- Prep is everything: Clean stems and hydrated flowers are the foundation of a bouquet that lasts.
- Think in layers: Start with hero flowers, add secondary blooms, and finish with greenery.
- The spiral is key: Use the spiral technique to give your bouquet professional volume and stability.
- Check your angles: Always use a mirror to ensure the bouquet looks great from every side.
- Secure the handle: Use high-quality floral tape and pins to make the handle comfortable and safe to hold.
- Keep it cool: Storage in a cool, dark environment is the best way to preserve the blooms until the ceremony.
Frequently Asked Questions
How many flowers do I need for a standard bridal bouquet?
A standard medium-sized bouquet usually requires between 20 and 30 stems total.
This count typically includes about 10 focal flowers, 10 secondary flowers, and 5 to 10 pieces of greenery or filler.
It is always a good idea to buy 20% more than you think you need to account for broken stems or bruised petals.
When is the best time to make the bouquet?
The ideal time is the day before the wedding or the morning of the event if you have a late afternoon ceremony.
Making it too early risks the flowers wilting, while leaving it until the last minute can add unnecessary stress to your schedule.
If you make it the day before, ensure it stays in a refrigerator that does not contain fruit, as fruit releases gases that kill flowers.
Can I use silk flowers instead of fresh ones?
Yes, the construction steps are almost identical for silk flowers, though you won’t need to worry about hydration or rotting leaves.
Silk flowers allow you to finish the bouquet weeks in advance, which can be a huge relief for a busy DIY bride.
Just make sure to use high-quality “real touch” silks to ensure they look convincing in photographs.
What is the best way to transport the bouquet to the venue?
Place the bouquet in a sturdy vase with a small amount of water and set the vase inside a heavy box.
Pack tissue paper around the base of the vase so it cannot tip over during the car ride.
Keep the car cool and avoid placing the flowers in direct sunlight through the windows.
Our Top Recommended Finds
- Professional Floral Shears: A sharp pair of bypass pruners will make clean cuts without crushing the stems, which is vital for water uptake.
- Stem Stripper Tool: This simple metal or plastic tool allows you to remove thorns and leaves in one quick motion, saving your hands from scratches.
- Waterproof Floral Tape: Look for the stretchy green tape that becomes sticky when pulled; it is much more reliable than standard adhesive tape.
Bringing Your Floral Vision To Life
Now that you understand the mechanics of building a bouquet, the best thing you can do is practice with a few grocery store bundles.
Experiment with different color palettes and textures until you find a combination that feels right for your personal style.
Once you feel comfortable with the spiral technique, you might even want to try making matching boutonnieres or bridesmaid bouquets to complete the set.
Gather your supplies today and start playing with shapes; you will be surprised at how quickly your intuition for floral design develops.