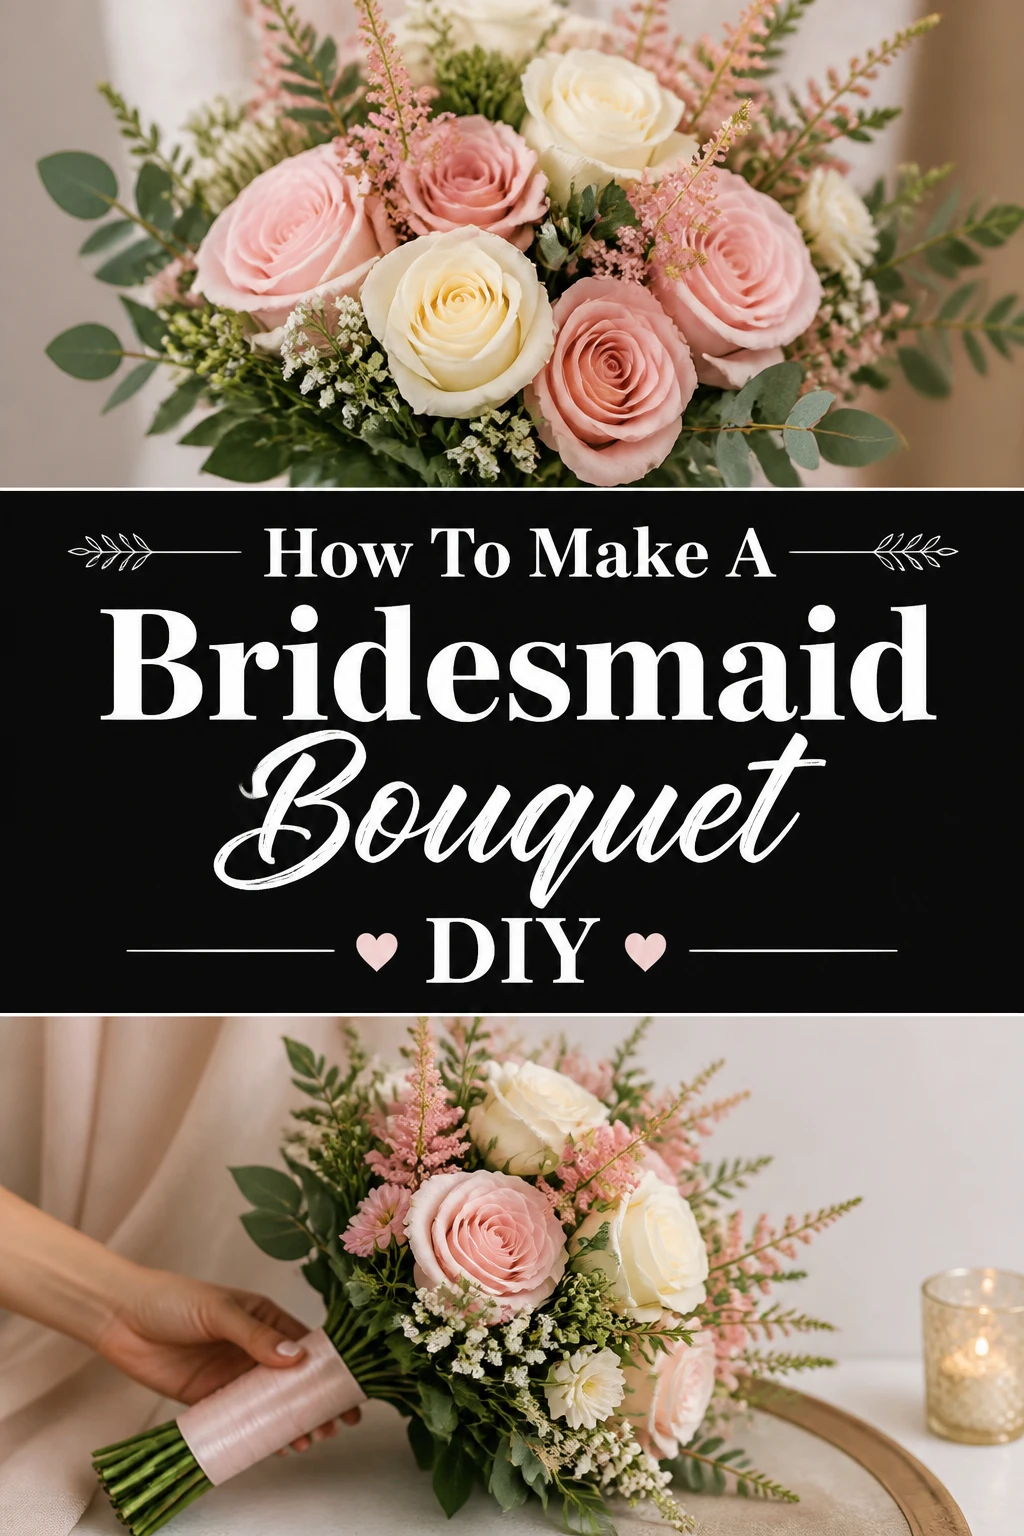
💐 How To Make A Bridesmaid Bouquet DIY

Wedding Planning
No fluff, no drama. Just easy weekly advice, planning shortcuts, and gentle reminders to help you actually enjoy your engagement.
Creating a bridesmaid bouquet by hand adds such a personal, heartfelt touch to any wedding. It’s a wonderful way to infuse love and care into the special day. I remember making these for my best friend’s wedding, and the joy on her face was absolutely priceless. This guide will help you achieve that same beautiful result with confidence.
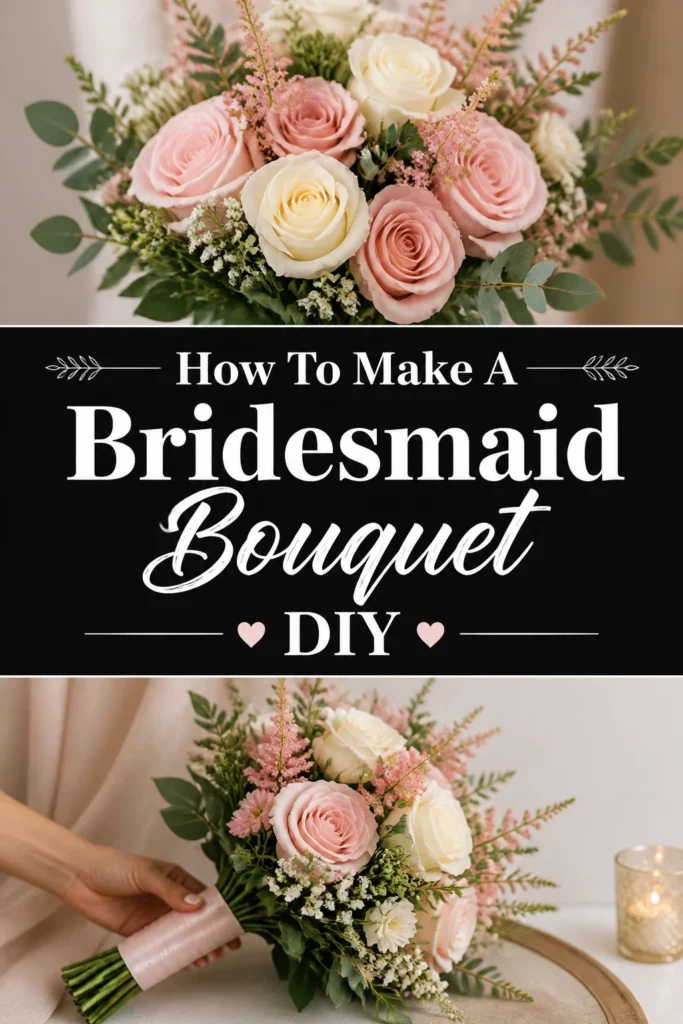
Quick Overview
This guide will walk you through crafting a stunning bridesmaid bouquet, ensuring it looks professional and lasts through the celebrations. You’ll learn the techniques pros use, tailored for a DIY approach.
- Time needed: 2-4 hours (including flower prep)
- Difficulty: Beginner to Intermediate
- What you’ll need: Fresh flowers, greenery, floral tape, ribbon, floral shears, a bucket of water
Step-by-Step Instructions
Step 1: Gather Your Supplies
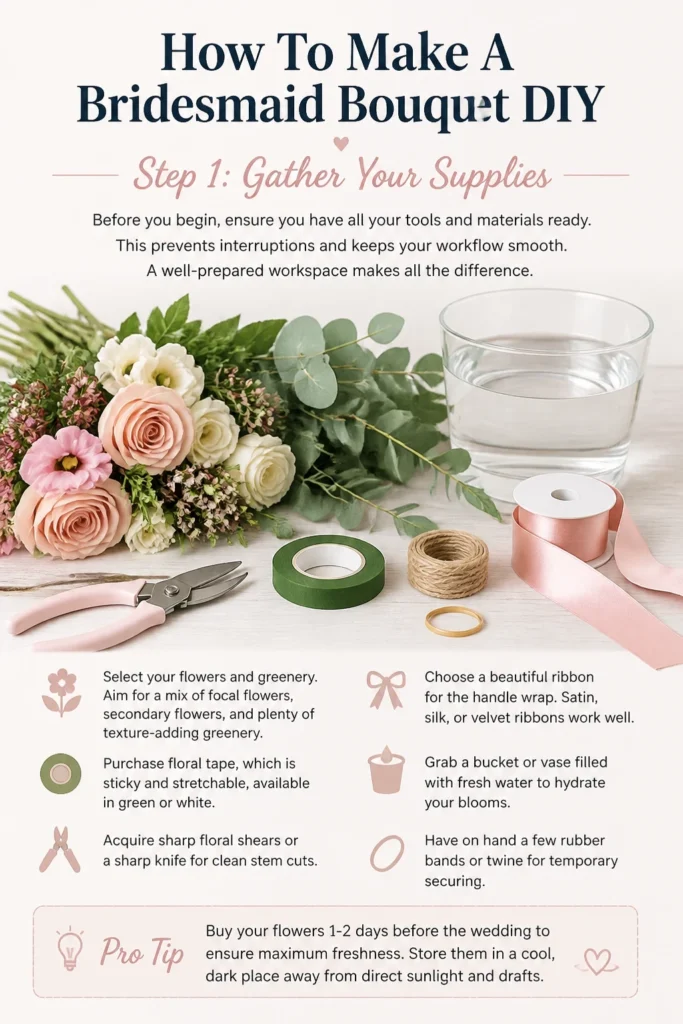
Before you begin, ensure you have all your tools and materials ready. This prevents interruptions and keeps your workflow smooth. A well-prepared workspace makes all the difference.
- Select your flowers and greenery. Aim for a mix of focal flowers, secondary flowers, and plenty of texture-adding greenery.
- Purchase floral tape, which is sticky and stretchable, available in green or white.
- Choose a beautiful ribbon for the handle wrap. Satin, silk, or velvet ribbons work well.
- Acquire sharp floral shears or a sharp knife for clean stem cuts.
- Grab a bucket or vase filled with fresh water to hydrate your blooms.
- Have on hand a few rubber bands or twine for temporary securing.
Pro Tip: Buy your flowers 1-2 days before the wedding to ensure maximum freshness. Store them in a cool, dark place away from direct sunlight.
Step 2: Prepare Your Flowers and Greenery
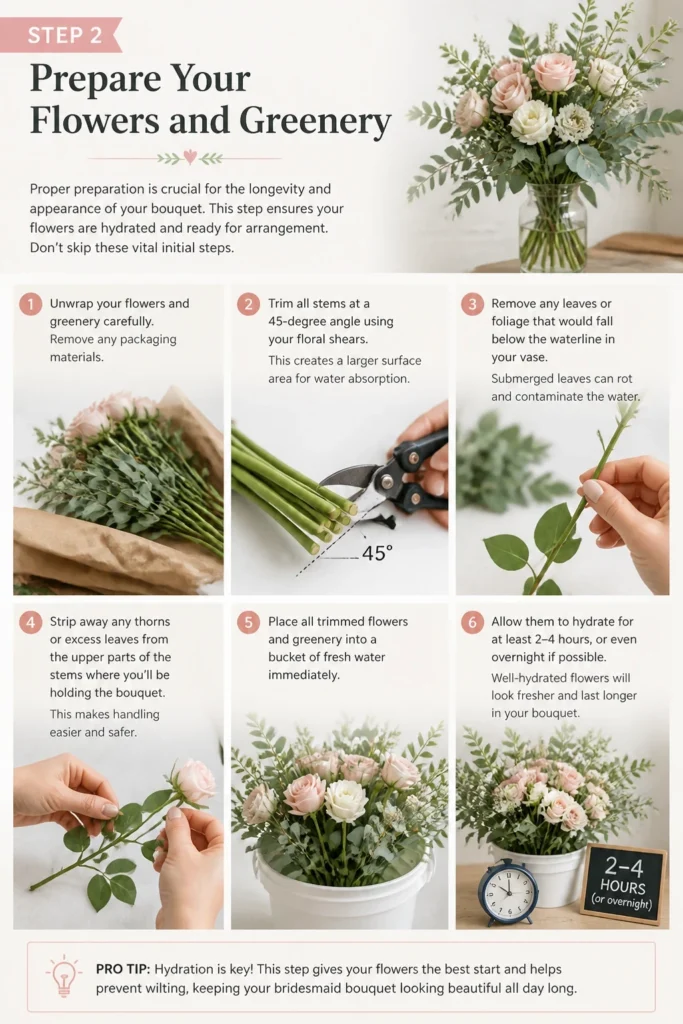
Proper preparation is crucial for the longevity and appearance of your bouquet. This step ensures your flowers are hydrated and ready for arrangement. Don’t skip these vital initial steps.
- Unwrap your flowers and greenery carefully. Remove any packaging materials.
- Trim all stems at a 45-degree angle using your floral shears. This creates a larger surface area for water absorption.
- Remove any leaves or foliage that would fall below the waterline in your vase. Submerged leaves can rot and contaminate the water.
- Strip away any thorns or excess leaves from the upper parts of the stems where you’ll be holding the bouquet. This makes handling easier and safer.
- Place all trimmed flowers and greenery into a bucket of fresh water immediately. Allow them to hydrate for at least 2-4 hours, or even overnight.
Step 3: Choose Your Focal Flowers
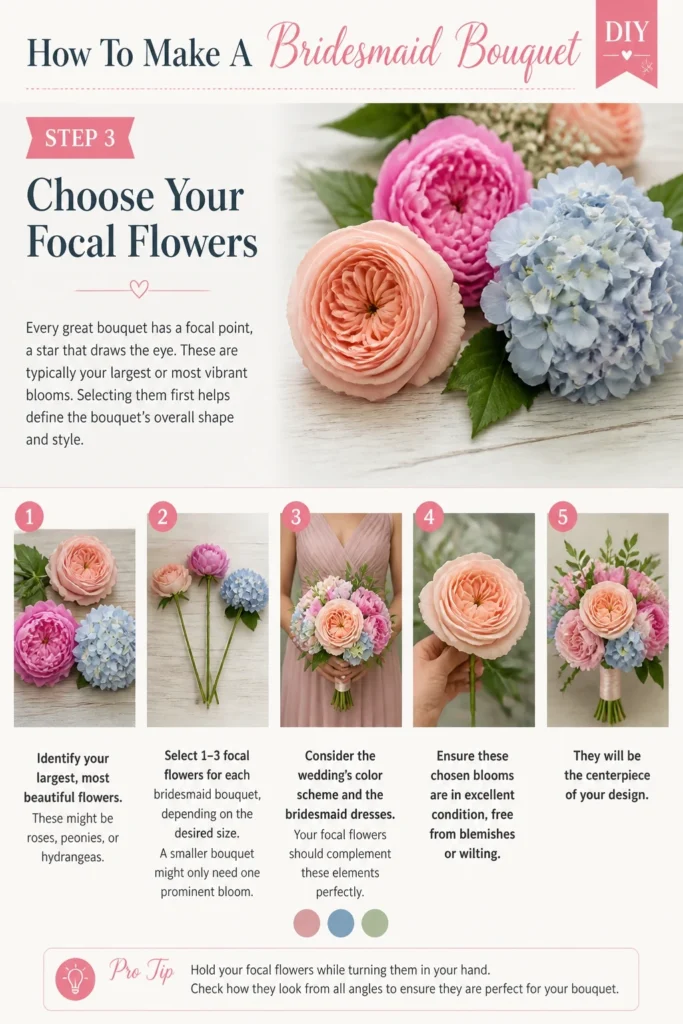
Every great bouquet has a focal point, a star that draws the eye. These are typically your largest or most vibrant blooms. Selecting them first helps define the bouquet’s overall shape and style.
- Identify your largest, most beautiful flowers. These might be roses, peonies, or hydrangeas.
- Select 1-3 focal flowers for each bridesmaid bouquet, depending on the desired size. A smaller bouquet might only need one prominent bloom.
- Consider the wedding’s color scheme and the bridesmaid dresses. Your focal flowers should complement these elements perfectly.
- Ensure these chosen blooms are in excellent condition, free from blemishes or wilting. They will be the centerpiece of your design.
Step 4: Start Building the Core (The Spiral Technique)
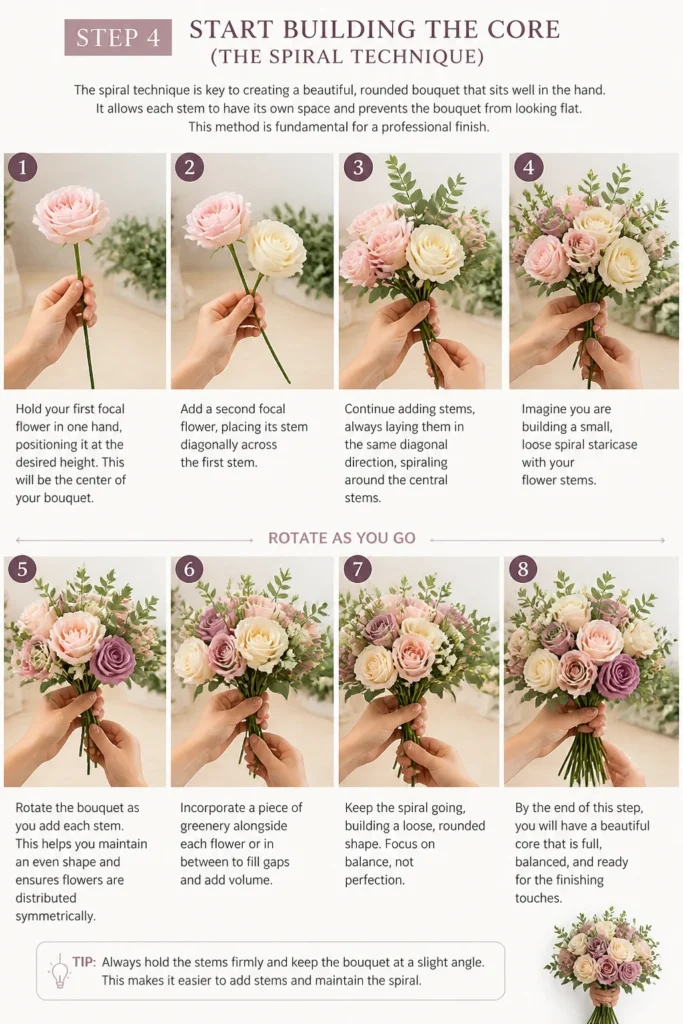
The spiral technique is key to creating a beautiful, rounded bouquet that sits well in the hand. It allows each stem to have its own space and prevents the bouquet from looking flat. This method is fundamental for a professional finish.
- Hold your first focal flower in one hand, positioning it at the desired height. This will be the center of your bouquet.
- Add a second focal flower, placing its stem diagonally across the first stem.
- Continue adding stems, always laying them in the same diagonal direction, spiraling around the central stems. Imagine you are building a small, loose spiral staircase with your flower stems.
- Rotate the bouquet as you add each stem. This helps you maintain an even shape and ensures flowers are distributed symmetrically.
- Incorporate a piece of greenery alongside each flower or every few flowers. This creates a soft, natural base and fills gaps.
- Keep the arrangement loose initially. You can always tighten it later.
Pro Tip: Maintain a gentle, consistent grip on the bouquet. Holding it too tightly can damage stems, while too loose a grip will cause it to fall apart.
Step 5: Incorporate Secondary and Filler Flowers
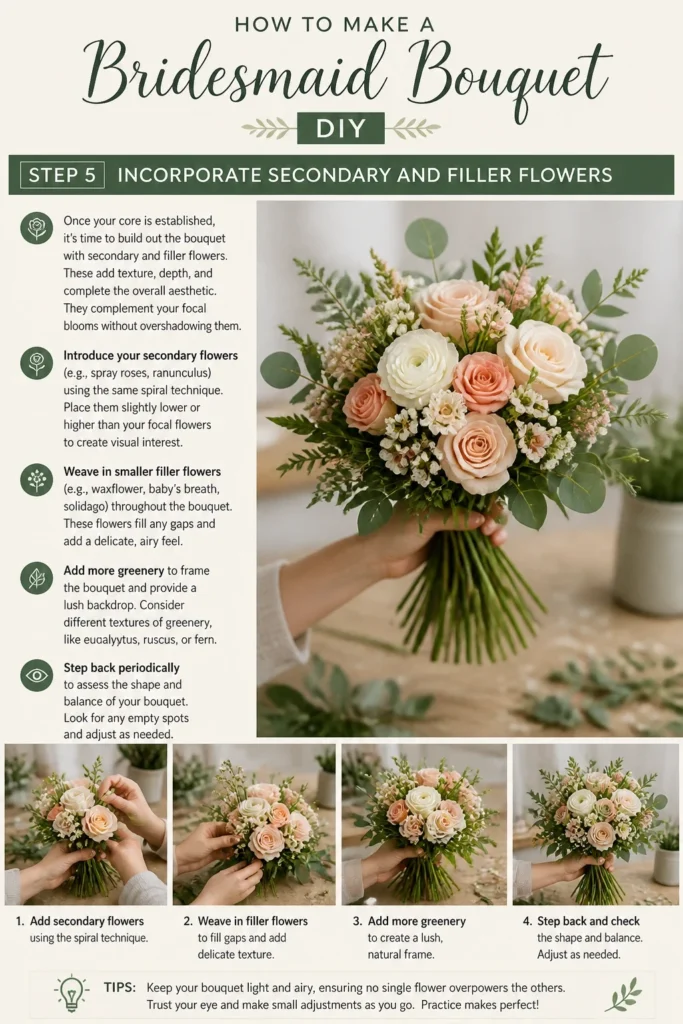
Once your core is established, it’s time to build out the bouquet with secondary and filler flowers. These add texture, depth, and complete the overall aesthetic. They complement your focal blooms without overshadowing them.
- Introduce your secondary flowers (e.g., spray roses, ranunculus) using the same spiral technique. Place them slightly lower or higher than your focal flowers to create visual interest.
- Weave in smaller filler flowers (e.g., waxflower, baby’s breath, solidago) throughout the bouquet. These flowers fill any gaps and add a delicate, airy feel.
- Add more greenery to frame the bouquet and provide a lush backdrop. Consider different textures of greenery, like eucalyptus, ruscus, or fern.
- Step back periodically to assess the shape and balance of your bouquet. Look for any empty spots or areas that seem too dense.
- Adjust stem placements as needed by gently pulling or pushing them to achieve your desired look.
Step 6: Secure the Stems
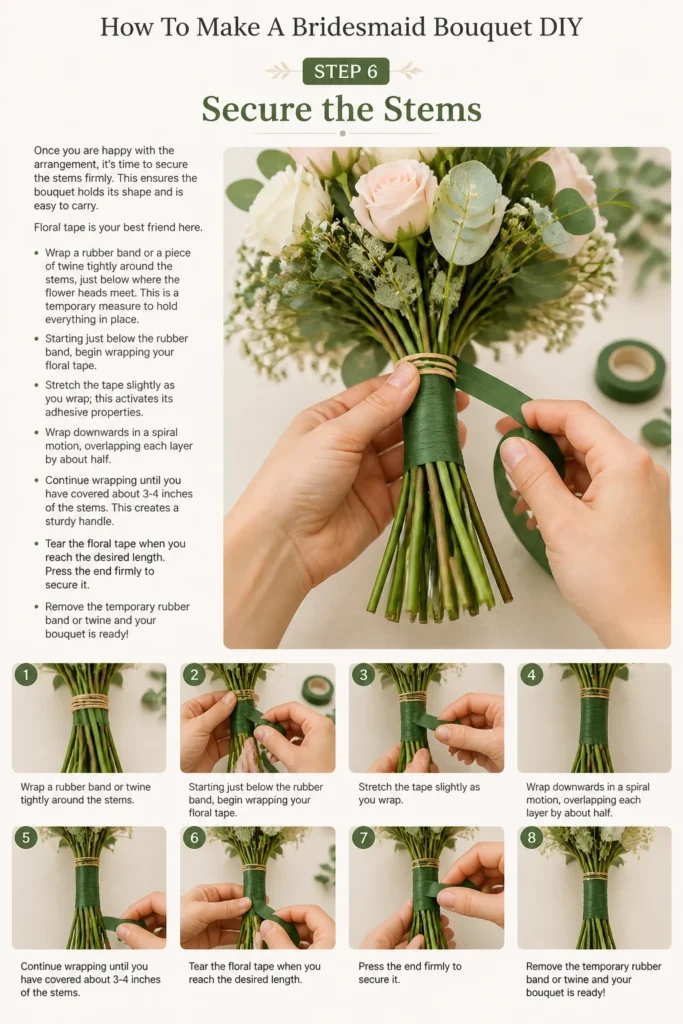
Once you are happy with the arrangement, it’s time to secure the stems firmly. This ensures the bouquet holds its shape and is easy to carry. Floral tape is your best friend here.
- Wrap a rubber band or a piece of twine tightly around the stems, just below where the flower heads meet. This is a temporary measure to hold everything in place.
- Starting just below the rubber band, begin wrapping your floral tape. Stretch the tape slightly as you wrap; this activates its adhesive properties.
- Wrap downwards in a spiral motion, overlapping each layer by about half. Continue wrapping until you have covered about 3-4 inches of the stems. This creates a sturdy handle.
- Tear the floral tape when you reach the desired length. Press the end firmly to secure it.
- Remove the temporary rubber band or twine after securing with floral tape.
Step 7: Wrap the Handle with Ribbon
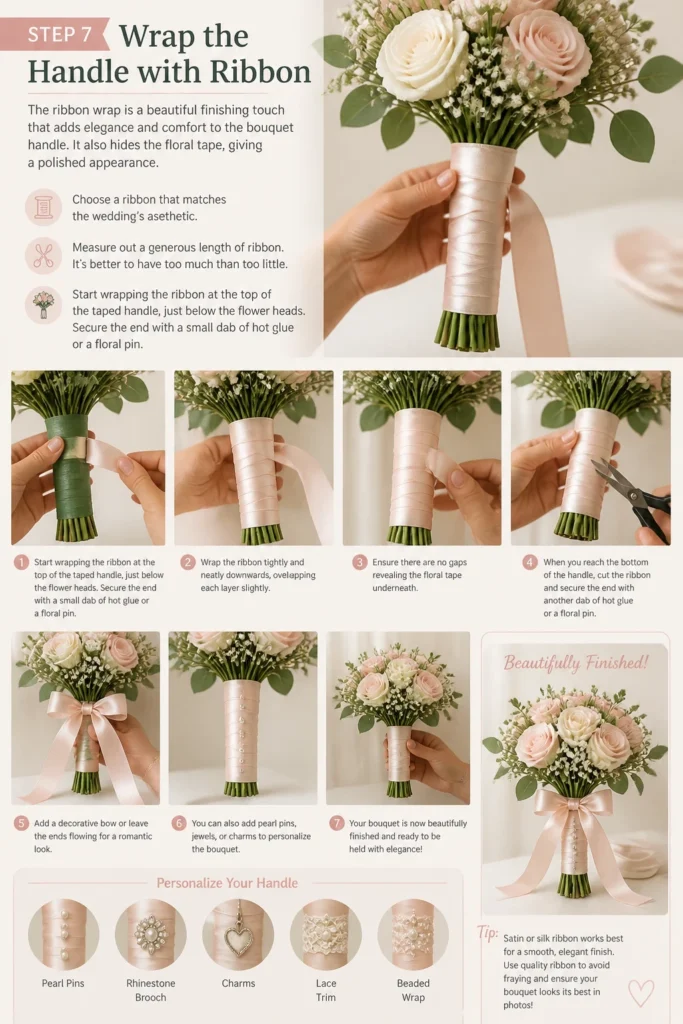
The ribbon wrap is a beautiful finishing touch that adds elegance and comfort to the bouquet handle. It also hides the floral tape, giving a polished appearance. Choose a ribbon that matches the wedding’s aesthetic.
- Measure out a generous length of ribbon. It’s better to have too much than too little.
- Start wrapping the ribbon at the top of the taped handle, just below the flower heads. Secure the end with a small dab of hot glue or a floral pin.
- Wrap the ribbon tightly and neatly downwards, overlapping each layer slightly. Ensure there are no gaps revealing the floral tape underneath.
- When you reach the bottom of the handle, cut the ribbon and secure the end with another dab of hot glue or a floral pin.
- Add a decorative bow or leave the ends flowing for a romantic look. You can also add pearl-tipped pins for extra embellishment.
Step 8: Final Touches and Storage
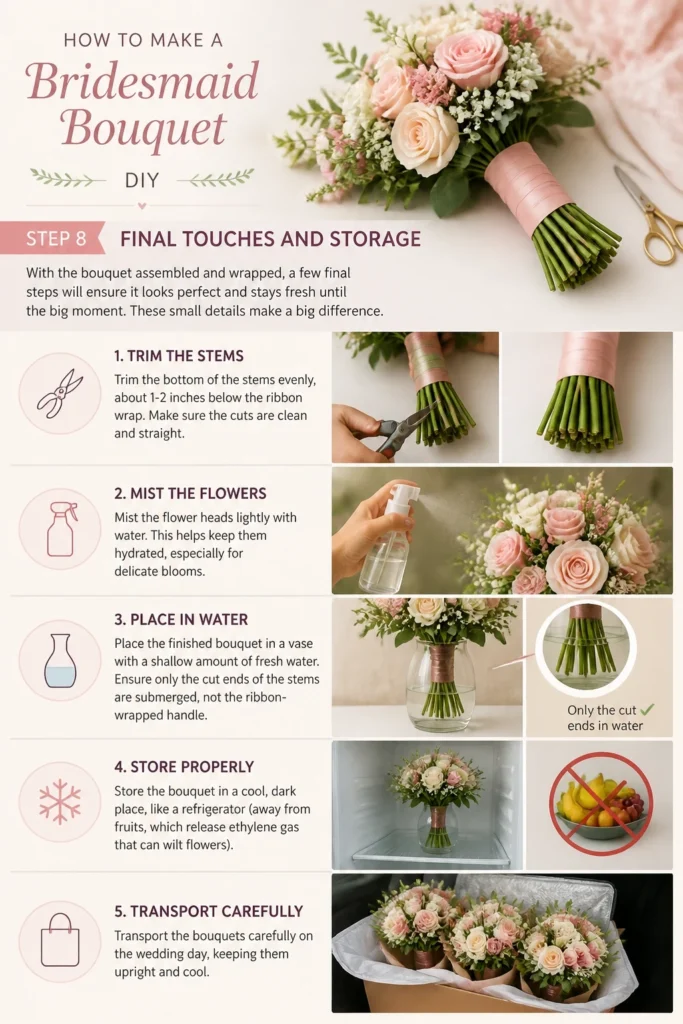
With the bouquet assembled and wrapped, a few final steps will ensure it looks perfect and stays fresh until the big moment. These small details make a big difference.
- Trim the bottom of the stems evenly, about 1-2 inches below the ribbon wrap. Make sure the cuts are clean and straight.
- Mist the flower heads lightly with water. This helps keep them hydrated, especially for delicate blooms.
- Place the finished bouquet in a vase with a shallow amount of fresh water. Ensure only the cut ends of the stems are submerged, not the ribbon-wrapped handle.
- Store the bouquet in a cool, dark place, like a refrigerator (away from fruits, which release ethylene gas that can wilt flowers).
- Transport the bouquets carefully on the wedding day, keeping them upright and cool.
Common Mistakes to Avoid
Steering clear of these common pitfalls will save you time and ensure your bridesmaid bouquets look their best. A little foresight goes a long way.
Over-stuffing the Bouquet
A common mistake is trying to fit too many flowers into one bouquet. This can make it look dense, heavy, and lose its graceful shape. Over-stuffing can also damage delicate petals.
Instead, aim for a balanced, airy look. Allow each flower to have its moment and breathe. Less can often be more, especially for bridesmaid bouquets which are typically smaller than the bridal bouquet. Focus on quality and thoughtful placement over quantity.
Not Prepping Flowers Correctly
Skipping the crucial step of trimming stems and removing excess foliage can drastically reduce your bouquet’s lifespan. Hydration is key for fresh flowers. Neglecting this step means your flowers will wilt faster.
Always trim stems at an angle and remove all leaves below the waterline. Allow flowers to hydrate fully before you begin arranging. This simple step ensures your blooms stay vibrant and fresh throughout the event.
Forgetting the Spiral Technique
If you just bundle stems together without a specific method, your bouquet will likely look flat, messy, and difficult to hold. The stems won’t sit comfortably in the hand. This can also lead to flowers falling out of place.
The spiral technique is essential for a round, stable bouquet. It creates a natural, outward-flowing shape and a comfortable handle. Practice this technique with a few stems first until you feel confident.
Using Too Little or Too Much Floral Tape
Insufficient floral tape means the bouquet won’t be securely held, risking flowers shifting or falling out. Conversely, using too much tape can make the handle bulky and inflexible. It also wastes materials.
Wrap the floral tape firmly and consistently, overlapping by about half an inch. Aim for a secure, yet sleek, handle. Two to three layers of tape wrapped tightly are usually sufficient for a sturdy hold.
Troubleshooting
Even with the best intentions, you might encounter a few issues. Here are solutions to common problems you might face while making your bridesmaid bouquets.
Bouquet Looks Lopsided
If your bouquet seems uneven or heavier on one side, it’s likely due to uneven distribution of flowers or greenery. This can happen if you don’t rotate the bouquet as you build it.
Gently unwrap the temporary rubber band if you haven’t secured it with floral tape yet. Carefully rearrange the flowers, adding more greenery or smaller blooms to the lighter side. Remember to rotate the bouquet frequently during assembly to maintain symmetry.
Flowers Wilting Quickly
Rapid wilting is almost always a sign of inadequate hydration or improper storage. Flowers need water to stay fresh and vibrant. Heat and direct sunlight are also major culprits.
Ensure you trimmed all stems at an angle and removed submerged leaves during preparation. Allow flowers to hydrate in fresh water for several hours before arranging. After assembly, store the bouquets in a cool, dark place, with stem ends in a shallow amount of fresh water.
Stems Breaking During Assembly
Delicate stems can snap if handled too roughly or if you’re gripping the bouquet too tightly. Some flowers naturally have more brittle stems than others. This can be frustrating and costly.
Handle each stem gently, especially those of more fragile flowers. Maintain a firm but not crushing grip on the bouquet itself. If a stem breaks, try to trim it shorter and incorporate it lower in the bouquet if possible, or set it aside and replace it with a fresh bloom.
Key Takeaways
Making a bridesmaid bouquet DIY is a rewarding process that adds a personal touch to any wedding. Keep these core principles in mind for success.
- Preparation is paramount: Always trim stems and hydrate flowers thoroughly before you begin.
- Master the spiral technique: This method creates a beautiful, rounded shape and a comfortable handle.
- Balance your blooms: Use a mix of focal, secondary, and filler flowers, along with greenery, for depth and texture.
- Secure firmly: Floral tape is essential for holding the bouquet together securely and creating a strong base for the ribbon.
- Personalize the details: Choose ribbons and embellishments that complement the wedding theme and the bridesmaids’ attire.
- Store properly: Keep finished bouquets in a cool, dark place with water until they are needed to maintain freshness.
Frequently Asked Questions
Here are answers to some common questions about making your own bridesmaid bouquets. These insights can help you plan and execute your floral vision.
How many flowers do I need for each bouquet?
The number of flowers depends on their size and the desired bouquet dimension. For a standard bridesmaid bouquet, aim for 15-25 stems total, including a mix of 3-5 focal flowers, 5-7 secondary flowers, and 7-13 filler flowers and greenery. Smaller, more delicate blooms will require more stems.
When should I make the bouquets?
It’s best to assemble the bouquets no more than 1-2 days before the wedding. This ensures the flowers are at their freshest. If you’re doing multiple bouquets, consider starting the day before the wedding and finishing on the morning of. Always store them properly after assembly.
Can I use artificial flowers?
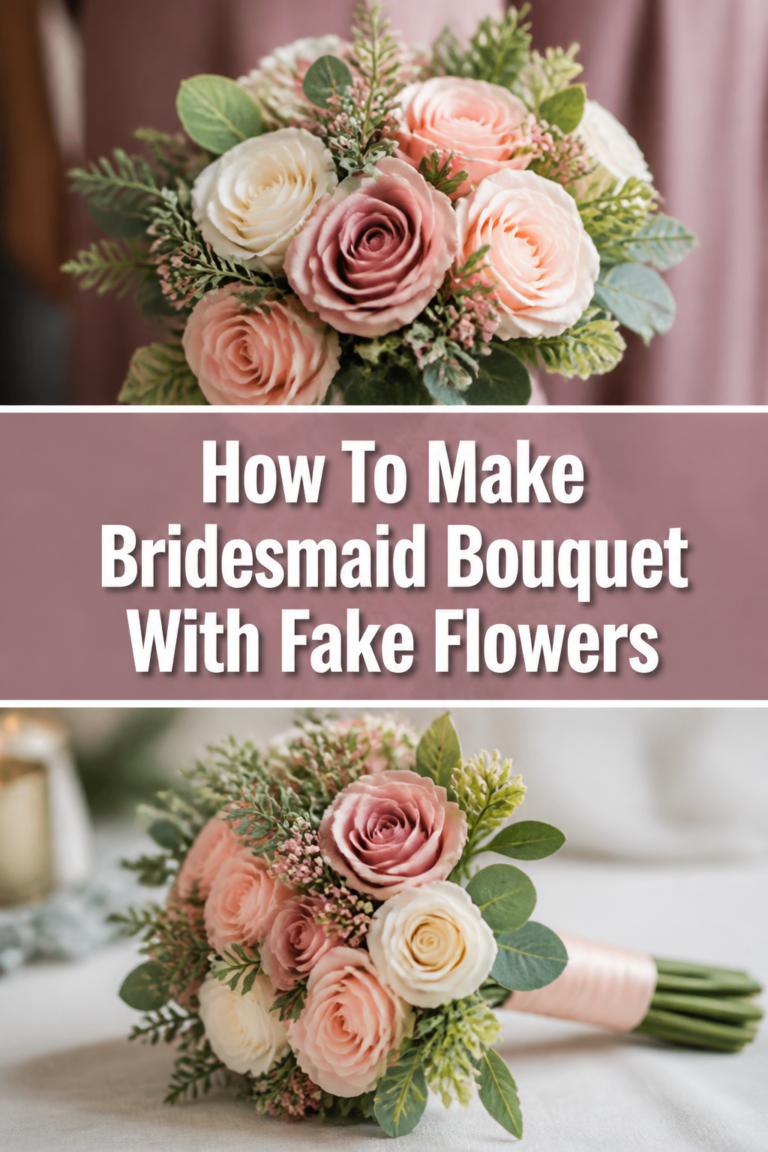
Absolutely! Using artificial flowers can be a great option, especially if you want the bouquets to be keepsakes or if you have concerns about fresh flowers wilting. The assembly process is very similar, though you won’t need to worry about hydration. You might need floral wire to manipulate stems.
What kind of ribbon is best for the handle?
Satin, silk, velvet, or grosgrain ribbons are excellent choices. They provide a luxurious feel and drape beautifully. Consider the wedding’s overall style. For a rustic look, burlap or lace ribbon can be lovely. Ensure the ribbon is wide enough (1-2 inches) to comfortably cover the taped handle.
Our Top Recommended Finds
Having the right tools makes all the difference when crafting beautiful bouquets. These items are essential for any DIY florist.
- Floral Shears: Sharp, ergonomic shears make clean cuts, preventing stem damage and ensuring better water absorption.
- Green Floral Tape: This stretchy, adhesive tape is indispensable for securing stems tightly and creating a sturdy handle.
- High-Quality Satin Ribbon: A beautiful ribbon not only covers the tape but also adds a luxurious finishing touch to your handcrafted bouquet.
Crafting Memories, One Bloom at a Time
Making your own bridesmaid bouquets is more than just a DIY project; it’s an act of love. You’re not just arranging flowers; you’re weaving in personal touches and creating lasting memories. The joy of seeing your creations carried down the aisle is truly unparalleled.
Now that you have the knowledge and steps, why not explore other floral arrangements? Consider making boutonnieres or corsages next. Embrace your inner florist and let your creativity bloom. Start planning your flower selections today and bring your vision to life!
Wedding Planning
No fluff, no drama. Just easy weekly advice, planning shortcuts, and gentle reminders to help you actually enjoy your engagement.