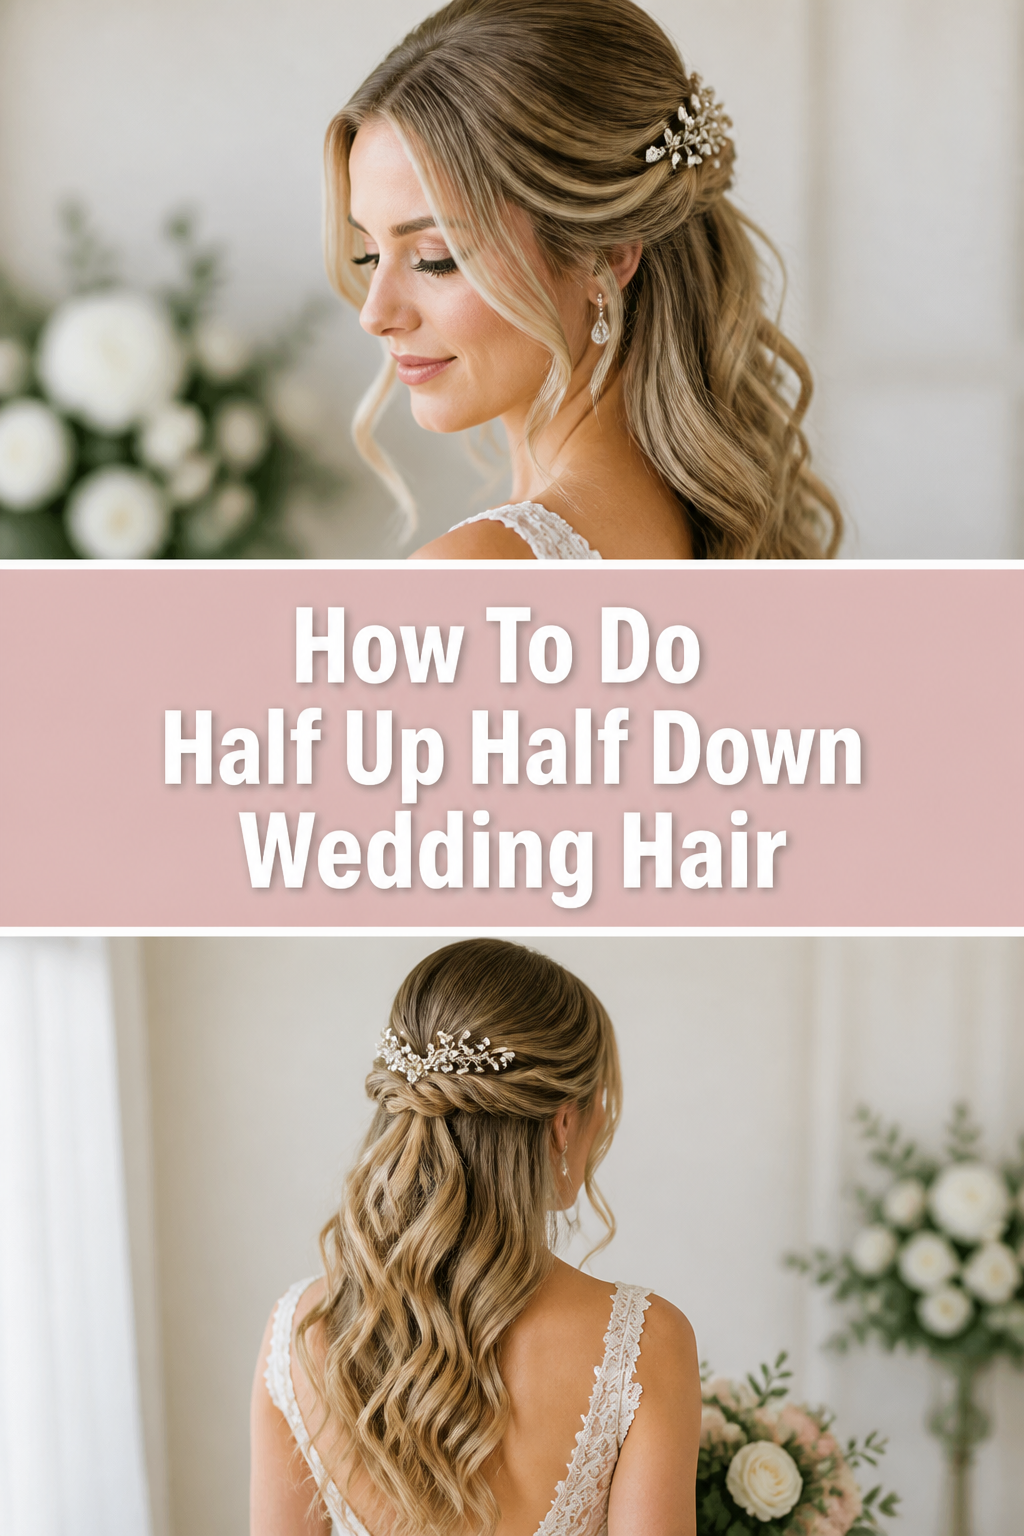
👰♀️ How To Do Half Up Half Down Wedding Hair
Planning your wedding day hair can feel overwhelming with so many beautiful options.
The half up half down style remains a timeless favorite, offering elegance and comfort.
I’ve personally helped countless brides achieve their dream look, and this guide shares those tried-and-true techniques for a flawless finish.

Quick Overview
This guide will walk you through creating a stunning half up half down wedding hairstyle. You’ll learn how to prep your hair, expertly section it, add volume, and secure your style for lasting beauty.
- Time needed: 60-90 minutes (plus practice time)
- Difficulty: Intermediate
- What you’ll need: Heat protectant, curling iron, hairspray, bobby pins, clear elastic bands, fine-tooth comb, texture spray.
Step-by-Step Instructions
Step 1: Prepare Your Canvas
Start with freshly washed and dried hair. Day-old hair often holds style better, but clean hair can work well with the right products.
Apply a heat protectant spray generously throughout your hair. This crucial step shields your strands from heat damage during styling.
Gently detangle your hair with a wide-tooth comb, ensuring there are no knots or snags.
Pro Tip: For extra grip and volume, apply a texturizing spray or dry shampoo to your roots and mid-lengths before any heat styling. This gives your hair a better foundation to hold curls and volume.
Step 2: Add Waves and Curls
Begin by curling all of your hair. Use a curling iron with a 1 to 1.5-inch barrel for soft, romantic waves.
Take 1-inch sections of hair and wrap them around the barrel, holding for 5-10 seconds depending on your hair type.
Alternate the direction of the curls (some away from your face, some towards it) for a more natural, voluminous look.
Once each curl is released, gently pin it up against your scalp to cool completely. This sets the curl and ensures maximum longevity.
Step 3: Create Your Half Up Section
Once all curls have cooled, unpin them and gently shake your hair out. Do not brush them yet.
Use your fingers or a fine-tooth comb to create a clean horizontal section across the crown of your head. This section should extend from just above one ear to just above the other.
Gather this top section of hair, making sure it’s smooth and free of bumps. You can adjust the height of this section based on your preference for a higher or lower half-up style.
Pro Tip: For extra volume at the crown, gently backcomb (tease) the hair at the roots of this top section before gathering it. Use a fine-tooth comb for a subtle lift.
Step 4: Secure the Base
Once your top section is gathered, secure it with a clear elastic band. Make sure the band is tight enough to hold but not so tight that it causes discomfort.
For a more polished look, take a small strand of hair from underneath the secured ponytail. Wrap this strand around the elastic band to conceal it, then secure the end with a small bobby pin.
Ensure the bobby pin is hidden underneath the wrapped hair, creating a seamless finish.
Step 5: Incorporate a Twist or Braid (Optional)
This step adds an extra touch of elegance. You can either twist or braid strands to enhance your half-up style.
Take a small section of hair from either side of your head, just below your secured half-up section. Gently twist each section backward, away from your face.
Bring these twisted sections back towards the center and secure them with bobby pins, either over or under your existing half-up ponytail. Alternatively, create two small braids and pin them in place.
This creates beautiful detail and helps to blend the half-up portion with the loose curls below.
Step 6: Refine the Loose Curls
Now, it’s time to perfect the hair that’s left down. Gently run your fingers through the curls to break them up slightly and create a softer, more natural wave.
Avoid brushing, as this can make the curls fall flat. If any curls have loosened too much, quickly re-curl them with your iron.
Apply a light mist of hairspray to the loose curls to ensure they hold their shape throughout the day and night.
Pro Tip: For a truly romantic, lived-in look, very gently pull apart the curls with your fingers to make them appear softer and more voluminous. A small amount of shine serum can add a beautiful finish.
Step 7: Add Finishing Touches and Accessories
Inspect your entire hairstyle from all angles. Smooth down any flyaways using a light hold hairspray and your fingertips.
This is the perfect moment to add any wedding hair accessories. A delicate comb, a sparkling clip, or fresh flowers can be tucked into the secured half-up section or along the twists.
Position your chosen accessory carefully, ensuring it complements the style without overpowering it.
Step 8: Lock in Your Look
Once you are completely satisfied with your half up half down style, finish with a generous, even mist of strong-hold hairspray.
Hold the can about 10-12 inches away from your head to ensure an even application without making your hair stiff or sticky.
Focus on the secured sections and the areas around your face to keep everything perfectly in place for your special day.
Common Mistakes to Avoid
Skipping Hair Prep
Many people jump straight into styling without properly preparing their hair. This often leads to a style that lacks volume, falls flat quickly, or doesn’t hold curls effectively.
Always start with the right products like heat protectant, texture spray, or dry shampoo. These lay the foundation for a long-lasting, beautiful style.
Over-Teasing or Under-Teasing
Teasing (backcombing) is key for volume, but too much can create a matted, unnatural look, while too little leaves hair flat. The goal is subtle lift.
Tease only at the roots of the section you want to lift, using a fine-tooth comb. Work in small subsections and gently smooth the top layer over the teased hair to hide it.
Not Securing Properly
A beautiful style is useless if it doesn’t stay put. Relying on just one or two bobby pins can lead to slippage throughout the day.
Use clear elastic bands for the main half-up section and plenty of bobby pins to secure any twists, braids, or accessories. Criss-cross bobby pins for extra hold and ensure they are well-hidden.
Rushing the Cooling Process
Heat styling works by changing the hair’s bonds, but these bonds only set once the hair cools. Rushing this step causes curls to drop almost immediately.
Always pin up curls after heating them and allow them to cool completely before letting them down or touching them. This setting time is crucial for curl longevity.
Troubleshooting
Hair Falls Flat Quickly
If your hair isn’t holding its volume or curls, it likely needs more support. Ensure you’re using texturizing spray or dry shampoo on clean hair before styling.
Also, make sure you’re letting your curls cool completely while pinned up. A strong-hold hairspray applied at the end is essential for locking everything in.
Flyaways and Frizz
Humidity or dry hair can cause unwanted flyaways and frizz. Start with a frizz-controlling serum or leave-in conditioner before drying your hair.
For flyaways during styling, lightly spray hairspray onto your fingertips and gently smooth them down. A soft-bristle brush can also help tame them without disturbing the style.
Sections Are Uneven or Messy
Achieving clean sections requires patience and the right tools. Use a fine-tooth comb to create precise partings for your half-up section and any braids or twists.
If a section looks messy, gently undo it and try again. It’s better to take an extra minute to refine a section than to have an uneven look.
Key Takeaways
- Proper hair preparation with heat protectant and texture spray is the foundation for a lasting style.
- Curling all hair and allowing curls to cool completely while pinned ensures maximum hold and longevity.
- Precision in sectioning and strategic teasing at the crown adds elegant volume and a polished finish.
- Secure your half-up section firmly with a clear elastic and conceal it with a wrapped hair strand.
- Utilize bobby pins effectively, crisscrossing them for extra hold, especially for twists or accessories.
- Finish with a strong-hold hairspray to lock in the entire look, ensuring it withstands the celebration.
Frequently Asked Questions
Can I do this style on short hair?
This style works best on hair that is at least shoulder-length. If your hair is shorter, you might still achieve a half-up look, but the “down” portion will be less prominent. Consider clip-in extensions for added length and volume.
How far in advance should I practice this hairstyle?
It’s highly recommended to practice this style several times before the big day. Start practicing at least 2-4 weeks in advance to become comfortable with the steps and timing. This allows you to refine your technique and identify any challenges.
What if my hair doesn’t hold curls well?
If your hair struggles to hold curls, ensure you’re using a strong-hold mousse or styling cream before blow-drying. Also, make sure your curling iron is hot enough for your hair type and you’re letting the curls cool completely while pinned. A texture spray can also give curls more grip.
Can I use a curling wand instead of an iron?
Absolutely! A curling wand can create beautiful, relaxed waves perfect for this style. The technique for wrapping and cooling the hair remains the same. Experiment with different barrel sizes to find the curl pattern you prefer.
Our Top Recommended Finds
- Strong Hold Hairspray: Essential for locking in your style and combating humidity throughout the day.
- 1.25-inch Curling Iron: A versatile size for creating soft, romantic waves that are neither too tight nor too loose.
- Texture Spray: Adds grip, volume, and a lived-in feel to your hair, making it easier to style and ensuring curls last.
Embrace Your Bridal Radiance
Creating your perfect half up half down wedding hair is a journey of practice and patience, culminating in a truly beautiful result.
You now have the tools and techniques to craft an elegant, long-lasting style that will beautifully frame your face on your special day.
Don’t wait—gather your supplies and start practicing today to feel confident and stunning as you walk down the aisle.