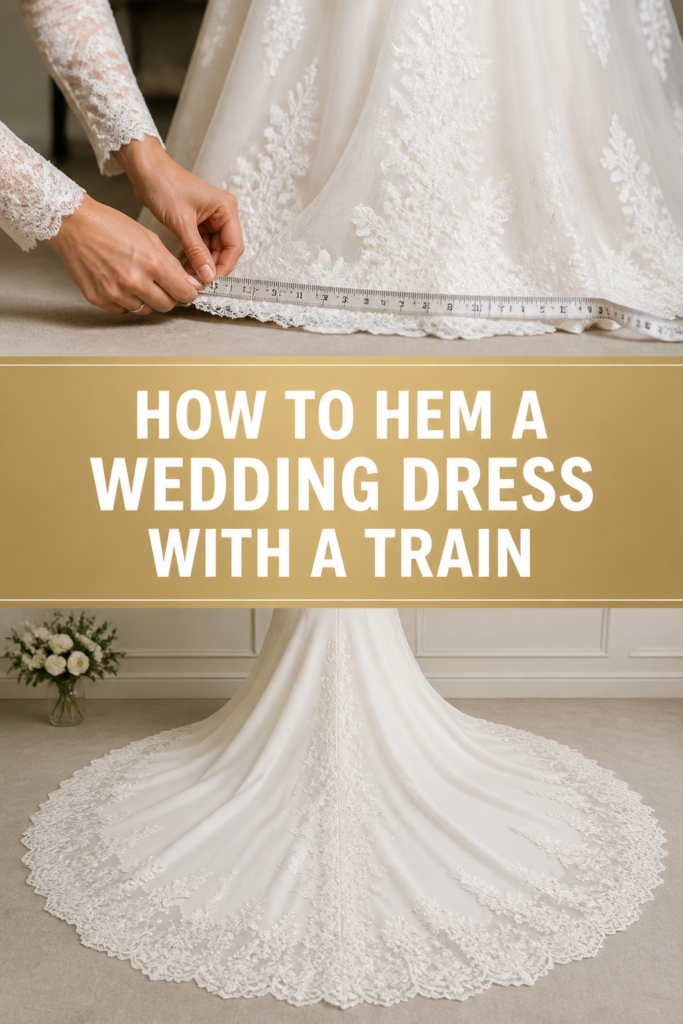
👗 How To Hem A Wedding Dress With A Train
Altering a wedding gown is often seen as the final hurdle before the big day arrives.
The process requires a blend of patience, precision, and a very steady hand with a pair of shears.
Having spent years in bridal ateliers, I have learned that hemming a train is less about cutting fabric and more about preserving the gown’s original silhouette.
Quick Overview
Hemming a dress with a train is a complex task because you are dealing with varying lengths and often multiple layers of delicate fabric.
- Time needed: 6 to 10 hours depending on the number of layers
- Difficulty: Advanced
- What you’ll need: Fabric shears, fine pins, tailor’s chalk, a sewing machine or hand-sewing needles, an iron with a silk setting, and a helper.
Step-by-Step Instructions
Step 1: Prepare the Fitting Environment
Set up a clean, hard-surface floor area where the dress can spread out without catching on carpet fibers or gathering dust.
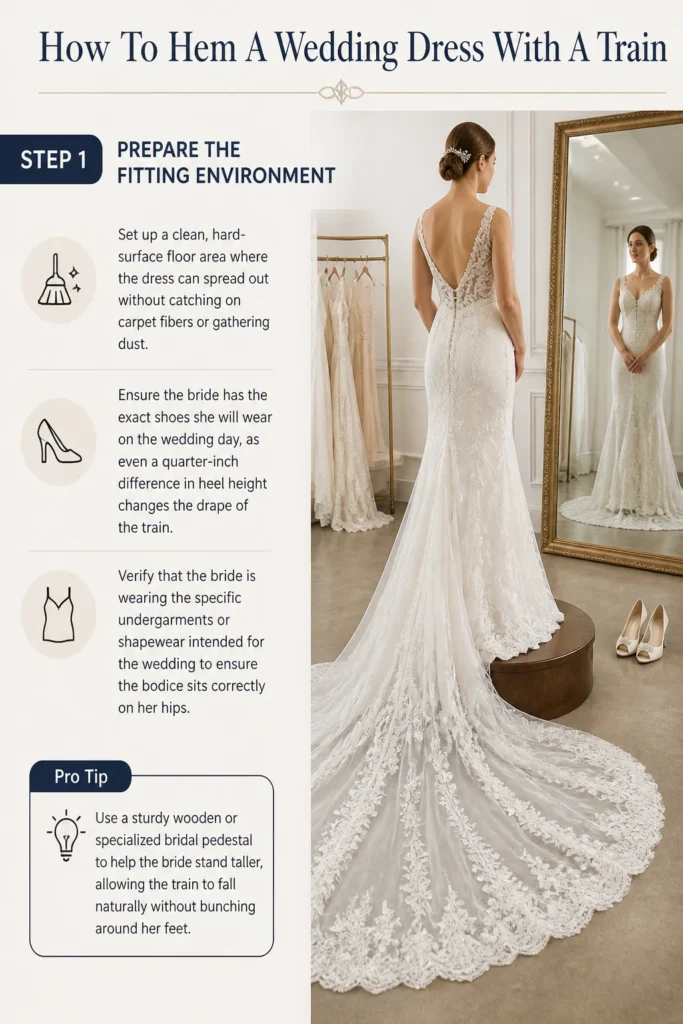
Ensure the bride has the exact shoes she will wear on the wedding day, as even a quarter-inch difference in heel height changes the drape of the train.
Verify that the bride is wearing the specific undergarments or shapewear intended for the wedding to ensure the bodice sits correctly on her hips.
Pro Tip: Use a sturdy wooden or specialized bridal pedestal to help the bride stand taller, allowing the train to fall naturally without bunching around her feet.
Step 2: Mark the Front Hem Length
Begin at the center front of the dress and determine where the fabric should touch the floor.
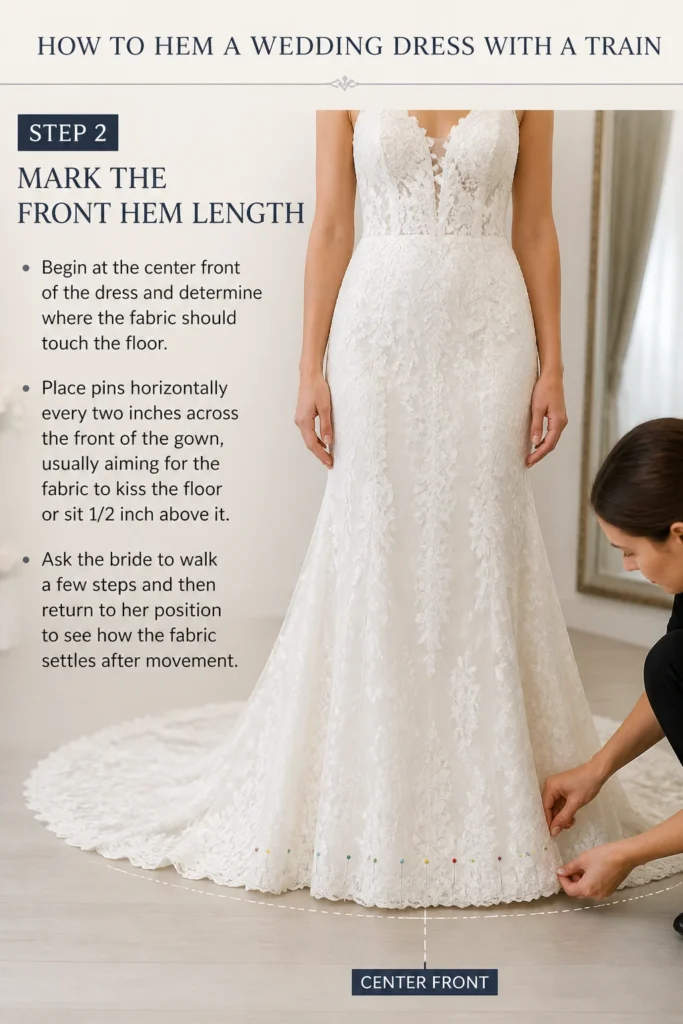
Place pins horizontally every two inches across the front of the gown, usually aiming for the fabric to “kiss” the floor or sit 1/2 inch above it.
Ask the bride to walk a few steps and then return to her position to see how the fabric settles after movement.
Step 3: Transition to the Side Seams
Move from the center front toward the side seams, maintaining the same distance from the floor.
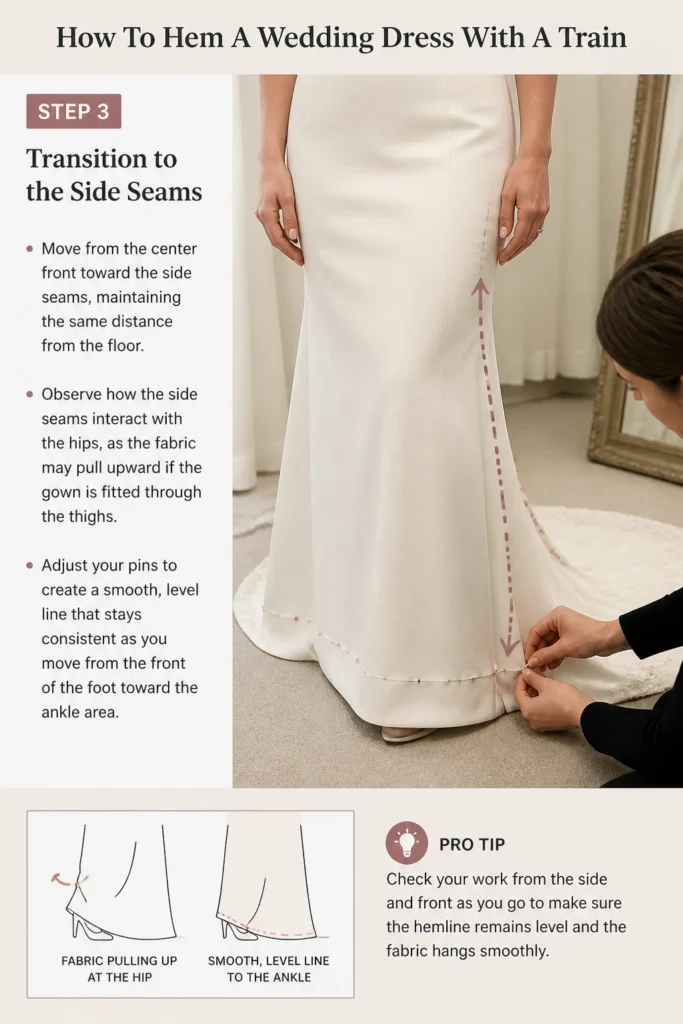
Observe how the side seams interact with the hips, as the fabric may pull upward if the gown is fitted through the thighs.
Adjust your pins to create a smooth, level line that stays consistent as you move from the front of the foot toward the ankle area.
Step 4: Blend the Hem into the Train
Identify the “break point” where the front hem must start lengthening to become the train.
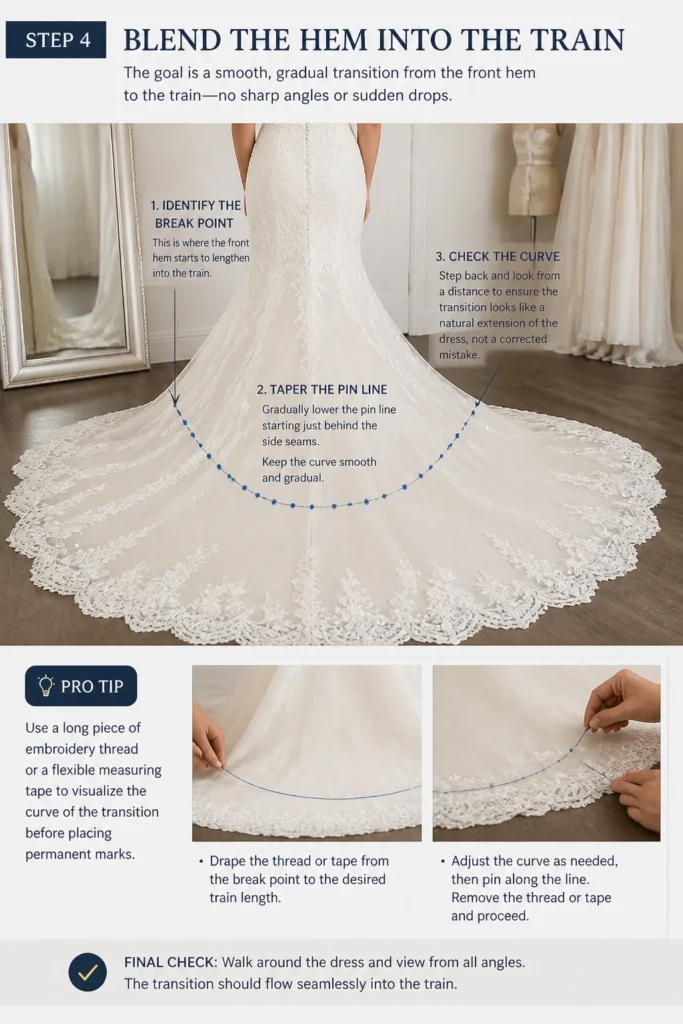
Taper the pin line gradually downward starting from just behind the side seams, ensuring there are no sharp angles or sudden drops in length.
Check the curve from a distance to make sure the transition looks like a natural extension of the dress rather than a corrected mistake.
Pro Tip: Use a long piece of embroidery thread or a flexible measuring tape to visualize the curve of the transition before placing permanent marks.
Step 5: Measure and Mark the Underskirt
Lift the top layer of lace or tulle and repeat the pinning process on the lining and crinoline layers.
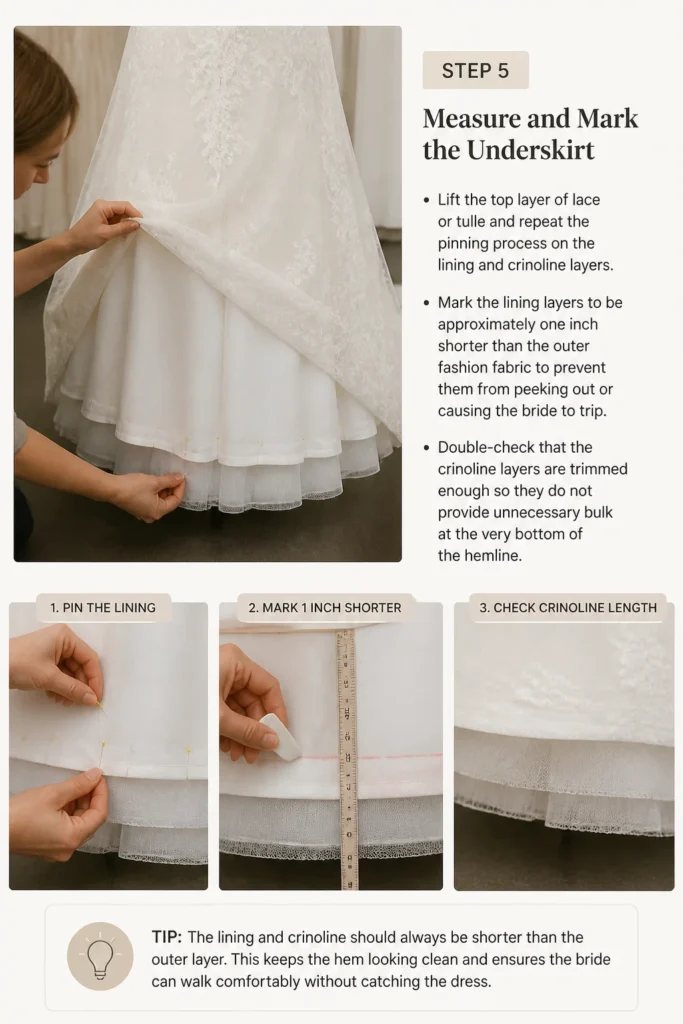
Mark the lining layers to be approximately one inch shorter than the outer fashion fabric to prevent them from peeking out or causing the bride to trip.
Double-check that the crinoline layers are trimmed enough so they do not provide unnecessary bulk at the very bottom of the hemline.
Step 6: Trim the Excess Fabric
Lay the dress flat on a large cutting table after the bride has carefully stepped out of the pinned gown.
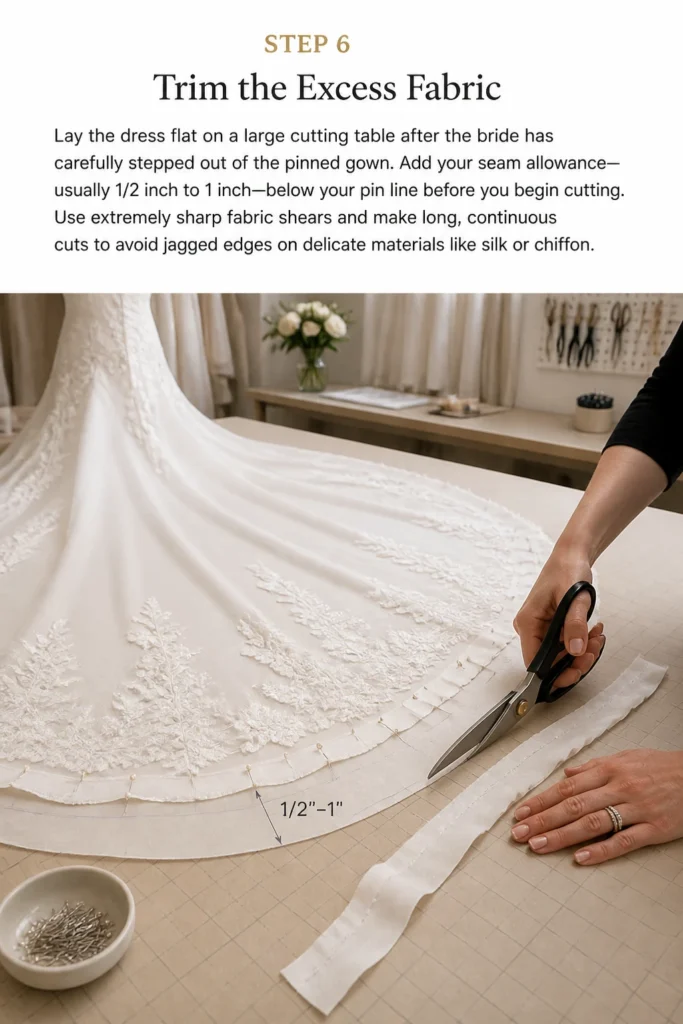
Add your seam allowance—usually 1/2 inch to 1 inch—below your pin line before you begin cutting.
Use extremely sharp fabric shears and make long, continuous cuts to avoid jagged edges on delicate materials like silk or chiffon.
Step 7: Finish the Raw Edges
Select a finishing technique based on the fabric, such as a narrow rolled hem for chiffon or a horsehair braid for structured satin.
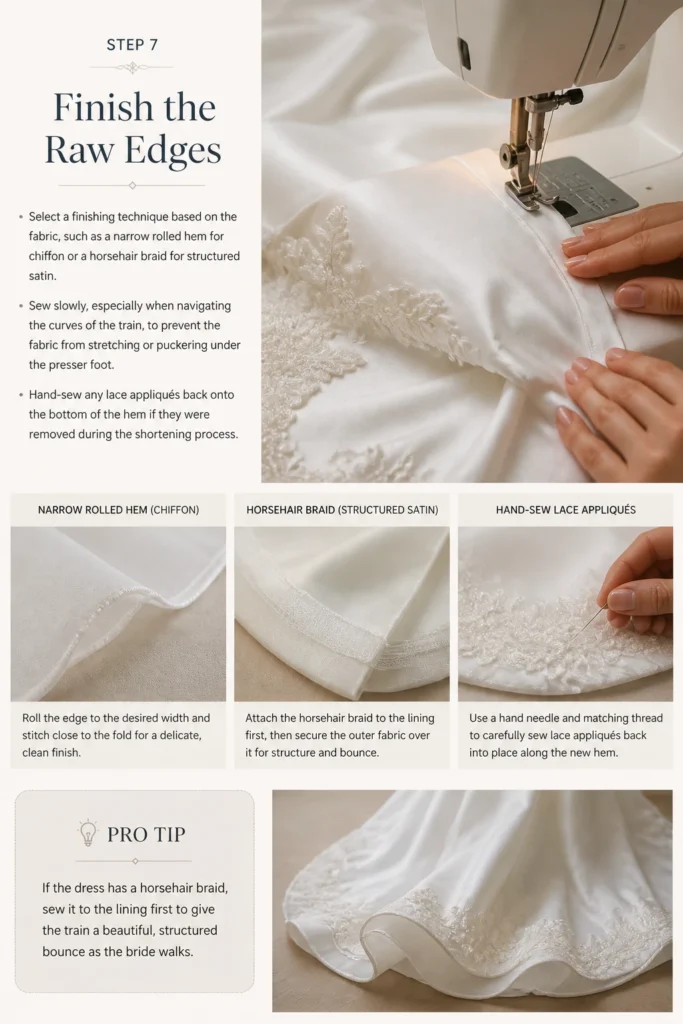
Sew slowly, especially when navigating the curves of the train, to prevent the fabric from stretching or puckering under the presser foot.
Hand-sew any lace appliqués back onto the bottom of the hem if they were removed during the shortening process.
Pro Tip: If the dress has a horsehair braid, sew it to the lining first to give the train a beautiful, structured “bounce” as the bride walks.
Step 8: Final Pressing and Inspection
Press the new hemline using a press cloth to protect the bridal fabric from heat damage or shine.
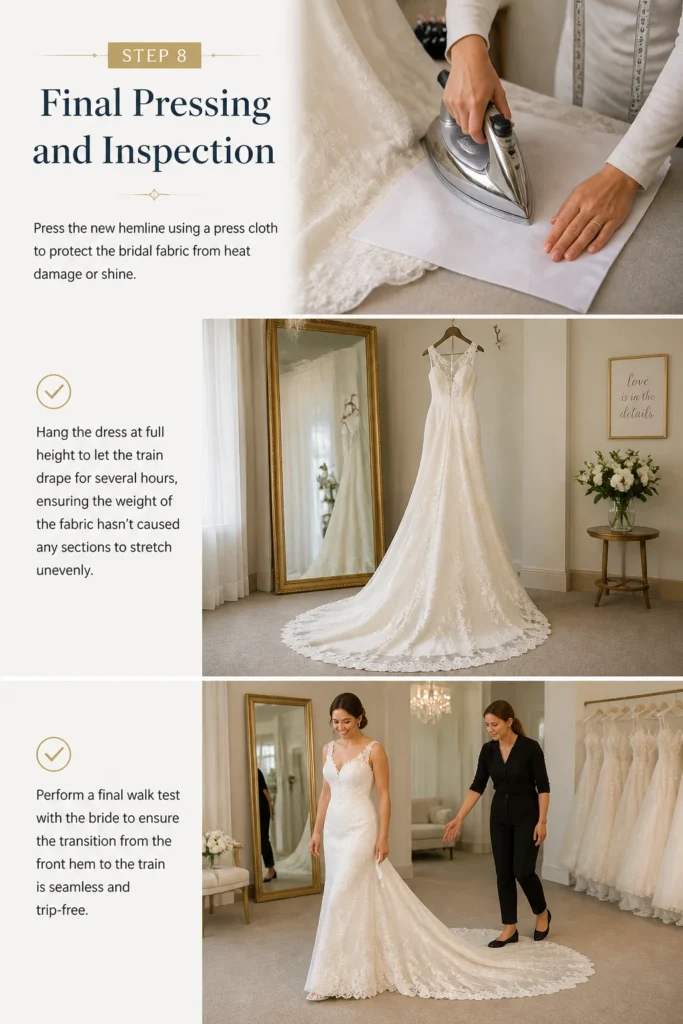
Hang the dress at full height to let the train drape for several hours, ensuring the weight of the fabric hasn’t caused any sections to stretch unevenly.
Perform a final “walk test” with the bride to ensure the transition from the front hem to the train is seamless and trip-free.
Common Mistakes to Avoid
Cutting the Lining the Same Length as the Shell
One of the most frequent errors is cutting every layer of the dress to the exact same measurement. When the bride moves, the inner layers often shift forward. If the lining is the same length as the outer lace, it will poke out from underneath, looking messy in photographs and potentially catching on the bride’s heels. Always keep the lining slightly shorter to maintain a clean aesthetic.
Ignoring the “Bias” of the Fabric
Wedding dresses are often constructed with fabric cut on the bias, meaning it is diagonal to the grain. This makes the fabric stretchy and prone to “growing” over time. If you hem a bias-cut dress immediately after pinning, you might find that it is an inch longer the next morning. It is vital to let the dress hang for at least 24 hours after the first marking before you commit to the cut.
Forgetting the Bustle Points
A train is beautiful for the ceremony, but it must be bustled for the reception. If you change the length of the hem or the shape of the train, the original bustle points may no longer work. You must re-evaluate how the fabric folds when lifted. Failing to do this can result in a lopsided bustle that drags on the dance floor.
Over-Trimming the Side Transitions
The area where the flat front hem meets the long train is the most sensitive part of the alteration. Many beginners cut this transition too steeply, creating a “step” effect. This looks unnatural and ruins the flow of the gown. The transition should be a long, gentle arc that is almost imperceptible to the eye.
Troubleshooting
The Hem is Puckering or Wavy
Puckering usually happens when the tension on your sewing machine is too high for delicate bridal fabrics. It can also occur if you are pulling the fabric through the machine rather than letting the feed dogs do the work. To fix this, rip out the stitches and re-sew using a walking foot or a tissue paper stabilizer underneath the fabric. The tissue paper provides support and can be easily torn away after the seam is finished.
The Train Feels Too Heavy to Move
Sometimes, after hemming, the remaining train fabric feels bulky or difficult for the bride to kick out while walking. This is often caused by heavy crinoline or stiff netting layers that were not trimmed back enough. Check the inner layers and consider removing a few inches of the stiffest netting. This reduces the weight without sacrificing the outward shape of the skirt.
Uneven Length After Sewing
If the hem looked perfect when pinned but looks uneven after sewing, the fabric likely shifted during the stitching process. This is common with satin and silk. You can resolve this by “hanging” the hem. Use a steamer to relax the fibers and see if the unevenness settles. If it remains, you may need to unpick the specific section and re-pin it while the dress is hanging on a mannequin.
Key Takeaways
- Always use the wedding shoes during every fitting to ensure the height is perfectly calibrated for the specific heel.
- Leave a seam allowance of at least one inch to allow for minor adjustments after the first round of sewing.
- Trim the lining layers slightly shorter than the outer fabric to prevent them from showing or causing trips.
- Let the dress hang for 24 hours before cutting if the fabric is heavy or cut on the bias.
- Maintain a gentle curve when transitioning from the floor-length front to the extended back train.
- Use a press cloth and low heat to avoid scorching delicate bridal fabrics during the final finishing.
Frequently Asked Questions
Can I hem a wedding dress with a lace border?
Yes, but it is a much more labor-intensive process than a standard hem. You must carefully unpick the lace trim from the bottom of the dress before shortening the fabric. Once the base fabric is cut and finished, you then hand-sew the lace border back onto the new hemline. This ensures that the beautiful scalloped edge of the lace remains intact and at the correct level.
Should I cut the train off entirely if it is too long?
While you can technically remove a train, it usually changes the entire balance of the dress. Most wedding gowns are designed with the weight of the train in mind to help the skirt drape correctly. If the train is simply too long for your venue, it is better to shorten it while maintaining the original oval shape rather than cutting it into a “floor-length all around” style, which may cause the front to kick out awkwardly.
How much does it cost to have a train hemmed professionally?
Professional bridal tailors typically charge between $200 and $600 for a hem, depending on the number of layers and the complexity of the fabric. If the gown has a lace border or multiple layers of horsehair braid, the price will be on the higher end. Doing it yourself can save money, but you must factor in the cost of high-quality tools and the significant time investment required to do it correctly.
What is the best stitch for a wedding dress hem?
A “blind hem” is generally the preferred choice for bridal wear because it is nearly invisible from the right side of the fabric. If you are working with very fine chiffon, a narrow rolled hem created with a specialized serger or a rolled hem foot on a sewing machine is best. For heavy satins, a hand-stitched catch stitch provides the most flexibility and a high-end finish that allows the fabric to move naturally.
Our Top Recommended Finds
- Micro-Fine Glass Head Pins: These are essential for bridal work because they are incredibly sharp and thin, meaning they won’t leave visible holes in delicate silks or satins.
- Horsehair Braid: If your dress has a full skirt, adding or replacing the horsehair braid at the hem will give the train the structure it needs to stay fanned out behind you.
- Appliqué Scissors: These specialized “duckbill” scissors allow you to trim excess fabric close to lace or embroidery without accidentally nicking the main body of the dress.
Refining Your Bridal Alteration Skills
Once you have mastered the art of the hem, you might find yourself looking at other parts of the gown that need a custom touch.
Understanding how fabric behaves on a curve is a skill that translates to many other sewing projects beyond the bridal world.
Take your time with the final pressing, as the crispness of the edge is what separates a DIY project from a professional-grade alteration.
Start your project today by setting up your fitting area and taking those first crucial measurements with the bride in her wedding shoes.