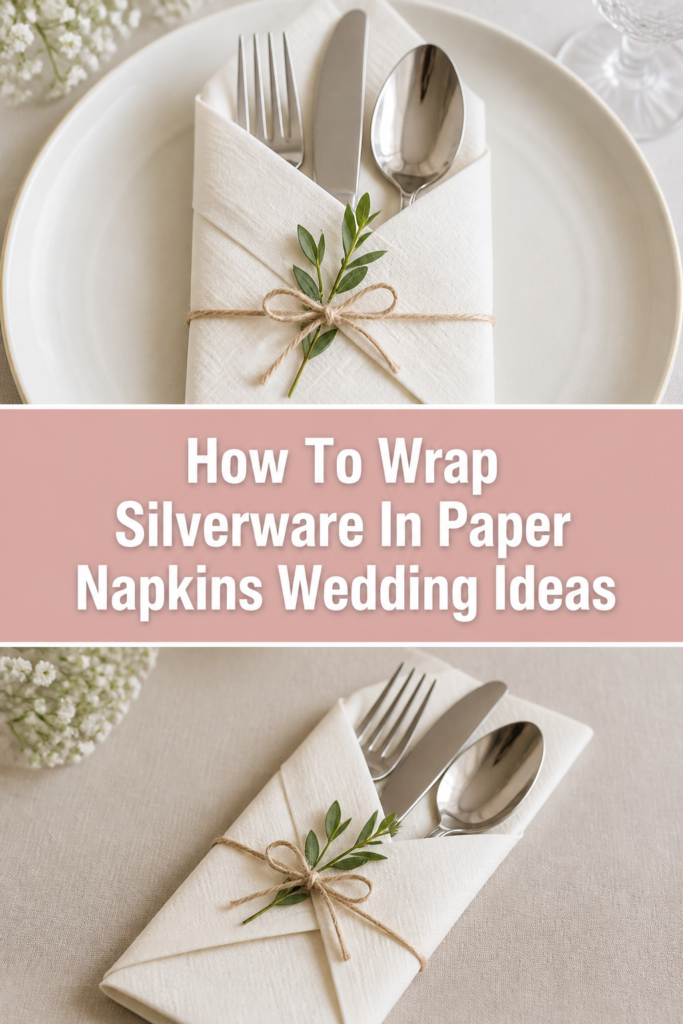
🍴 How To Wrap Silverware In Paper Napkins Wedding Ideas
Planning a wedding often means balancing a beautiful aesthetic with a realistic budget.
I remember sitting in my kitchen with three bridesmaids, surrounded by 200 sets of silverware and a mountain of navy blue napkins.
Through trial and error, we discovered that the right folding technique transforms a simple paper napkin into a high-end design element.
Quick Overview
This guide will show you how to create professional-looking silverware bundles that stay secure from the prep station to the reception table.
- Time needed: 1 to 2 hours for 100 settings
- Difficulty: Beginner
- What you’ll need: High-quality paper napkins, silverware sets, and optional decorative accents like twine or greenery.
Step-by-Step Instructions
Step 1: Source High-Quality Paper
Choose a napkin that feels substantial in the hand. For weddings, look for “linen-feel” or “airlaid” paper napkins rather than standard 2-ply grocery store versions.
Select a color that complements your table runners or floral arrangements. Neutral tones like cream, slate gray, or dusty rose tend to look the most sophisticated in paper form.
Check the size of the napkin before purchasing a bulk order. A standard 16×16 inch dinner napkin is the ideal size for most complex folding techniques.
Pro Tip: Order a single pack first to test the folding quality and ensure the paper doesn’t crack or tear at the creases.
Step 2: Prepare Your Workspace
Clear a large, flat surface like a dining table or a clean kitchen island. You need enough room to layout the napkins and stack the finished products.
Wash your hands thoroughly and dry them completely before touching the paper. Paper napkins absorb oils and moisture easily, which can leave visible marks on lighter colors.
Organize your silverware into piles of forks, knives, and spoons. Having everything within arm’s reach makes the assembly line process much faster.
Step 3: Execute The Classic Pocket Fold
Lay the napkin flat on the table with the patterned side (if any) facing down. Orient it so it looks like a square in front of you.
Fold the napkin in half from bottom to top. Then, fold it in half again from right to left to create a smaller square.
Turn the square so the open corners are at the top right. Take the top layer of the top-right corner and fold it down diagonally to the bottom-left corner.
Press the crease firmly with your finger. Repeat this with the second layer, tucking it slightly under the first fold to create a tiered effect.
Flip the entire napkin over carefully. Fold the right third toward the center, then fold the left third over that.
Flip it back over to reveal a neat pocket on the front. Slide your knife, fork, and spoon into the slot.
Pro Tip: Use a clean ruler to press down on the folds if you want a very sharp, formal appearance.
Step 4: Master The Diagonal Wrap
Position the napkin as a diamond shape with one point facing toward your body. Place the silverware vertically in the center of the diamond.
Bring the bottom point up over the ends of the silverware handles. This creates a secure base so the utensils don’t slide out the bottom.
Fold the left corner tightly over the silverware. Ensure the paper is taut against the metal to prevent shifting during transport.
Roll the silverware toward the right corner until the entire napkin is wrapped around the utensils. This creates a clean, cylindrical look.
Step 5: Add Decorative Accents
Wrap a piece of jute twine or silk ribbon around the center of your napkin bundle. A simple knot or a small bow adds a tactile element that hides the paper edges.
Tuck a sprig of dried lavender, a small eucalyptus leaf, or a piece of rosemary into the fold. Fresh herbs provide a lovely scent as guests sit down to eat.
Slide a custom paper belly band over the napkin. You can print these at home with your wedding date or a “Thank You” message to personalize the setting.
Step 6: Scale Your Production
Set a timer for ten minutes and see how many you can complete. This helps you estimate exactly how much time the entire project will take.
Invite friends or family to help with the process. One person can do the initial folds, another can insert the silverware, and a third can add the ribbon.
Maintain a consistent “finished” pile. Keeping them neatly stacked prevents the paper from wrinkling before they are placed on the tables.
Step 7: Store And Transport Safely
Place the finished wraps into shallow plastic bins or sturdy cardboard boxes. Lay them in single layers separated by parchment paper if you are using delicate accents like wax seals.
Keep the containers in a cool, dry place. Humidity is the enemy of paper napkins and can cause them to lose their crisp shape or become limp.
Label each box with the table numbers or the total count. This makes it much easier for the venue staff or your setup crew to distribute them on the wedding day.
Pro Tip: Do not stack the boxes too high. The weight of the silverware can crush the napkins in the bottom containers.
Common Mistakes to Avoid
Using Low-Ply Napkins
Standard grocery store napkins are often too thin to hold the weight of metal silverware. They tend to rip during the folding process or look translucent and cheap once the utensils are inserted.
Invest in premium paper that mimics the texture of fabric. This ensures the folds stay crisp and the presentation looks intentional rather than like an afterthought.
Overcrowding the Pocket
Trying to fit a heavy knife, a dinner fork, and a soup spoon into a small fold can cause the paper to bulge or tear. This ruins the clean lines of the design and makes it difficult for guests to remove the utensils.
If you have a large silverware set, choose a wrap style rather than a pocket style. This allows the paper to expand naturally around the bulk of the metal.
Folding Too Far in Advance
While it is tempting to get this task done weeks before the wedding, paper can absorb odors and dust over time. If stored in a garage or a damp basement, the napkins may lose their freshness.
Aim to complete the wrapping no more than three to five days before the event. This keeps the paper looking bright and the folds feeling firm.
Ignoring the Silverware Orientation
If the knives are facing different directions or the forks are at varying heights, the table will look cluttered. Inconsistency is the quickest way to make a DIY project look unprofessional.
Pick a standard height for the silverware handles. Ensure all knife blades face inward toward the other utensils for safety and etiquette.
Troubleshooting
The Napkins Keep Unraveling
If your folds aren’t staying in place, the paper might be too springy or the fold might be too loose. You can solve this by applying a small, clear adhesive dot to the underside of the final fold.
Alternatively, using a tighter ribbon or twine wrap will provide the structural integrity needed to keep the bundle together. Make sure the tie is snug but doesn’t pinch the paper significantly.
The Silverware Is Sliding Out
This usually happens when the bottom “lock” fold is too shallow. When you bring the bottom corner up over the handles, ensure it covers at least two inches of the silverware.
If the utensils are still sliding, try a different folding method that fully encloses the bottom of the set. The “Diamond Roll” is typically the most secure option for heavy silverware.
Visible Fingerprints Or Smudges
Darker colored paper napkins can sometimes show oil marks from your skin. If you notice spots on the paper, try wearing thin cotton gloves while folding.
If a smudge appears on a finished wrap, do not try to rub it off with water. It is better to discard that napkin and start fresh to maintain a polished look.
Key Takeaways
- Use high-quality, linen-feel paper napkins for the best aesthetic and durability.
- Always work on a clean, dry surface with freshly washed hands to avoid staining the paper.
- Create an assembly line to handle large quantities efficiently and maintain consistency.
- Secure the bundles with ribbon, twine, or greenery to add a professional touch.
- Store finished wraps in shallow, labeled bins to prevent crushing and simplify venue setup.
- Test your chosen fold with your specific silverware to ensure a perfect fit before mass-producing.
Frequently Asked Questions
Can I use paper napkins for a formal black-tie wedding?
Yes, you can certainly use paper napkins if you choose premium “linen-feel” options. Many modern couples opt for high-end disposables to save on rental costs and cleaning fees. When folded precisely and accented with elegant ribbons or wax seals, they are indistinguishable from cloth in photos.
What size napkin is best for a silverware pocket?
A 16×16 inch or 17×17 inch napkin is the industry standard for dinner service. Anything smaller than 15 inches will likely be too tight to hold a full set of silverware comfortably. If you are using smaller luncheon napkins, stick to a simple wrap rather than a complex pocket fold.
How many napkins should I order?
Always order at least 25% more napkins than your guest count. This accounts for folding mistakes, tears, and guests who may need an extra napkin during the meal. Having a surplus also allows you to test different folding styles without worry.
Should I put the napkin on the plate or next to it?
Silverware bundles look excellent placed directly in the center of the dinner plate. This creates a focal point for the table setting and ensures the guest sees your hard work immediately. If you have elaborate centerpieces, placing them to the left of the plate is a classic alternative.
Our Top Recommended Finds
- Linen-Feel Paper Napkins: Look for “Airlaid” technology which provides a soft, cloth-like texture and superior strength compared to standard paper.
- Pre-Cut Velvet Ribbon: Using pre-cut lengths of ribbon saves hours of prep time and ensures every bow looks identical across all tables.
- Clear Adhesive Glue Dots: These are perfect for securing stubborn folds without leaving visible marks or messy residue on the paper.
Setting Your Tables For Success
Now that you have the techniques down, you can start experimenting with colors and textures that match your wedding theme.
Try folding five different styles this weekend to see which one feels the most natural to you.
Once you choose a favorite, gather your wedding party for a folding session and turn a big task into a fun pre-wedding memory.
Your guests will appreciate the thoughtful detail, and your tables will look stunning in every photograph.