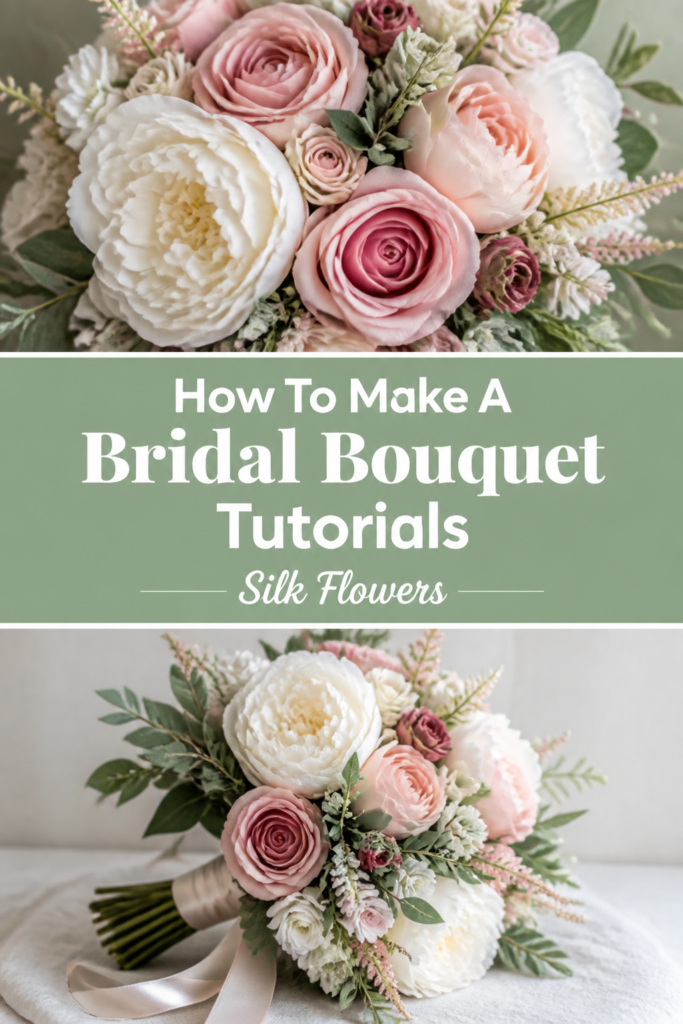
💐 How To Make A Bridal Bouquet Tutorials Silk Flowers
Crafting a bridal bouquet is a truly special endeavor. It adds a personal touch to any wedding day. I remember the joy of making a beautiful silk bouquet for my sister’s wedding, knowing it would last forever. This guide shares that hands-on experience, helping you create your own stunning arrangement with confidence.
Quick Overview
You are about to create a gorgeous, lasting silk bridal bouquet. This project is perfect for adding a personal, handmade touch to a wedding celebration. You’ll learn the techniques to assemble a professional-looking bouquet.
- Time needed: 2-4 hours (depending on complexity and experience)
- Difficulty: Beginner
- What you’ll need: Silk flowers, floral wire, floral tape, wire cutters, ribbon, scissors, greenery
Step-by-Step Instructions
Step 1: Gather Your Supplies
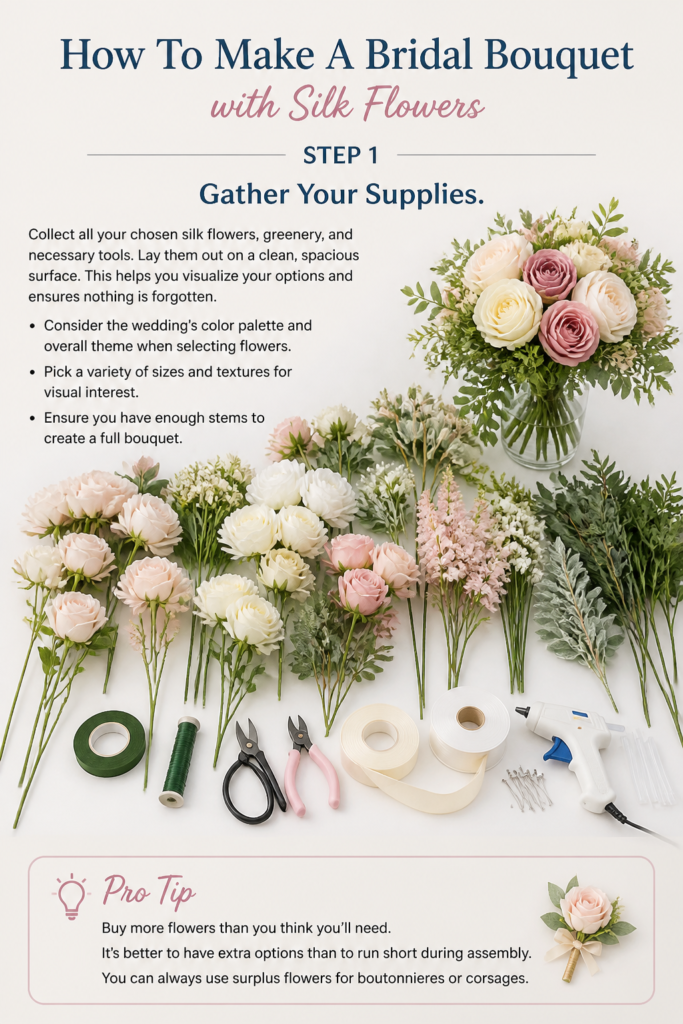
Collect all your chosen silk flowers, greenery, and necessary tools. Lay them out on a clean, spacious surface. This helps you visualize your options and ensures nothing is forgotten.
Consider the wedding’s color palette and overall theme when selecting flowers. Pick a variety of sizes and textures for visual interest. Ensure you have enough stems to create a full bouquet.
Pro Tip: Buy more flowers than you think you’ll need. It’s better to have extra options than to run short during assembly. You can always use surplus flowers for boutonnieres or corsages.
Step 2: Prepare Your Flowers
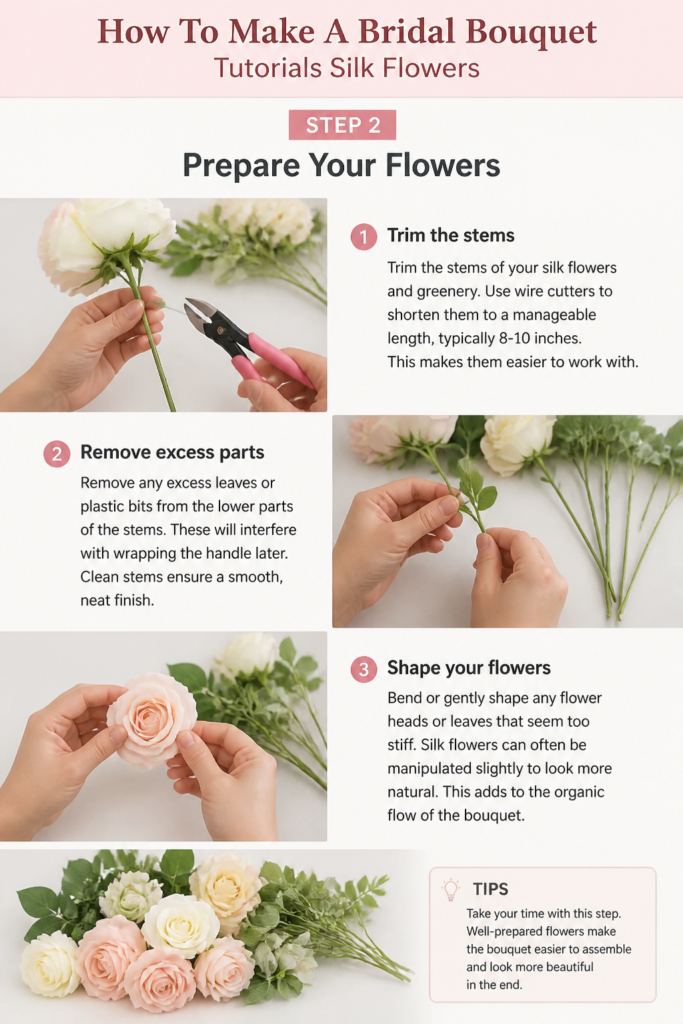
Trim the stems of your silk flowers and greenery. Use wire cutters to shorten them to a manageable length, typically 8-10 inches. This makes them easier to work with.
Remove any excess leaves or plastic bits from the lower parts of the stems. These will interfere with wrapping the handle later. Clean stems ensure a smooth, neat finish.
Bend or gently shape any flower heads or leaves that seem too stiff. Silk flowers can often be manipulated slightly to look more natural. This adds to the organic flow of the bouquet.
Step 3: Start the Core
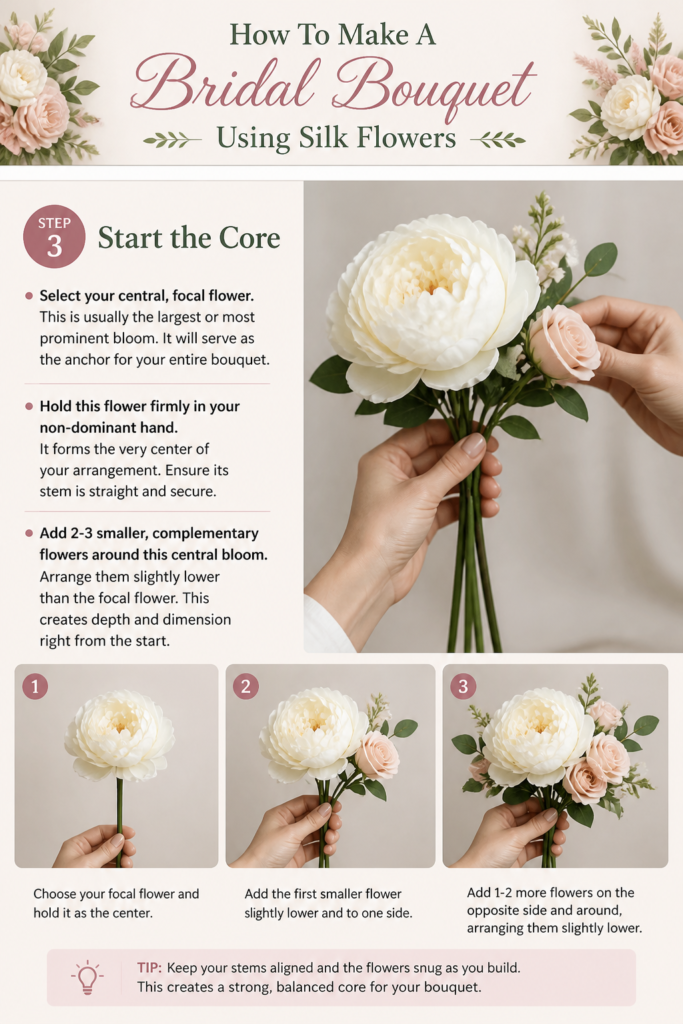
Select your central, focal flower. This is usually the largest or most prominent bloom. It will serve as the anchor for your entire bouquet.
Hold this flower firmly in your non-dominant hand. It forms the very center of your arrangement. Ensure its stem is straight and secure.
Add 2-3 smaller, complementary flowers around this central bloom. Arrange them slightly lower than the focal flower. This creates depth and dimension right from the start.
Step 4: Build Out the Shape

Continue adding flowers, rotating the bouquet as you go. Place blooms at varying heights and angles. This helps create a rounded, organic shape.
Incorporate different flower types and sizes. Mix larger statement flowers with smaller accent blooms. Distribute colors evenly throughout the arrangement.
Use the “spiral technique” for stem placement. Each new stem should be added at a slight angle, crossing over the previous stems. This creates a natural spiral in the stems. It also helps the bouquet stand on its own once finished.
Pro Tip: Step back frequently to assess your progress. Look at the bouquet from different angles. This helps identify any gaps or uneven areas early on.
Step 5: Add Filler and Greenery
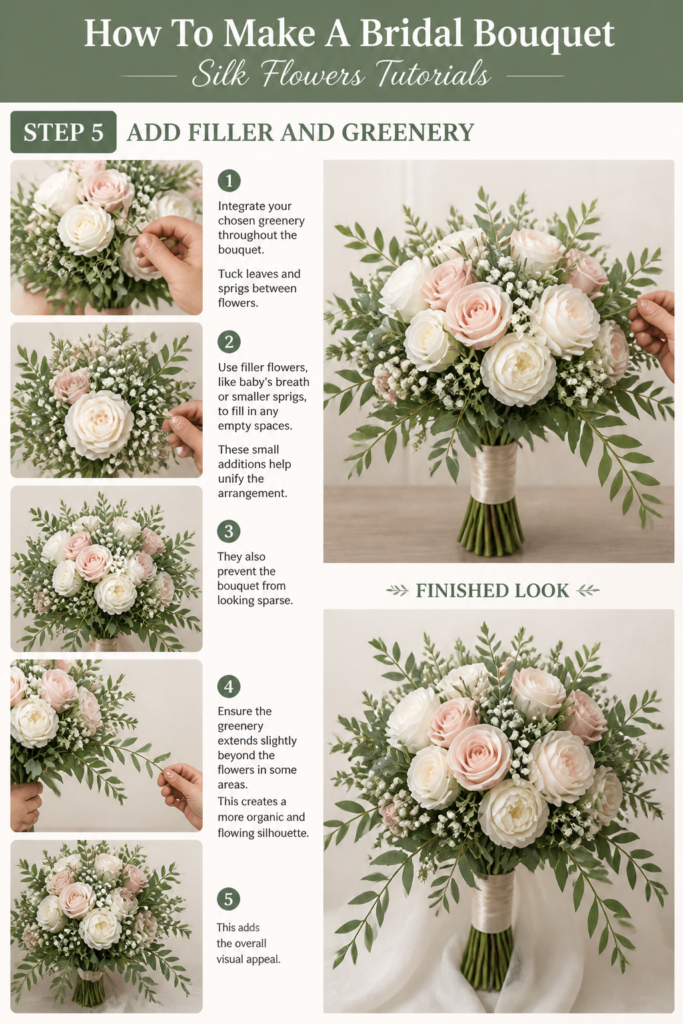
Integrate your chosen greenery throughout the bouquet. Tuck leaves and sprigs between flowers. Greenery adds texture, depth, and a natural feel.
Use filler flowers, like baby’s breath or smaller sprigs, to fill in any empty spaces. These small additions help unify the arrangement. They also prevent the bouquet from looking sparse.
Ensure the greenery extends slightly beyond the flowers in some areas. This creates a more organic and flowing silhouette. It adds to the overall visual appeal.
Step 6: Secure the Stems
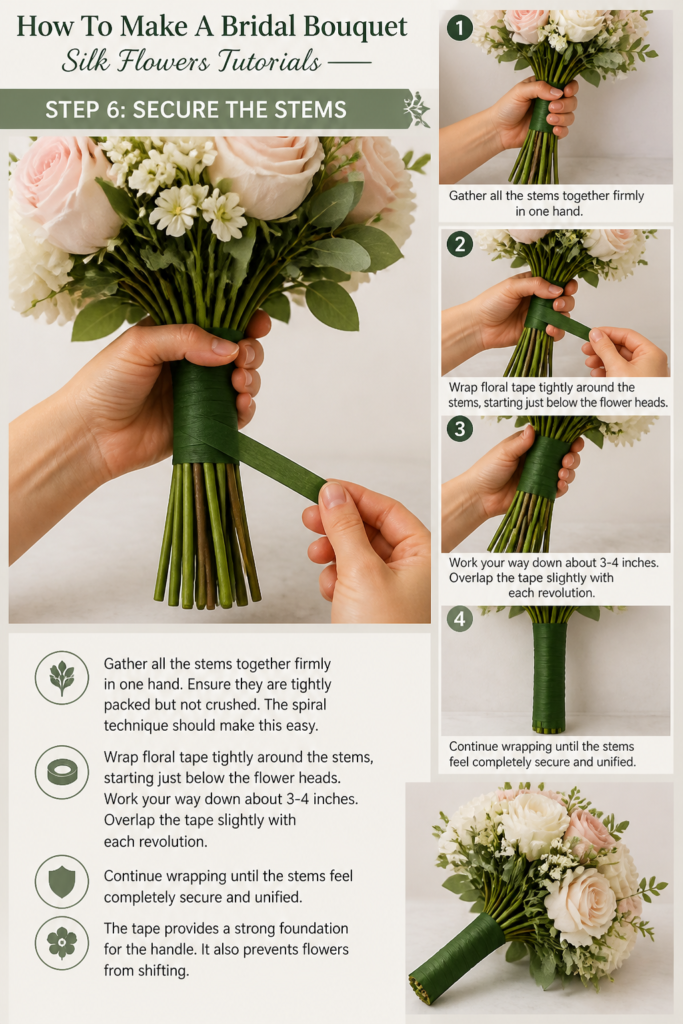
Gather all the stems together firmly in one hand. Ensure they are tightly packed but not crushed. The spiral technique should make this easy.
Wrap floral tape tightly around the stems, starting just below the flower heads. Work your way down about 3-4 inches. Overlap the tape slightly with each revolution.
Continue wrapping until the stems feel completely secure and unified. The tape provides a strong foundation for the handle. It also prevents flowers from shifting.
Step 7: Wrap the Handle
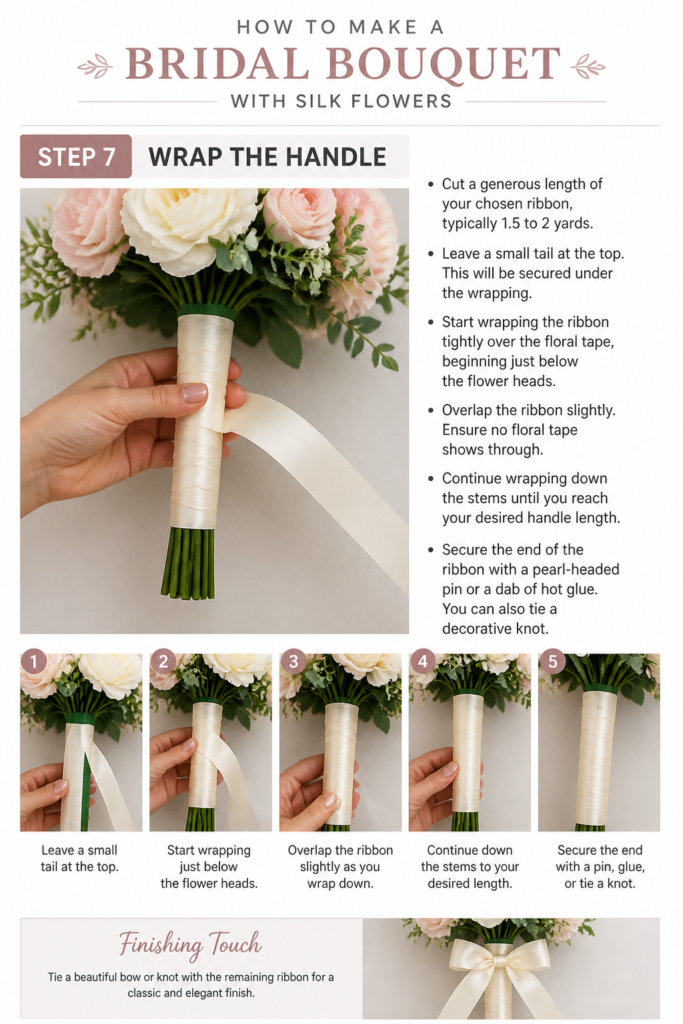
Cut a generous length of your chosen ribbon, typically 1.5 to 2 yards. Leave a small tail at the top. This will be secured under the wrapping.
Start wrapping the ribbon tightly over the floral tape, beginning just below the flower heads. Overlap the ribbon slightly. Ensure no floral tape shows through.
Continue wrapping down the stems until you reach your desired handle length. Secure the end of the ribbon with a pearl-headed pin or a dab of hot glue. You can also tie a decorative knot.
Step 8: Final Touches
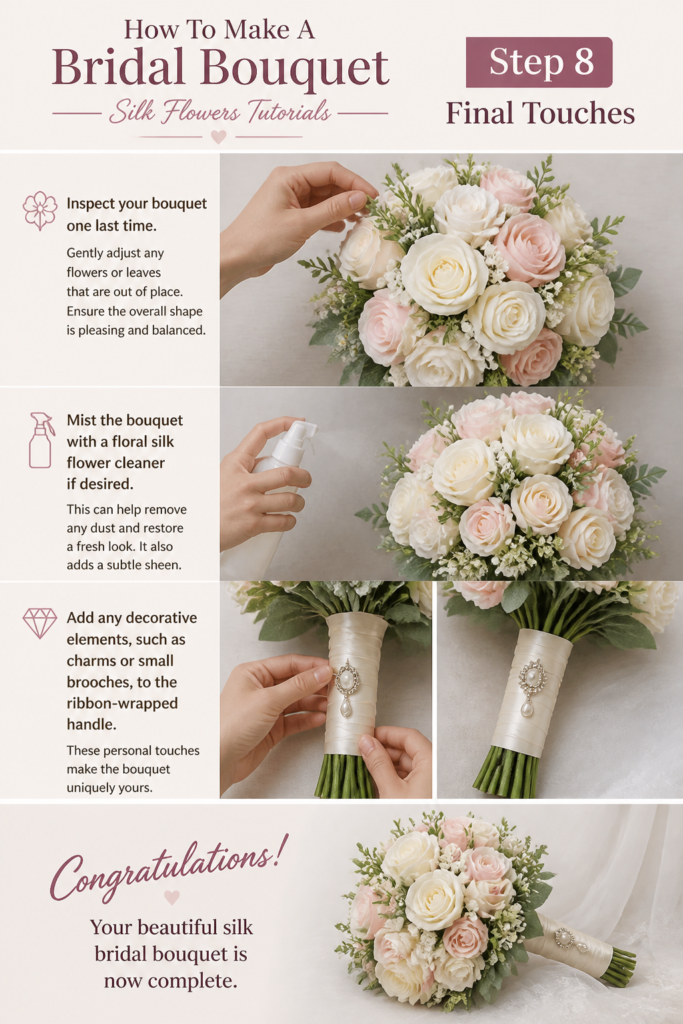
Inspect your bouquet one last time. Gently adjust any flowers or leaves that are out of place. Ensure the overall shape is pleasing and balanced.
Mist the bouquet with a floral silk flower cleaner if desired. This can help remove any dust and restore a fresh look. It also adds a subtle sheen.
Add any decorative elements, such as charms or small brooches, to the ribbon-wrapped handle. These personal touches make the bouquet uniquely yours. Your beautiful silk bridal bouquet is now complete.
Common Mistakes to Avoid
Over-stuffing the Bouquet
A common pitfall is adding too many flowers. This can make the bouquet look dense and heavy, losing its delicate appeal. It also makes individual blooms less noticeable.
Instead, aim for a balanced composition. Allow each flower some room to breathe. Use greenery and filler strategically to create fullness without overcrowding.
Ignoring Stem Preparation
Failing to trim or clean stems properly can lead to issues. Unprepared stems make the bouquet difficult to wrap. They can also create an uneven or messy handle.
Always take time to cut stems to uniform lengths. Remove any leaves below the point where the floral tape will start. This ensures a clean, professional finish.
Uneven Weight Distribution
If large flowers are all concentrated on one side, the bouquet will feel lopsided. This makes it uncomfortable to hold. It also looks visually unbalanced.
Distribute your larger, heavier blooms evenly throughout the bouquet. Use smaller flowers and greenery to fill gaps and balance the weight. Rotate the bouquet constantly during assembly.
Forgetting Greenery
A bouquet composed solely of flowers can sometimes look flat or unnatural. Greenery provides essential texture, depth, and a natural backdrop. It helps the colors of the flowers pop.
Always include a variety of greens in your bouquet. Tuck them in and around the flowers. This adds life and dimension, making the arrangement appear more organic.
Troubleshooting
Bouquet Looks Flat
If your bouquet lacks dimension and appears two-dimensional, it’s often due to flowers being placed at the same height. This can make the arrangement look less dynamic. It also loses its natural appeal.
Solution: Gently pull some flowers slightly higher or push others a bit lower. Create varying levels of depth within the arrangement. Angle some blooms outwards to break up the flat surface and add movement.
Stems Feel Loose
A loose stem bundle means your flowers might shift or fall out. This indicates insufficient or improperly applied floral tape. It can compromise the bouquet’s stability.
Solution: Unwrap the ribbon and re-tape the stems. Ensure you wrap the floral tape very tightly and overlap each layer. Start just below the flower heads and extend down several inches. This creates a much more secure base.
Ribbon Unraveling
If the decorative ribbon on your handle starts to loosen or unravel, it wasn’t secured properly at the start or end. This can ruin the finished look of your bouquet. It also exposes the floral tape underneath.
Solution: Re-wrap the ribbon, making sure to secure both ends firmly. Use a strong pearl-headed pin inserted through the ribbon and into the stem base. A small dab of hot glue on the inside of the ribbon at the start and end also provides excellent hold.
Key Takeaways
- Preparation is Key: Always trim and clean your silk flower stems before assembly for a neat finish.
- Build a Strong Core: Start with a central focal flower and build outwards in a spiral for a stable structure.
- Vary Heights and Textures: Incorporate different flower sizes, heights, and plenty of greenery to add depth and interest.
- Secure Tightly: Use floral tape firmly around the stems to prevent shifting and ensure the bouquet holds its shape.
- Personalize the Handle: Wrap the handle neatly with ribbon and add personal touches to make it uniquely yours.
- Step Back and Assess: Regularly view your bouquet from all angles during creation to ensure balance and fullness.
Frequently Asked Questions
Can I mix real and silk flowers in a bridal bouquet?
While technically possible, mixing real and silk flowers isn’t generally recommended for a bridal bouquet. Real flowers require water and can wilt, which might affect the silk blooms. They also have different weights and textures.
It’s usually best to choose one type of flower for consistency. If you love the look, consider using real flowers for the bridal bouquet and silk for bridesmaids or decor.
How far in advance can I make a silk bridal bouquet?
One of the greatest advantages of silk flowers is their longevity. You can create your bridal bouquet several months in advance. This alleviates stress closer to the wedding day.
Just be sure to store it properly. Keep it in a dust-free environment, away from direct sunlight. This preserves its colors and pristine condition.
How do I store the finished silk bouquet?
Store your completed silk bouquet in a sturdy box. Use acid-free tissue paper to gently cushion it. Avoid crushing the blooms.
Keep the box in a cool, dry place away from direct sunlight. Sunlight can fade the colors over time. A closet or an under-bed storage container works perfectly.
What type of ribbon is best for the handle?
Satin ribbon is a very popular choice for bouquet handles. It offers a luxurious sheen and a smooth texture. Grosgrain ribbon is another excellent option, providing a slightly more textured look and good grip.
Consider the wedding’s style and your personal preference. Ensure the ribbon is wide enough to cover the floral tape completely, typically 1.5 to 2 inches.
Our Top Recommended Finds
- High-Quality Silk Flower Assortment: Investing in realistic-looking silk flowers elevates your bouquet. Look for options with varied textures and natural color gradients.
- Professional Floral Wire Cutters: Good quality wire cutters make trimming thick silk stems effortless and precise. They prevent hand strain and ensure clean cuts.
- Premium Satin Ribbon Set: A multi-roll satin ribbon set in various widths and colors provides versatility. It ensures you have the perfect finishing touch for your handle.
Your Masterpiece Awaits
You now possess the knowledge and steps to craft a breathtaking silk bridal bouquet. This beautiful creation will be a cherished keepsake long after the wedding day. The process is rewarding, offering a chance to pour your love and creativity into a significant item.
Why wait to start your floral journey? Gather your chosen blooms and begin building your dream bouquet today. Consider exploring other silk flower arrangements, like boutonnieres or centerpieces, to match your new skills. Embrace the joy of creating something truly beautiful with your own hands.