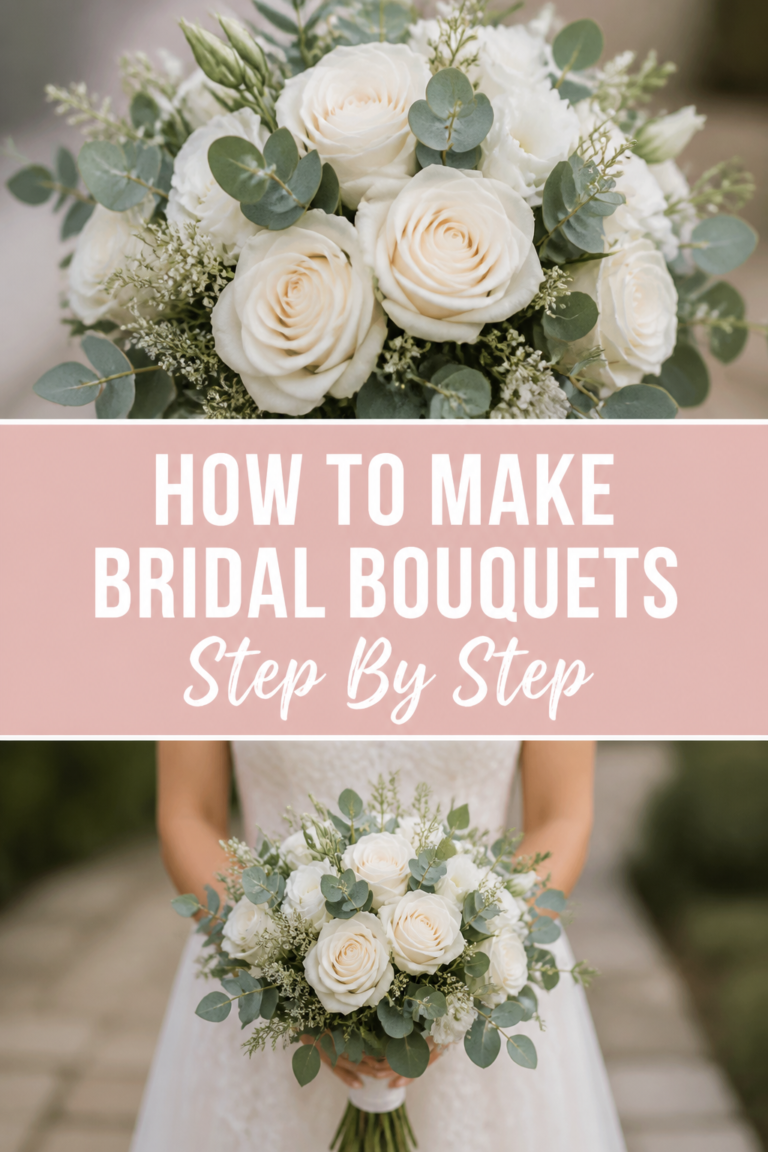
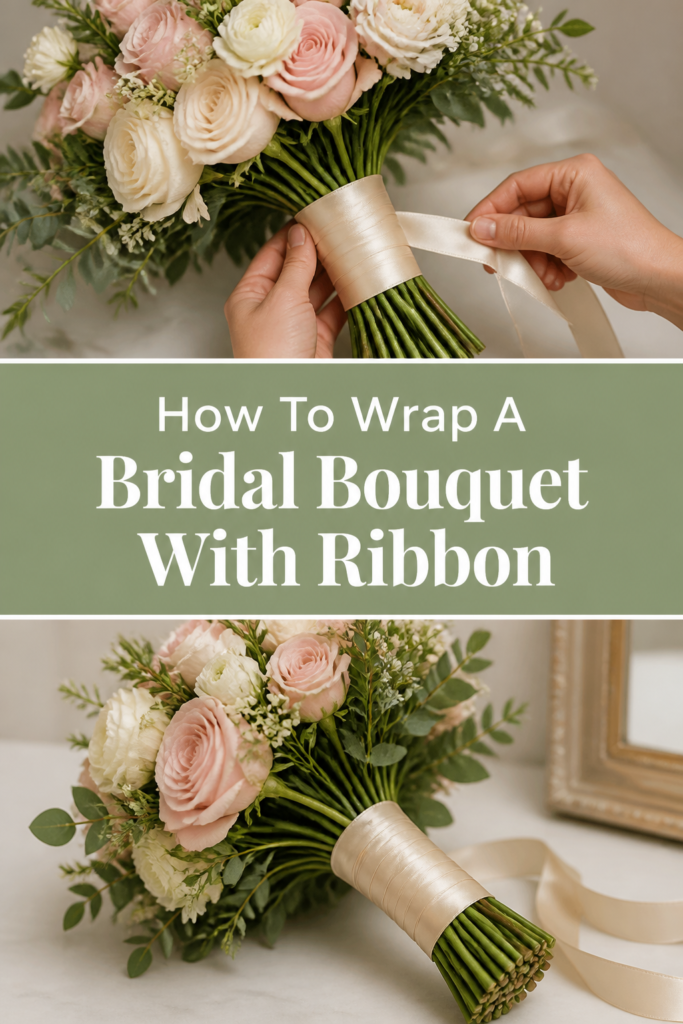
💐 How To Wrap A Bridal Bouquet With Ribbon
The final wrap on a bridal bouquet is the finishing touch that transforms a bundle of flowers into a professional piece of floral art.
During my years working in a high-end floral boutique, I learned that the ribbon handle is just as important as the blooms themselves for the bride’s comfort and photos.
This guide shares the exact techniques used by professionals to ensure your bouquet stays secure, comfortable, and beautiful from the first look to the final dance.
Quick Overview
Wrapping a bouquet is a tactile process that requires patience and a steady hand to achieve a smooth, high-end finish.
- Time needed: 15 to 20 minutes
- Difficulty: Intermediate
- What you’ll need: Floral shears, stem wrap tape, high-quality ribbon, pearl-headed pins, and a towel.
Step-by-Step Instructions
Step 1: Clean and Dry the Stems
Prepare the bouquet by ensuring all foliage has been stripped from the handle area where the ribbon will sit.
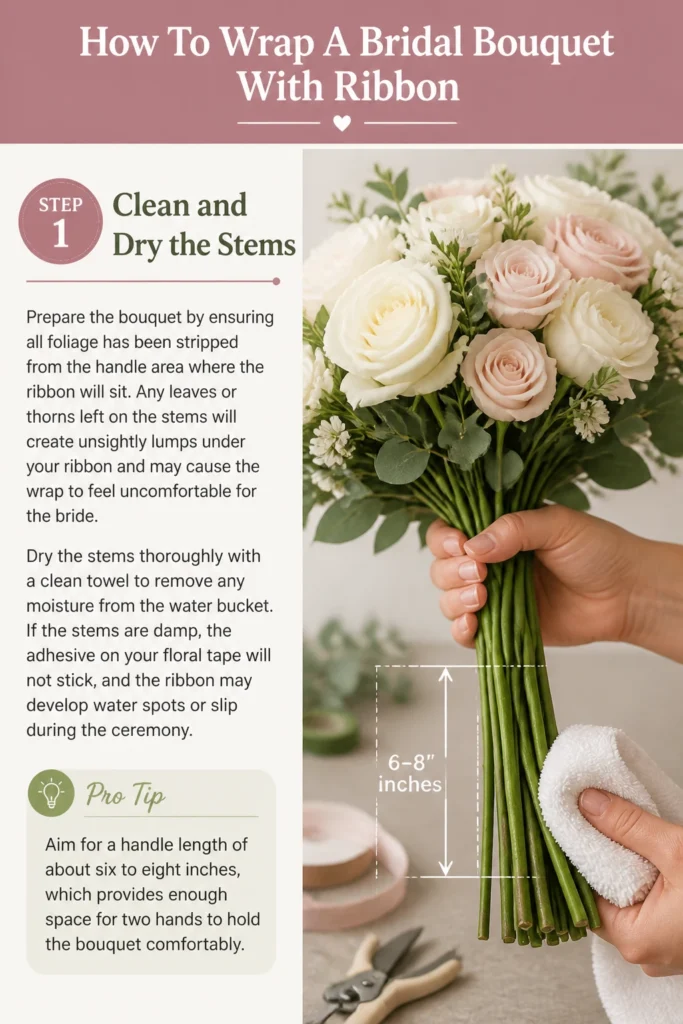
Any leaves or thorns left on the stems will create unsightly lumps under your ribbon and may cause the wrap to feel uncomfortable for the bride.
Dry the stems thoroughly with a clean towel to remove any moisture from the water bucket.
If the stems are damp, the adhesive on your floral tape will not stick, and the ribbon may develop water spots or slip during the ceremony.
Pro Tip: Aim for a handle length of about six to eight inches, which provides enough space for two hands to hold the bouquet comfortably.
Step 2: Create a Solid Foundation with Floral Tape
Secure the stems together using green floral tape, starting about an inch below the bloom heads.

Stretch the tape as you wrap it around the stems to activate the wax-based adhesive that makes it tacky and secure.
Wrap downward in a tight spiral, overlapping the tape slightly until you reach the point where you want the ribbon wrap to end.
This tape layer acts as a “grip” for the ribbon, preventing the fabric from sliding up and down the smooth, slick stems of the flowers.
Step 3: Measure and Cut Your Ribbon
Select a ribbon that complements the wedding palette, typically choosing between satin, grosgrain, or hand-dyed silk.
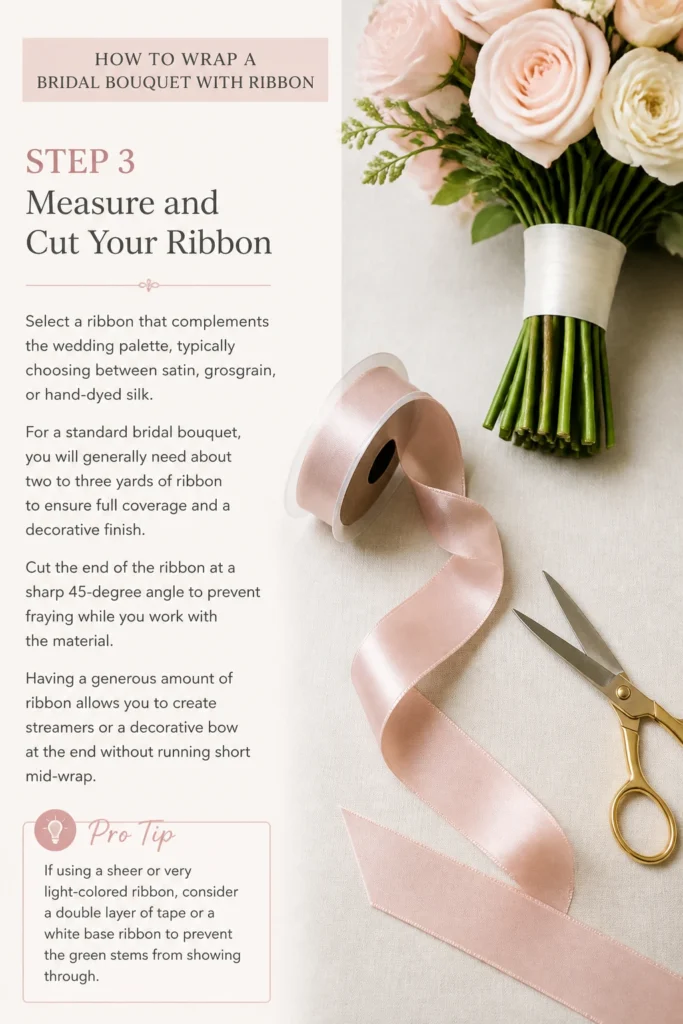
For a standard bridal bouquet, you will generally need about two to three yards of ribbon to ensure full coverage and a decorative finish.
Cut the end of the ribbon at a sharp 45-degree angle to prevent fraying while you work with the material.
Having a generous amount of ribbon allows you to create streamers or a decorative bow at the end without running short mid-wrap.
Pro Tip: If using a sheer or very light-colored ribbon, consider a double layer of tape or a white base ribbon to prevent the green stems from showing through.
Step 4: Secure the Starting Point
Place the end of the ribbon at the top of the handle, just under the lowest blooms of the bouquet.
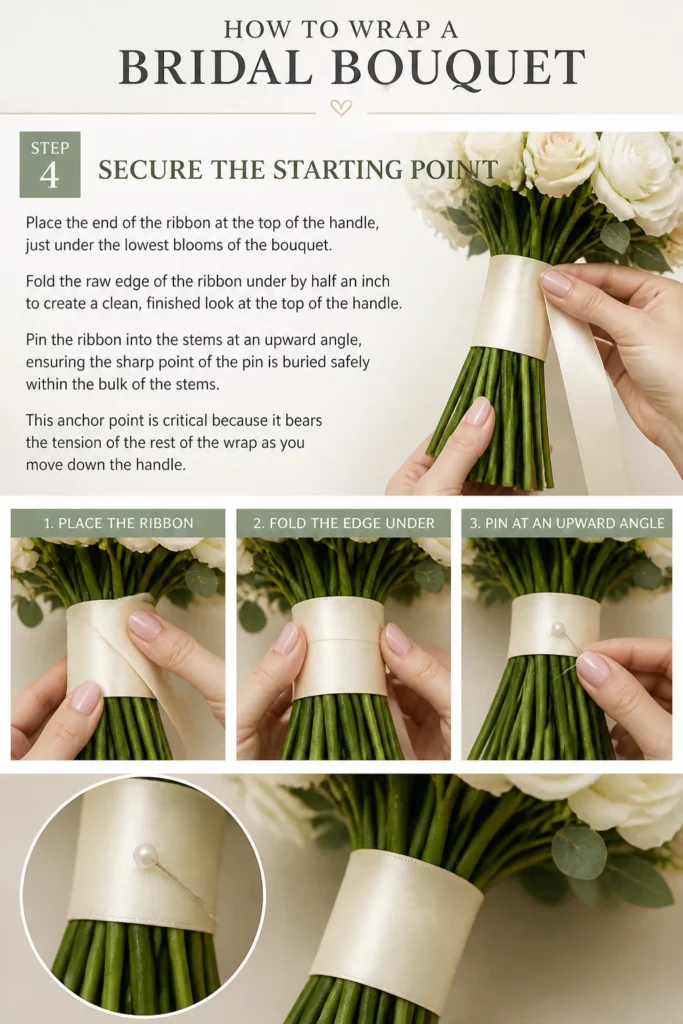
Fold the raw edge of the ribbon under by half an inch to create a clean, finished look at the top of the handle.
Pin the ribbon into the stems at an upward angle, ensuring the sharp point of the pin is buried safely within the bulk of the stems.
This anchor point is critical because it bears the tension of the rest of the wrap as you move down the handle.
Step 5: Execute the Spiral Wrap
Hold the bouquet firmly in one hand while using your dominant hand to guide the ribbon around the stems.
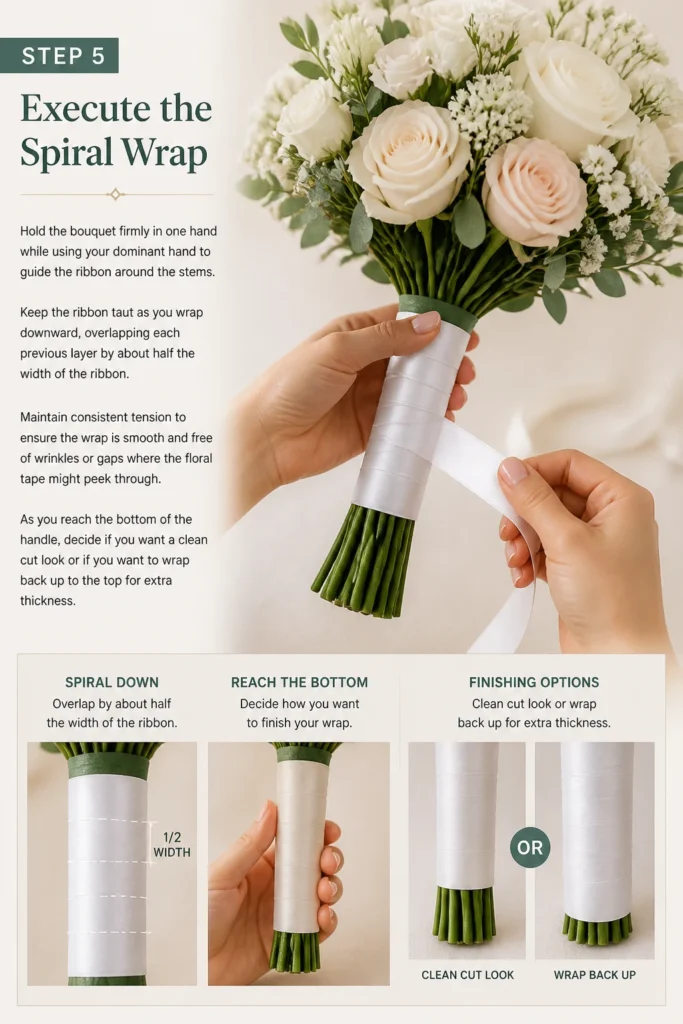
Keep the ribbon taut as you wrap downward, overlapping each previous layer by about half the width of the ribbon.
Maintain consistent tension to ensure the wrap is smooth and free of wrinkles or gaps where the floral tape might peek through.
As you reach the bottom of the handle, decide if you want a “clean cut” look or if you want to wrap back up to the top for extra thickness.
Step 6: Finish the Bottom Edge
Fold the ribbon over the bottom of the stems if you want a fully enclosed handle, or stop just above the cut ends for an “exposed stem” look.
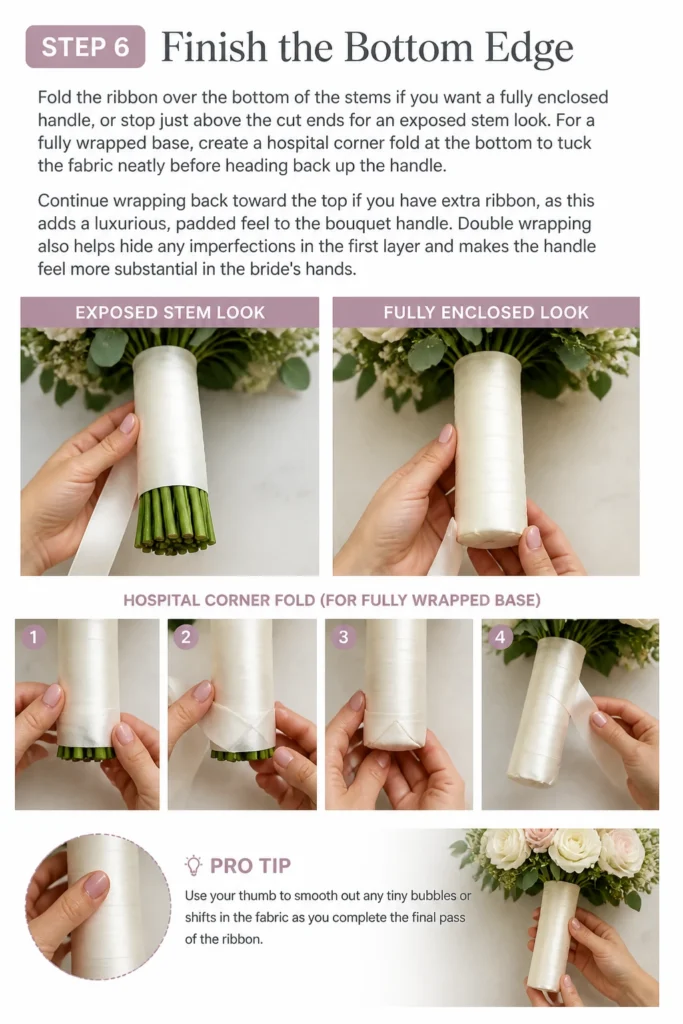
For a fully wrapped base, create a “hospital corner” fold at the bottom to tuck the fabric neatly before heading back up the handle.
Continue wrapping back toward the top if you have extra ribbon, as this adds a luxurious, padded feel to the bouquet handle.
Double wrapping also helps hide any imperfections in the first layer and makes the handle feel more substantial in the bride’s hands.
Pro Tip: Use your thumb to smooth out any tiny bubbles or shifts in the fabric as you complete the final pass of the ribbon.
Step 7: Insert the Decorative Pins
Align a row of pearl-headed pins along the “seam” of the ribbon where the end meets the wrap.
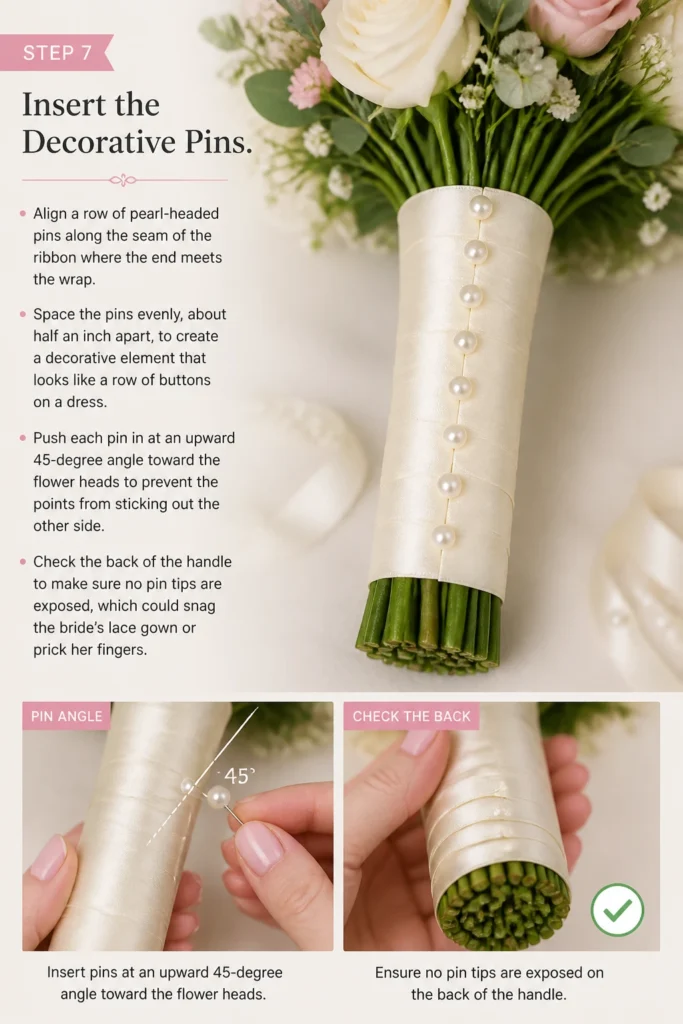
Space the pins evenly, about half an inch apart, to create a decorative element that looks like a row of buttons on a dress.
Push each pin in at an upward 45-degree angle toward the flower heads to prevent the points from sticking out the other side.
Check the back of the handle to make sure no pin tips are exposed, which could snag the bride’s lace gown or prick her fingers.
Step 8: Add Streamers or a Bow
Tie a separate length of ribbon around the top of the handle if the bride desires long, flowing streamers.
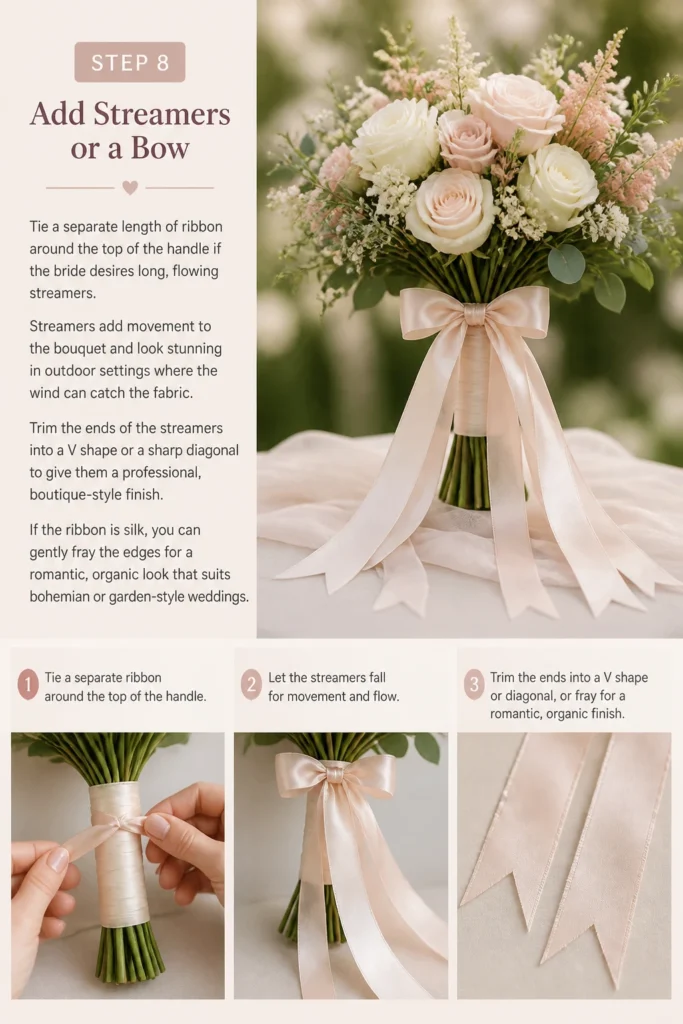
Streamers add movement to the bouquet and look stunning in outdoor settings where the wind can catch the fabric.
Trim the ends of the streamers into a “V” shape or a sharp diagonal to give them a professional, boutique-style finish.
If the ribbon is silk, you can gently fray the edges for a romantic, organic look that suits bohemian or garden-style weddings.
Common Mistakes to Avoid
Wrapping Over Wet Stems
Many beginners rush the process and wrap the ribbon while the stems are still dripping with water from the vase.
This moisture eventually seeps into the ribbon, causing dark spots and potentially encouraging mold if the bouquet is prepared a day in advance.
Always take the time to pat each stem dry and let the bouquet sit for five minutes before applying the floral tape and ribbon.
Using Too Much Tension
While the wrap needs to be tight, pulling too hard on delicate silk or thin satin can cause the fabric to pucker or even tear.
Excessive tension can also squeeze the stems too tightly, potentially bruising softer stems like tulips or ranunculus.
Find a balance where the ribbon is snug enough not to move but relaxed enough to lay flat against the handle.
Exposed Pin Points
One of the most dangerous mistakes is inserting pins horizontally through the stems, which often results in the sharp tip exiting the other side.
A bride will be moving her hands frequently, and an exposed pin can cause a painful injury or ruin an expensive silk dress.
Always angle pins upward and feel around the entire handle with your hand to ensure it is perfectly smooth and safe.
Troubleshooting
The Ribbon is Slipping Down
If the ribbon starts to slide toward the bottom of the bouquet, it usually means the floral tape layer underneath was not tacky enough.
You can fix this by unwrapping the ribbon and adding a fresh layer of floral tape, making sure to stretch the tape to activate its stickiness.
Alternatively, you can use a tiny dot of floral adhesive or a small piece of double-sided tape at the top and bottom to lock the ribbon in place.
The Handle Feels Too Bulky
A handle that is too thick can be difficult for a bride with smaller hands to hold comfortably for several hours.
This often happens if you use too many layers of floral tape or a very thick, heavy-gauge ribbon like velvet.
To fix this, trim the stems more aggressively and use a single layer of high-quality, thin satin ribbon to keep the profile slim.
The Ribbon Shows Green Through the Fabric
Light-colored ribbons, especially white or cream, often become slightly transparent when pulled tight against dark green stems.
If you see green peeking through, you should wrap the handle first with white floral tape instead of the standard green version.
If white tape is unavailable, a base layer of inexpensive white grosgrain ribbon will provide the opacity needed for the top layer to look perfect.
Key Takeaways
- Dry stems are mandatory to prevent ribbon staining and slipping during the wedding day.
- Floral tape provides the grip necessary to keep the ribbon from sliding off the smooth flower stems.
- Angle your pins upward into the center of the stems to protect the bride’s hands and her wedding gown.
- Overlap by half the width of the ribbon to ensure full coverage and a smooth, professional texture.
- Choose ribbon carefully based on the wedding style, using silk for romantic looks and satin for classic elegance.
- Check for safety by running your hand over the finished handle to ensure no sharp points or rough edges exist.
Frequently Asked Questions
How many yards of ribbon do I need for a bridal bouquet?
Most standard bridal bouquets require between two and three yards of ribbon for a full wrap with a few short streamers. If you want very long, floor-length streamers or a large, multi-looped bow, you should plan for five to six yards to be safe.
Can I use hot glue to secure the ribbon?
Hot glue is generally discouraged because the heat can damage the delicate stems of the flowers and cause them to wilt faster. Furthermore, hot glue can create hard lumps under the ribbon, whereas pins allow for a much smoother and more adjustable finish.
What type of pins are best for bouquet wraps?
Pearl-headed corsage pins are the industry standard because they are long enough to grip the stems and the pearl head adds a decorative touch. Ensure you use pins with a sharp point and a stainless steel shaft to prevent any rusting if they come into contact with moisture.
Should I wrap the bouquet the night before or the morning of the wedding?
It is best to wrap the bouquet the morning of the wedding to ensure the ribbon stays fresh and dry. If you must wrap it the night before, keep the bouquet in a cool place and ensure the ribbon does not touch the water in the storage vase.
Our Top Recommended Finds
- Professional Floral Shears: A sharp, ergonomic pair of shears ensures clean stem cuts that won’t crush the water-conducting vessels of the flowers.
- Pearl-Headed Corsage Pins: These pins provide the perfect blend of security and aesthetic appeal for the back of the bouquet handle.
- Hand-Dyed Silk Ribbon: For a high-end look, silk ribbon offers a soft drape and beautiful texture that photographs much better than synthetic alternatives.
Perfecting Your Floral Presentation
Now that you have mastered the art of the ribbon wrap, you can experiment with different textures and styles to match any wedding theme.
Consider trying a “French Braid” wrap for a more intricate look, or using twine for a rustic, woodland-inspired celebration.
Practice your technique on a few grocery store bundles this week to build your confidence before the big day arrives.