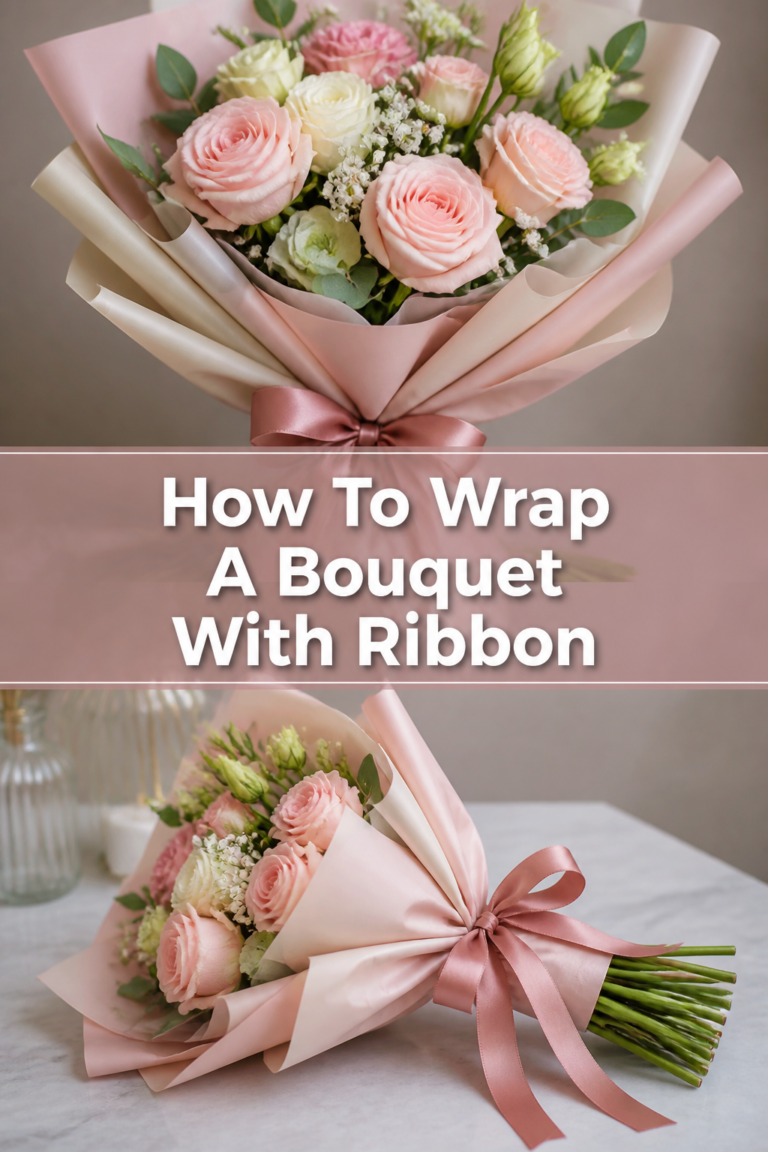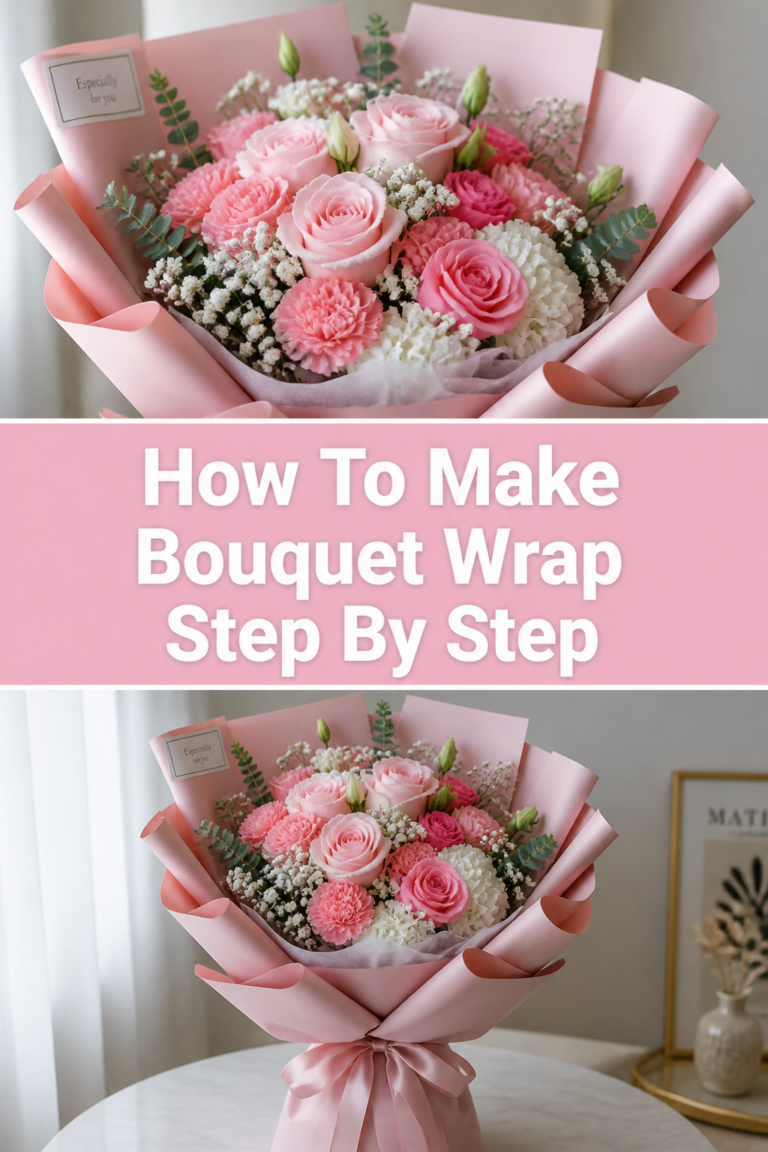
🌸 How To Make Floral Swag For Wedding Arch
I still remember the nervous excitement of designing my first wedding arch for a close friend’s summer ceremony.
The scent of fresh eucalyptus filled the room as I realized that a beautiful floral swag is more than just decor; it is the frame for one of life’s most significant moments.
This guide shares the professional techniques and personal shortcuts I have learned to help you create a stunning, secure floral arrangement with confidence.

Quick Overview
Creating a floral swag is a rewarding project that allows you to customize your wedding aesthetic perfectly. You will learn how to build a stable base, layer textures, and ensure your blooms stay fresh through the entire ceremony.
- Time needed: 2 to 4 hours (plus flower prep time)
- Difficulty: Intermediate
- What you’ll need: Floral foam cages, zip ties, floral wire, pruning shears, greenery, focal flowers, filler flowers, and a spray bottle.
Step-by-Step Instructions
Step 1: Prepare Your Workstation and Flowers
Clean your workspace thoroughly to ensure no dirt or debris gets onto your petals. You need a large, flat table that is at a comfortable height for standing, as you will want to move around your arrangement.
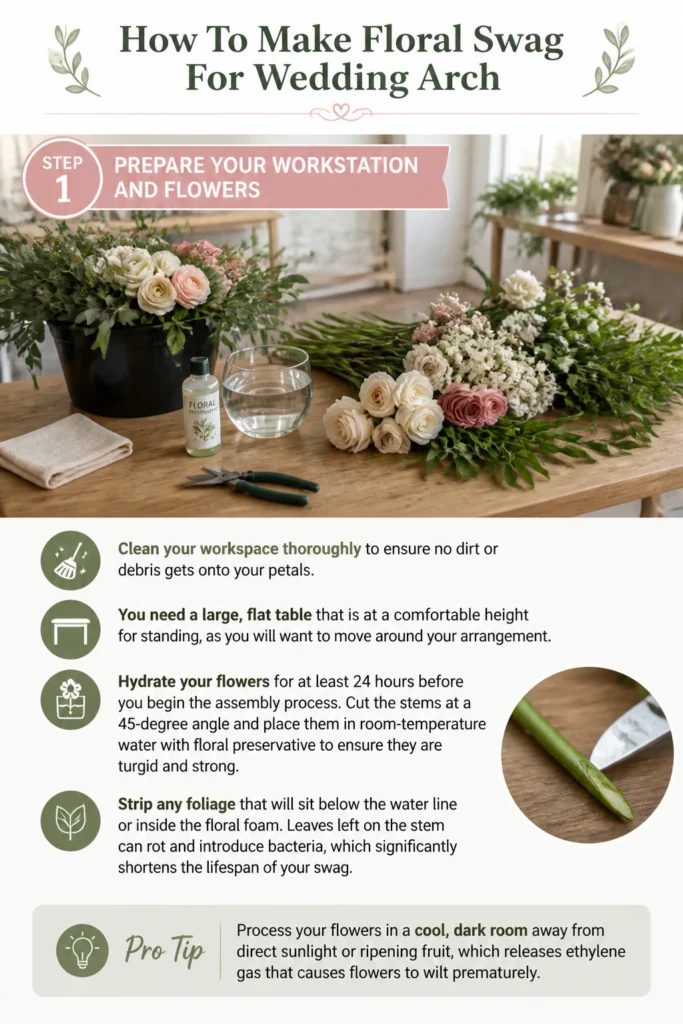
Hydrate your flowers for at least 24 hours before you begin the assembly process. Cut the stems at a 45-degree angle and place them in room-temperature water with floral preservative to ensure they are turgid and strong.
Strip any foliage that will sit below the water line or inside the floral foam. Leaves left on the stem can rot and introduce bacteria, which significantly shortens the lifespan of your swag.
Pro Tip: Process your flowers in a cool, dark room away from direct sunlight or ripening fruit, which releases ethylene gas that causes flowers to wilt prematurely.
Step 2: Soak Your Floral Foam Cages
Submerge your floral foam cages in a bucket of water mixed with flower food. Do not push the foam down into the water; let it sink naturally so that air bubbles are not trapped inside the core.
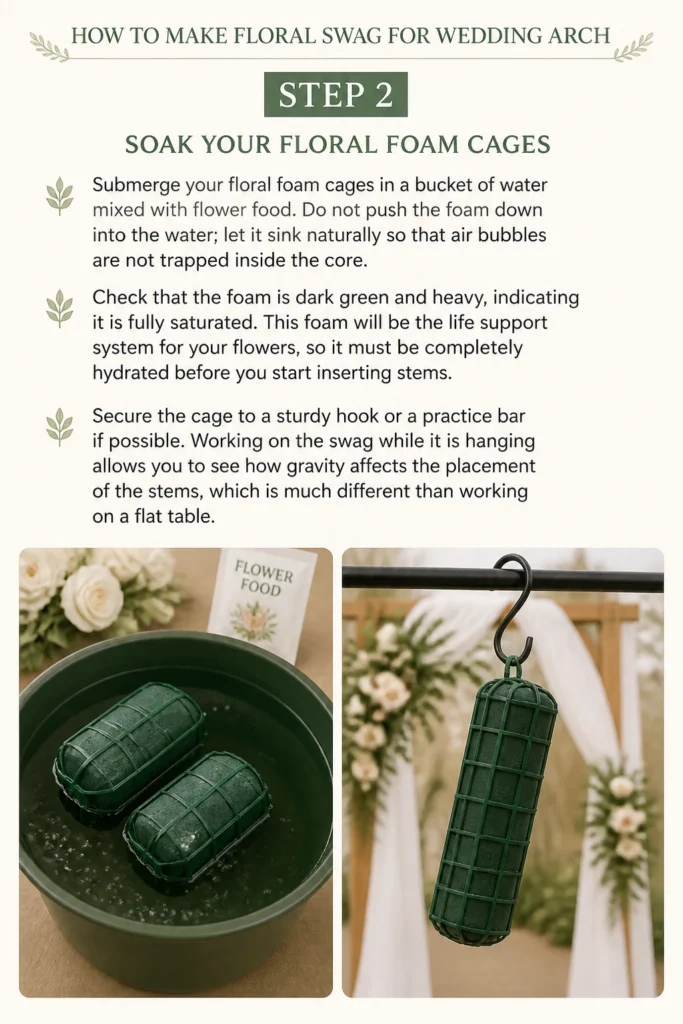
Check that the foam is dark green and heavy, indicating it is fully saturated. This foam will be the life support system for your flowers, so it must be completely hydrated before you start inserting stems.
Secure the cage to a sturdy hook or a practice bar if possible. Working on the swag while it is hanging allows you to see how gravity affects the placement of the stems, which is much different than working on a flat table.
Step 3: Establish the Greenery Skeleton
Define the overall shape and length of your swag using long, sturdy greenery like Italian Ruscus or Eucalyptus. Start by inserting stems into the ends of the foam cage to establish the horizontal or vertical reach of the piece.
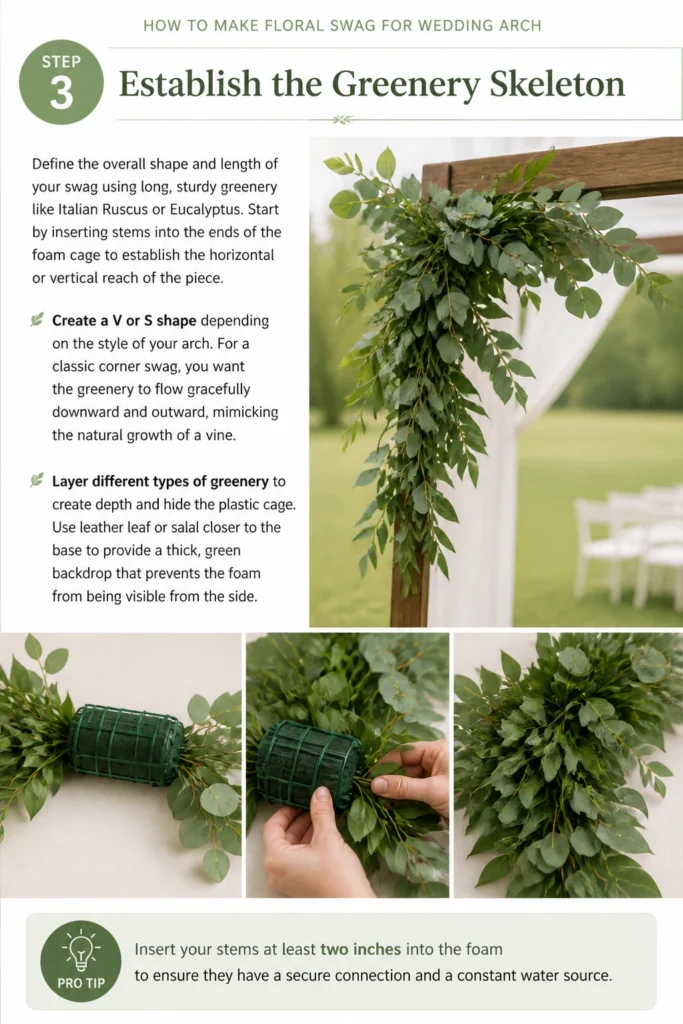
Create a “V” or “S” shape depending on the style of your arch. For a classic corner swag, you want the greenery to flow gracefully downward and outward, mimicking the natural growth of a vine.
Layer different types of greenery to create depth and hide the plastic cage. Use leather leaf or salal closer to the base to provide a thick, green backdrop that prevents the foam from being visible from the side.
Pro Tip: Insert your stems at least two inches into the foam to ensure they have a secure connection and a constant water source.
Step 4: Place Your Focal Flowers
Select your largest, most impactful blooms to serve as the focal points. These are usually roses, peonies, or dahlias that draw the eye toward the center of the arrangement.
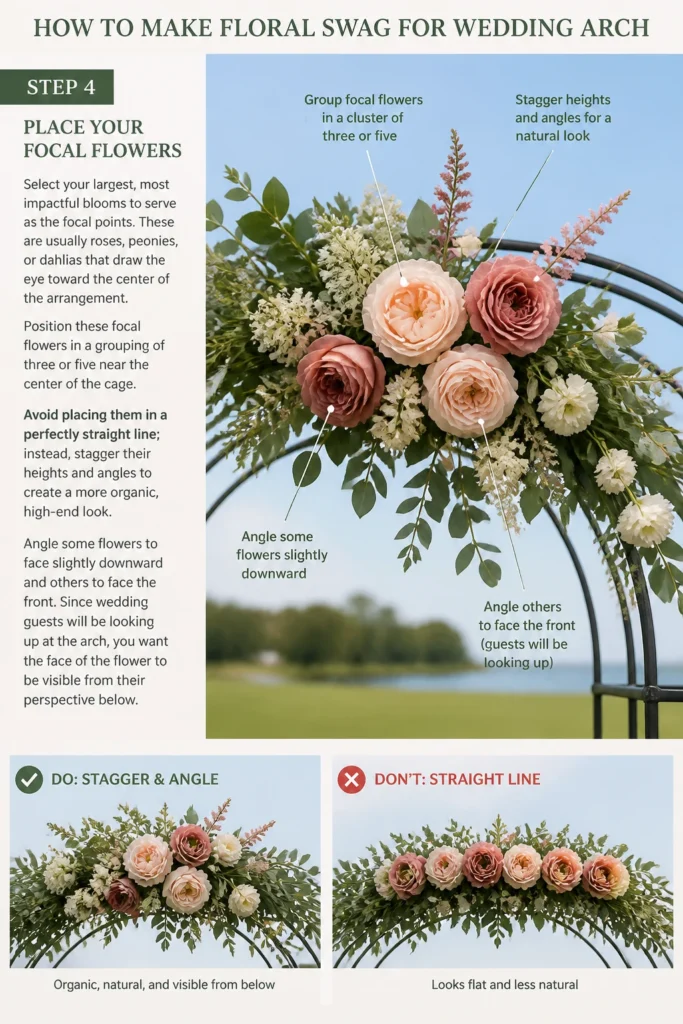
Position these focal flowers in a grouping of three or five near the center of the cage. Avoid placing them in a perfectly straight line; instead, stagger their heights and angles to create a more organic, high-end look.
Angle some flowers to face slightly downward and others to face the front. Since wedding guests will be looking up at the arch, you want the “face” of the flower to be visible from their perspective below.
Step 5: Integrate Secondary Blooms
Add medium-sized flowers like spray roses, ranunculus, or carnations around your focal pieces. These flowers bridge the gap between the large blooms and the greenery, softening the transitions.
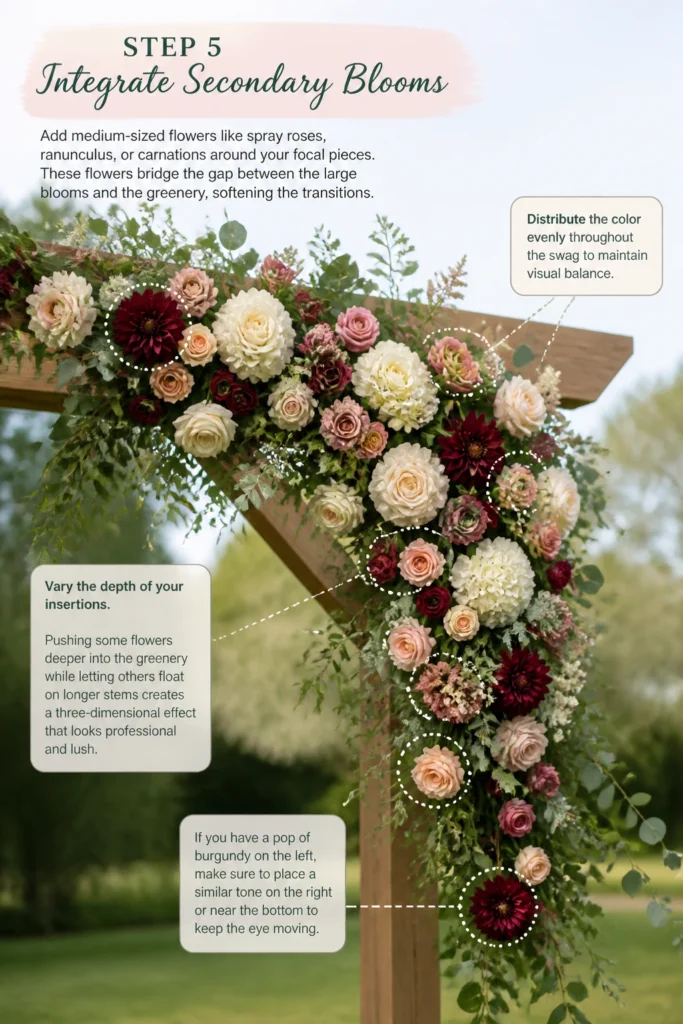
Distribute the color evenly throughout the swag to maintain visual balance. If you have a pop of burgundy on the left, make sure to place a similar tone on the right or near the bottom to keep the eye moving.
Vary the depth of your insertions. Pushing some flowers deeper into the greenery while letting others “float” on longer stems creates a three-dimensional effect that looks professional and lush.
Step 6: Add Texture and Filler
Insert delicate filler flowers like baby’s breath, waxflower, or feverfew into the remaining small gaps. These elements add a sense of airiness and fill in any spots where the foam might still be peeking through.

Incorporate textured elements like berries, thistle, or dried grasses for a modern touch. These materials provide a contrast to the soft petals and give the swag a more complex, interesting personality.
Step back frequently to look at the arrangement from a distance. What looks good from six inches away might look cluttered or lopsided from ten feet away, which is where the guests will be seated.
Pro Tip: Use a mirror to look at your arrangement. Seeing the reflection helps your brain spot gaps or asymmetrical areas that you might have missed looking at it directly.
Step 7: Secure the Swag to the Arch
Transport the swag carefully to the wedding venue, ideally in a cool vehicle. Use a large plastic bin or a specialized floral box to keep it from rolling over and crushing the delicate blooms.

Attach the swag to the arch using heavy-duty zip ties. Thread the zip ties through the plastic cage of the foam and around the wooden or metal frame of the arch, pulling them tight until the swag does not wobble.
Hide the zip ties by tucking a few loose stems of greenery or a stray bloom under the plastic strap. This ensures the mechanics are invisible to the guests and the camera.
Step 8: Final Touches and Hydration
Mist the entire arrangement with a finishing spray or plain water from a fine-mist bottle. This helps seal the petals and keeps the humidity high around the flowers, which is vital for outdoor ceremonies.
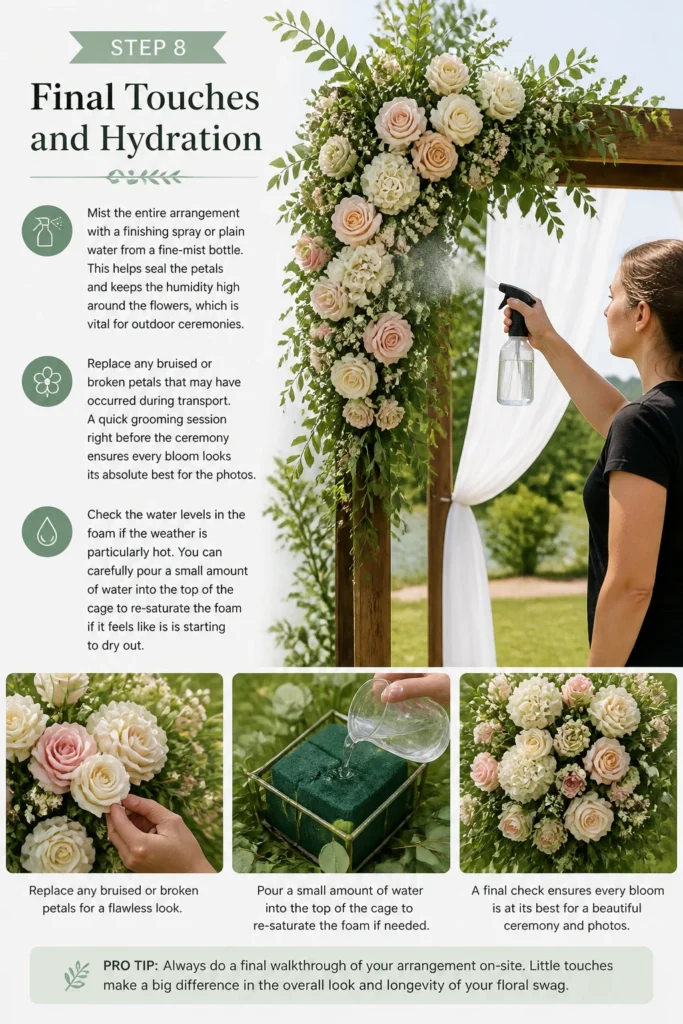
Replace any bruised or broken petals that may have occurred during transport. A quick “grooming” session right before the ceremony ensures every bloom looks its absolute best for the photos.
Check the water levels in the foam if the weather is particularly hot. You can carefully pour a small amount of water into the top of the cage to re-saturate the foam if it feels like it is starting to dry out.
Common Mistakes to Avoid
Ignoring the Back and Sides
Many beginners focus only on the front of the swag, leaving the sides and back exposed. When the bride and groom stand under the arch, they and their wedding party will see the “insides” of your work. Always wrap your greenery around the edges of the foam cage to ensure the design looks finished from every possible viewing angle.
Using Stems That Are Too Heavy
Large flowers like hydrangeas or heavy lilies can sometimes fall out of floral foam if they are not supported correctly. If you use heavy blooms, ensure the stems are cut long enough to reach deep into the foam. You can also use a small amount of floral wire to “stitch” the flower head to the cage for extra security during windy outdoor weddings.
Over-Saturating the Design
It is tempting to keep adding more and more flowers until the swag is a solid wall of petals. However, this often leads to a heavy, clunky appearance that lacks grace. Allow the greenery to breathe and leave some “negative space” so that the individual beauty of each focal flower can be appreciated by the audience.
Troubleshooting
The Swag Is Sagging or Tilting
If your swag feels like it is pulling away from the arch, your zip ties are likely too loose or poorly placed. Add a second or third zip tie at different points on the cage to distribute the weight. If the greenery is drooping, you may need to use floral wire to create a “splint” for the stem, keeping it upright and in its intended position.
Flowers Are Wilting Rapidly
Rapid wilting is usually caused by air pockets in the floral foam or intense heat. If a specific flower is dying, pull it out, recut the stem, and try to find a fresh spot in the foam to insert it. For outdoor weddings in high heat, consider using more hardy flowers like orchids, carnations, or tropicals that can withstand the sun better than delicate garden roses.
The Foam Cage Is Visible
If you can see the green plastic or the foam itself, you need more “basing” material. Small clumps of moss, short sprigs of boxwood, or even folded leaves can be pinned into the foam to cover these mechanical spots. Always do a final “peek-a-boo” check by walking around the arch and looking up from a seated position.
Key Takeaways
- Always hydrate your flowers for 24 hours and fully soak your floral foam cages before starting.
- Build a strong greenery skeleton first to define the shape and size of your swag.
- Layer your blooms from largest to smallest, ensuring you vary the depth for a 3D effect.
- Secure the arrangement with heavy-duty zip ties and hide them with extra foliage.
- Mist the final product and check for any visible mechanics or wilting stems before the ceremony starts.
Frequently Asked Questions
How far in advance can I make a floral swag?
You can typically make a floral swag 24 hours before the wedding if you have a cool place to store it. Freshness is key, so if you are using very delicate flowers like sweet peas or hydrangeas, try to assemble the piece as close to the event time as possible. Always keep the foam saturated and the petals misted to maximize the lifespan of the arrangement.
Can I use silk flowers instead of fresh ones?
Yes, silk flowers are a fantastic option for wedding arches, especially for destination weddings or very hot climates. The process is similar, but you will use dry floral foam specifically designed for artificial stems. Silk swags can be made weeks in advance, which significantly reduces stress on the actual wedding day.
How do I attach a swag to a metal arch without it sliding?
Metal arches can be slippery, causing the swag to slide down the poles. To prevent this, wrap a small piece of rubberized shelf liner or a thick rubber band around the metal pole where you plan to attach the swag. When you tighten the zip tie over this “grip” material, it creates friction that holds the arrangement firmly in place.
What are the best types of greenery for a wedding swag?
Eucalyptus (Seeded, Silver Dollar, or Willow), Italian Ruscus, and Salal are the industry favorites because they are incredibly hardy. They can last for hours without a direct water source and provide a beautiful, flowing movement. For a more formal look, consider using Magnolia leaves or Boxwood, which offer a structured and glossy appearance.
Our Top Recommended Finds
- Floral Foam Cages: Look for cages with built-in eyelets for zip ties, as these are much easier to mount to arches securely.
- Professional Pruning Shears: High-quality, sharp shears prevent crushing the stems, which allows for better water uptake and longer-lasting blooms.
- Finishing Touch Spray: This specialized floral spray locks in moisture and prevents petals from browning in dry or windy conditions.
Bringing Your Floral Vision To Life
Now that you understand the mechanics and artistry behind a professional floral swag, you are ready to start your own project. Take your time selecting a color palette that complements the venue and the season.
Consider practicing with a small bundle of grocery store flowers and a single foam cage before the big day arrives. This low-stakes trial run will help you get a feel for how the stems interact with the foam and how much greenery you truly need.
Once you have mastered the swag, you might want to explore creating matching aisle markers or a coordinating bouquet. Your wedding arch will stand as a beautiful testament to your creativity and the love celebrated on your wedding day.