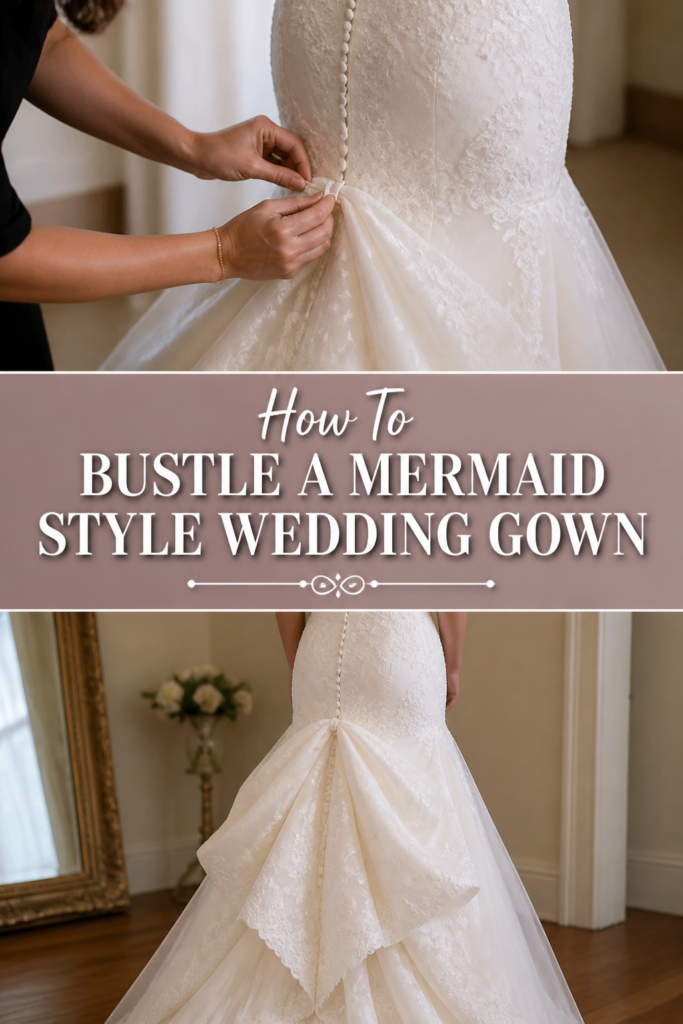
👰 How To Bustle A Mermaid Style Wedding Gown
Walking down the aisle in a mermaid gown feels like a red-carpet moment, but dancing in one requires a bit of structural magic.
I remember assisting a bride whose train was so heavy it nearly pulled her skirt down during the first dance.
After years of working with bridal fabrics and helping bridal parties backstage, I have mastered the specific techniques needed to secure these dramatic silhouettes.
Quick Overview
This guide will help you understand how to manage the unique flare and weight of a mermaid-style train.
- Time needed: 15 to 20 minutes
- Difficulty: Intermediate
- What you’ll need: A crochet hook, safety pins (for emergencies), a steady assistant, and a clear floor space.
Step-by-Step Instructions
Step 1: Identify the Flare Point
The mermaid gown is unique because it remains fitted through the hips and thighs before flaring out at the knee or mid-calf.
Locate the exact spot where the skirt begins to widen, as this is where your bustle anchors will likely be placed.
Check the underside of the fabric to see if your seamstress has already installed color-coded ribbons or clear buttons.
Pro Tip: Most mermaid gowns use an “American” or “French” bustle, and knowing which one you have is the first step to success.
Step 2: Prepare the Gown and the Space
Before you begin the bustling process, ensure the bride is standing on a clean, flat surface to prevent the train from catching on debris.
Spread the train out fully behind the bride so you can see the entire circumference of the fabric.
Ask the bride to stand perfectly still and look straight ahead, as shifting weight can cause the bustle to look lopsided.
Step 3: Locate the Center Anchor Point
Every bustle starts with a central point that dictates how the rest of the fabric will drape.
Find the middle seam of the train and look for a small loop or a hidden button near the top of the flare.
Lift the center of the train toward the waist or the “flare point” to see how the fabric naturally falls.
Ensure the hem of the gown is hovering just above the floor so the bride does not trip while walking backward.
Step 4: Secure the American Bustle (Over-Bustle)
If your gown has buttons on the outside of the skirt, you are likely performing an American bustle.
Hook the center loop onto the highest button located near the back of the thighs or the buttocks.
Move to the left side and find the corresponding side loop, then secure it to the side button.
Repeat this process on the right side to create a tiered, “waterfall” effect that mimics the layers of the gown.
Pro Tip: Use a small crochet hook to pull the fabric loops over the buttons if they are tight or difficult to grasp with your fingers.
Step 5: Execute the French Bustle (Under-Bustle)
French bustles are common for mermaid gowns because they tuck the fabric underneath, maintaining the sleek silhouette.
Reach under the skirt to find the numbered or color-coded ribbons sewn into the lining.
Match “Ribbon 1” to “Ribbon 1” and tie them in a secure double knot, ensuring the fabric folds inward cleanly.
Continue matching the pairs across the width of the train until the entire hem is lifted and tucked.
Smooth the exterior fabric with your hands to ensure there are no awkward lumps or visible ribbon ends.
Step 6: Balance the Side Flaring
Mermaid gowns often have extra volume on the sides that can look messy if not properly tucked.
Check the “wings” of the train to see if they are dragging or flaring out too far from the body.
Tuck any excess fabric toward the center of the bustle to create a streamlined, elegant shape.
Pin any loose layers with a heavy-duty safety pin from the inside if a loop has broken or is missing.
Step 7: Perform a Movement Test
The bustle must be functional as well as beautiful, so a test run is mandatory.
Ask the bride to walk forward, turn around, and take a few dance steps to ensure the bustle holds.
Watch the hemline to make sure it stays consistent and doesn’t drop as she moves.
Listen for the sound of fabric dragging, which indicates a point may need to be adjusted higher.
Common Mistakes to Avoid
Bustling Too High or Too Low
If you attach the loops to the wrong buttons, the gown will either look like a “bubble” skirt or will still drag on the floor. Always look for the specific markers left by the seamstress to find the intended height. If the bride is wearing lower heels for the reception, you may need to adjust the bustle slightly higher than originally planned.
Tying Ribbons Too Loosely
In a French bustle, loose ribbons will eventually slip, causing the train to fall during the reception. Make sure to use a tight double knot for every pair of ribbons. If the ribbons are made of slippery satin, consider tying them once and then securing the knot with a small safety pin for extra security.
Ignoring the Lining Layers
Many mermaid gowns have multiple layers of crinoline or tulle underneath the main fabric. If you only bustle the top layer, the heavy lining will still drag and potentially trip the bride. Always ensure that the internal layers are lifted and secured along with the decorative outer shell.
Troubleshooting
A Bustle Loop Breaks
This is the most common wedding day emergency, often caused by someone stepping on the train. Keep a “bridal emergency kit” with large, sturdy safety pins and a needle with heavy-duty thread. Pin the fabric from the underside, catching enough material to support the weight of the train without tearing the delicate outer lace.
The Bustle Looks Uneven
If one side of the gown looks longer than the other, a loop has likely been skipped or attached to the wrong anchor. Unhook the side points and start from the center again to ensure symmetry. Sometimes the bride’s posture can make the bustle look crooked, so have her stand straight before you make any permanent adjustments.
The Fabric Is Too Heavy for the Buttons
Heavy satin or beaded mermaid gowns can put immense pressure on tiny bridal buttons. If the buttons look like they are about to pop off, reinforce them by wrapping a clear hair elastic around the button and the loop. This adds a layer of tension relief and keeps the loop from sliding off the button during vigorous dancing.
Key Takeaways
- Identify your style: Know whether your gown uses an American (over) or French (under) bustle before the wedding day.
- Practice makes perfect: The maid of honor or a designated helper should practice bustling the gown at the final fitting.
- Start from the center: Always anchor the middle of the train first to ensure the fabric drapes evenly on both sides.
- Check the height: Ensure the hem sits about an inch off the ground to prevent tripping or fabric damage.
- Prepare for breaks: Carry safety pins to fix any loops or buttons that fail during the night.
Frequently Asked Questions
Can I bustle a mermaid gown myself?
It is nearly impossible to bustle a mermaid gown by yourself because the anchor points are located behind your legs and lower back. You will need an assistant who can see the back of the dress clearly to align the loops and buttons. Trying to do it yourself will likely result in an uneven hem or a strained back.
When should the bustle be put up?
Most brides choose to bustle their gown immediately after the ceremony and formal photos are finished. This transition usually happens right before the grand entrance to the reception or during the cocktail hour. It allows the bride to move freely through the crowd and prepare for the first dance without the weight of the train.
How long does it take to bustle a mermaid dress?
Depending on the complexity and the number of points, it usually takes between 5 and 15 minutes. A simple three-point American bustle is very quick, while a complex 10-point French bustle requires more time. Always factor this time into your wedding day schedule so you don’t feel rushed.
Will bustling damage the fabric of my dress?
If done correctly by a professional seamstress, a bustle is designed to support the weight of the fabric without causing damage. However, if the train is stepped on while bustled, it can tear the loops or the fabric at the anchor points. This is why it is important to ensure the bustle is high enough to stay off the floor.
Our Top Recommended Finds
- Small Plastic Crochet Hook: This is the best tool for pulling tiny thread loops over fabric-covered buttons without breaking your fingernails.
- Heavy-Duty Safety Pins: Look for “quilting pins” or large steel pins that can hold several pounds of fabric in case a bustle point fails.
- Handheld Steamer: After bustling, the fabric may have some wrinkles from being folded; a quick steam will make the drape look professional and fresh.
Master Your Reception Look
Now that you know the mechanics of the mermaid bustle, you can approach your wedding day with confidence.
The transition from ceremony elegance to reception fun is much easier when your gown is securely fastened.
Consider taking a video of your seamstress demonstrating the bustle during your final fitting to share with your bridesmaids.
With the right preparation, you will spend your night dancing rather than worrying about your train.