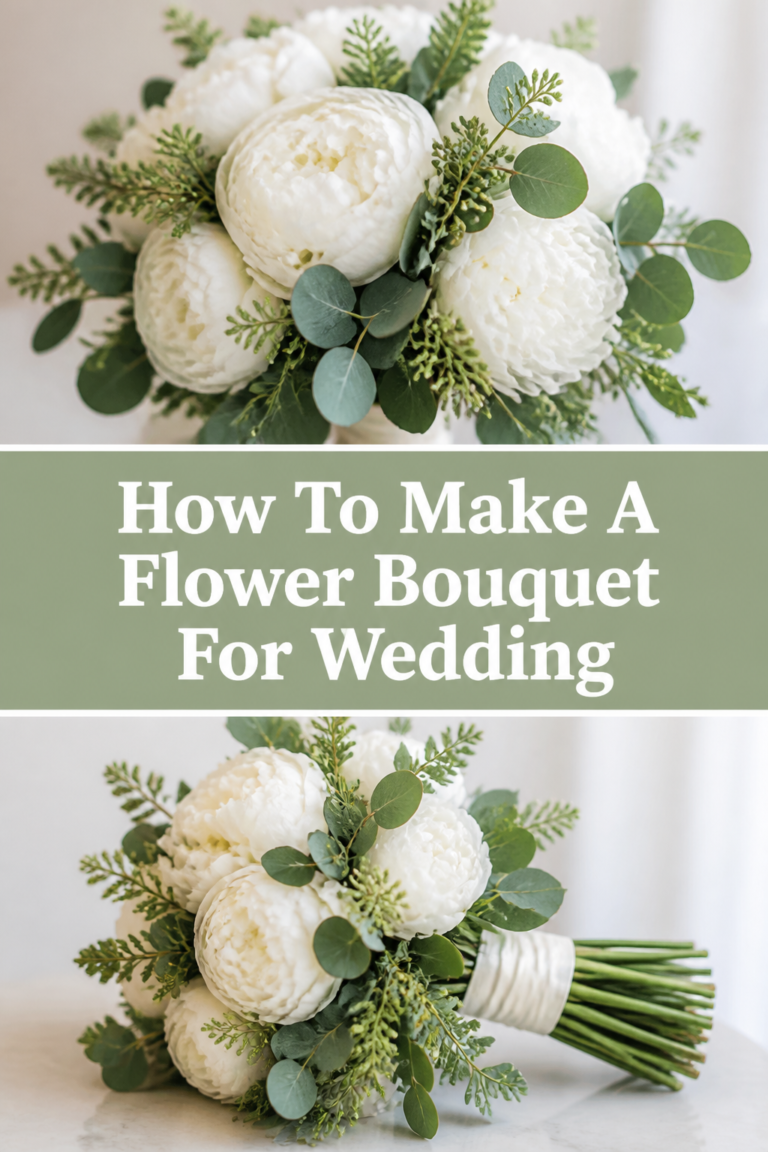
🌸 How To Make A Floral Arrangement For A Wedding Arch
I have spent years standing on ladders in drafty chapels and sunny gardens, wrestling with stubborn stems and heavy floral foam.
There is a specific kind of magic that happens when a bare wooden frame transforms into a lush, living masterpiece.
This guide comes from those hours of trial and error, ensuring your wedding arch looks professional and stays fresh until the final dance.

Quick Overview
Creating a floral arch is a labor of love that requires a balance of structural engineering and artistic flair.
You will be building a foundation that can withstand wind, heat, and the weight of water-soaked mechanics.
- Time needed: 3 to 5 hours (including prep and installation)
- Difficulty: Intermediate
- What you’ll need: Floral foam cages, heavy-duty zip ties, floral shears, focal flowers, filler flowers, and various types of greenery.
Step-by-Step Instructions
Step 1: Prepare Your Floral Foam
Soak your floral foam cages in a large bucket of water treated with flower food.
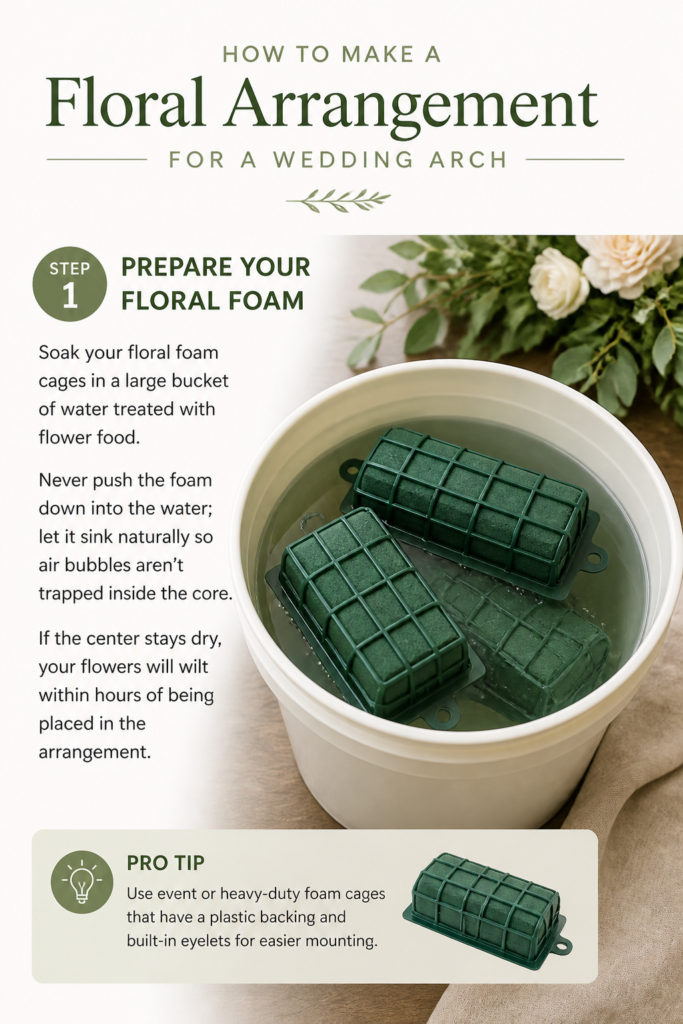
Never push the foam down into the water; let it sink naturally so air bubbles aren’t trapped inside the core.
If the center stays dry, your flowers will wilt within hours of being placed in the arrangement.
Pro Tip: Use “event” or “heavy-duty” foam cages that have a plastic backing and built-in eyelets for easier mounting.
Step 2: Secure the Mechanics to the Arch
Attach the soaked foam cages to the arch using thick, industrial-strength zip ties.
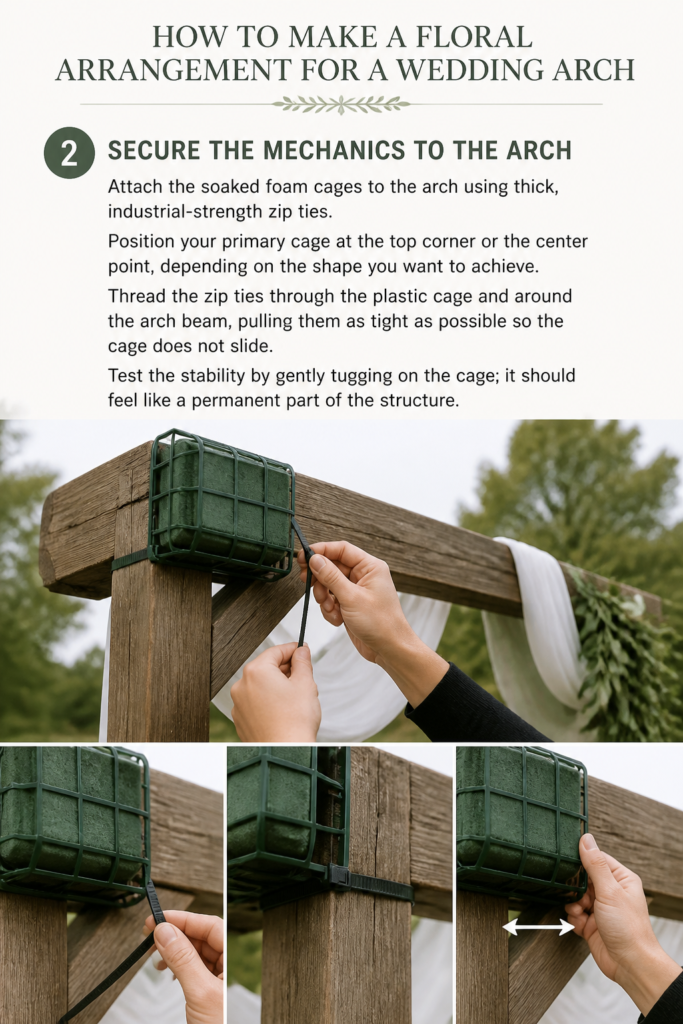
Position your primary cage at the top corner or the center point, depending on the shape you want to achieve.
Thread the zip ties through the plastic cage and around the arch beam, pulling them as tight as possible so the cage does not slide.
Test the stability by gently tugging on the cage; it should feel like a permanent part of the structure.
Step 3: Establish the Greenery Skeleton
Insert your longest stems of greenery first to define the overall size and shape of the arrangement.
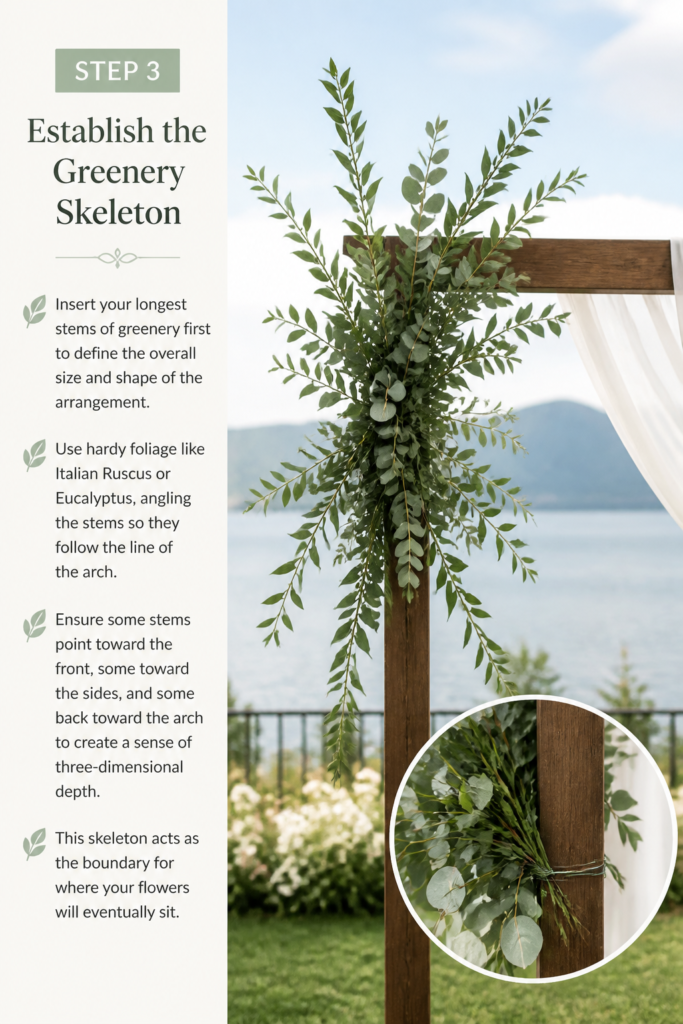
Use hardy foliage like Italian Ruscus or Eucalyptus, angling the stems so they follow the line of the arch.
Ensure some stems point toward the front, some toward the sides, and some back toward the arch to create a sense of three-dimensional depth.
This “skeleton” acts as the boundary for where your flowers will eventually sit.
Step 4: Create a Base Layer of Foliage
Fill the center of the foam with shorter, bushier pieces of greenery to hide the plastic cage and the zip ties.
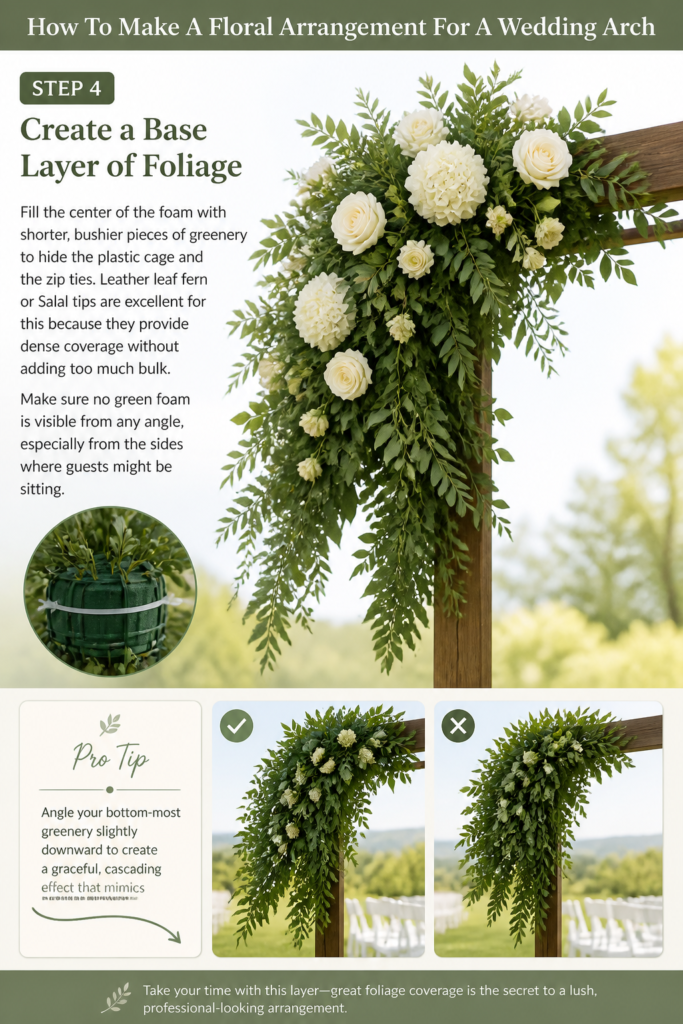
Leather leaf fern or Salal tips are excellent for this because they provide dense coverage without adding too much bulk.
Make sure no green foam is visible from any angle, especially from the sides where guests might be sitting.
Pro Tip: Angle your bottom-most greenery slightly downward to create a graceful, cascading effect that mimics natural growth.
Step 5: Place Your Focal Flowers
Select your largest and most expensive blooms, such as peonies, garden roses, or hydrangeas, to serve as the focal points.
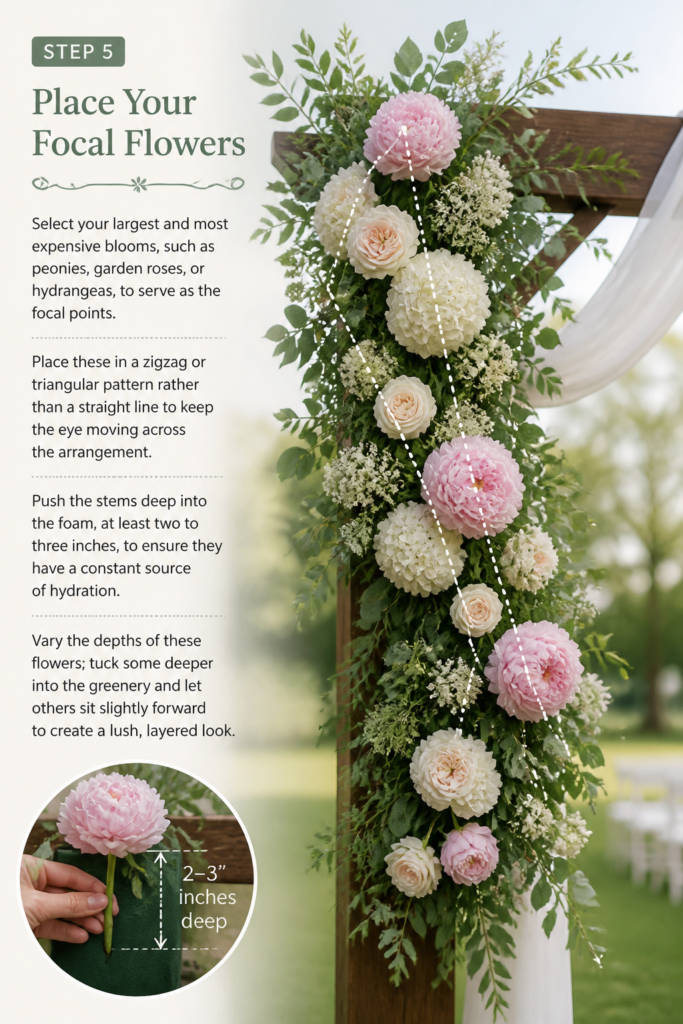
Place these in a “zigzag” or triangular pattern rather than a straight line to keep the eye moving across the arrangement.
Push the stems deep into the foam, at least two to three inches, to ensure they have a constant source of hydration.
Vary the depths of these flowers; tuck some deeper into the greenery and let others sit slightly forward to create a lush, layered look.
Step 6: Integrate Secondary Blooms
Add medium-sized flowers like spray roses, ranunculus, or carnations to bridge the gaps between your focal flowers.
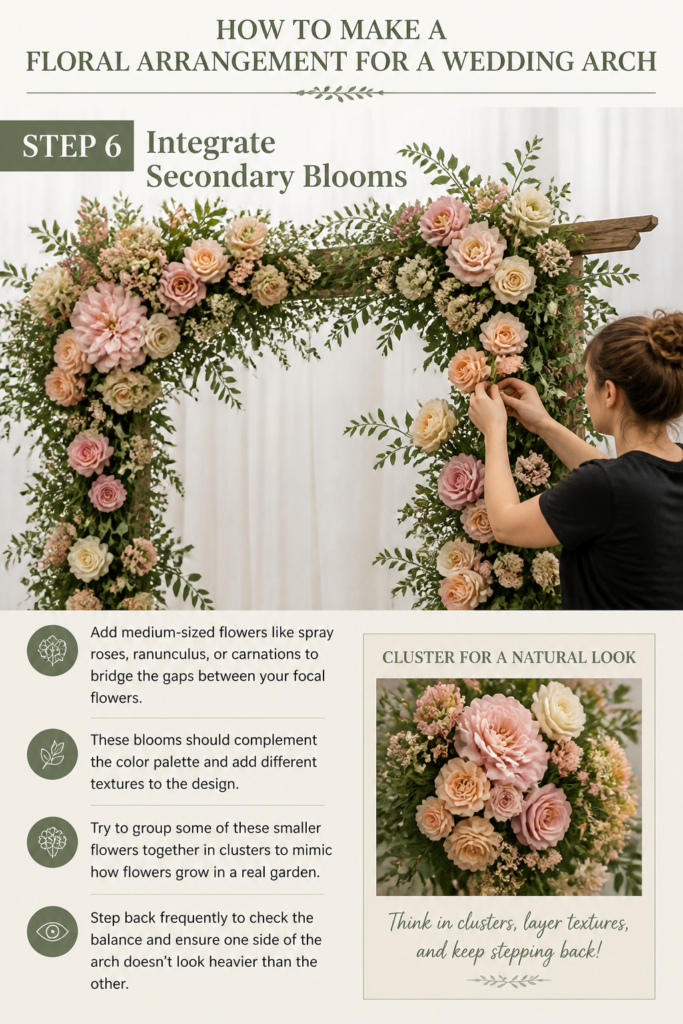
These blooms should complement the color palette and add different textures to the design.
Try to group some of these smaller flowers together in “clusters” to mimic how flowers grow in a real garden.
Step back frequently to check the balance and ensure one side of the arch doesn’t look heavier than the other.
Step 7: Add Line Flowers for Movement
Insert “line” flowers like snapdragons, delphinium, or gladiolus to extend the reach of the arrangement.
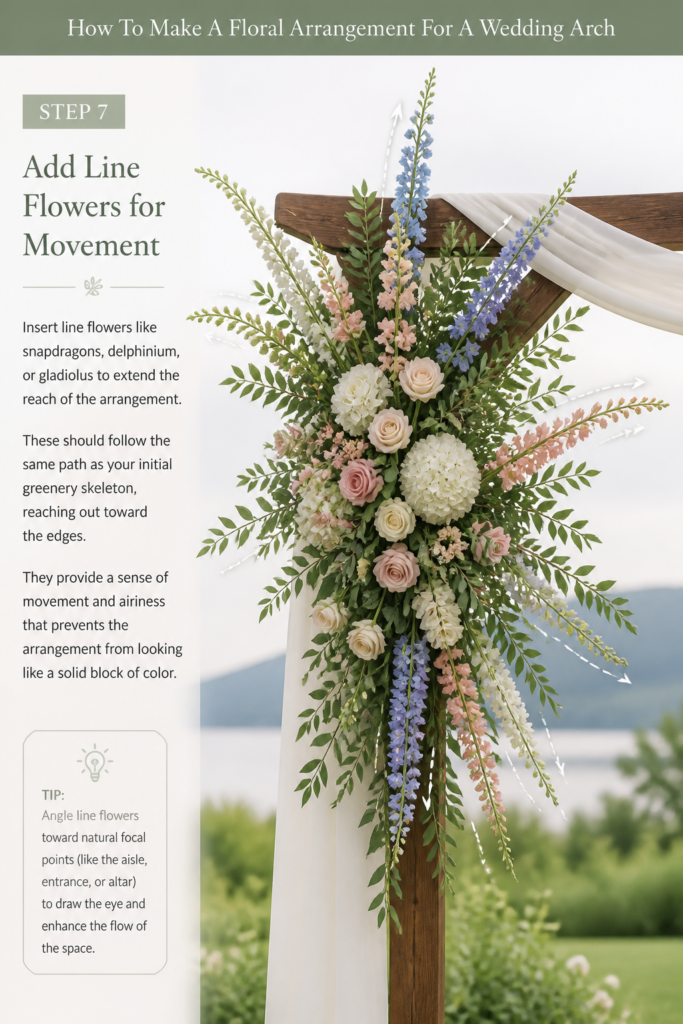
These should follow the same path as your initial greenery skeleton, reaching out toward the edges.
They provide a sense of movement and “airiness” that prevents the arrangement from looking like a solid block of color.
Step 8: Fill the Gaps with Delicate Textures
Tuck in delicate filler flowers like waxflower, baby’s breath, or Queen Anne’s lace to soften the edges.
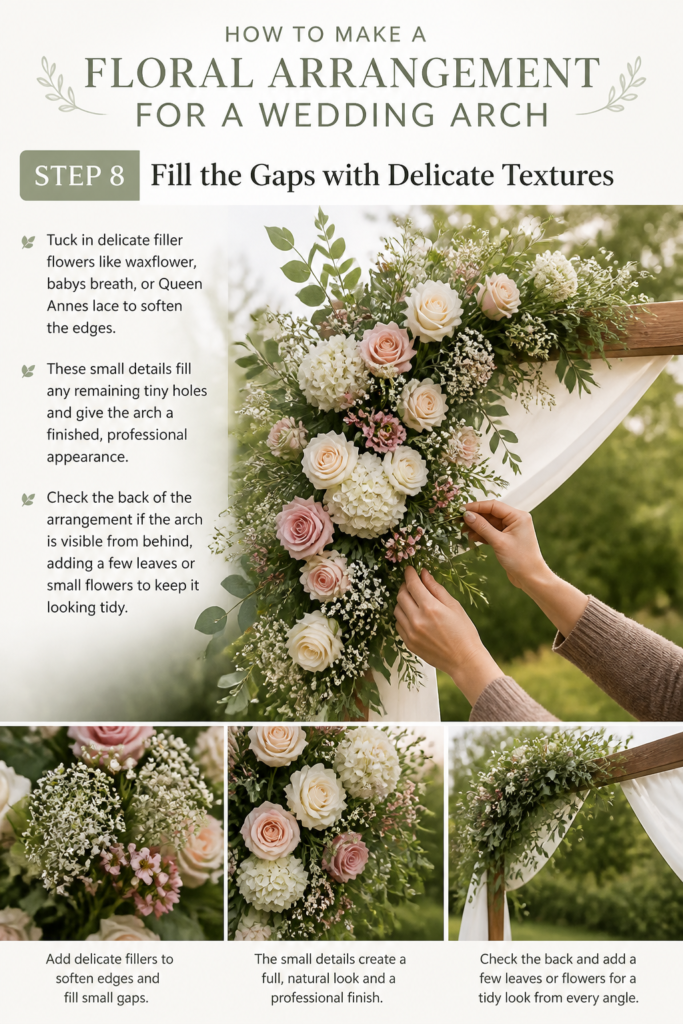
These small details fill any remaining tiny holes and give the arch a finished, professional appearance.
Check the back of the arrangement if the arch is visible from behind, adding a few leaves or small flowers to keep it looking tidy.
Step 9: Final Hydration and Security Check
Mist the entire arrangement with a finishing spray designed to seal in moisture and prevent petal wilt.
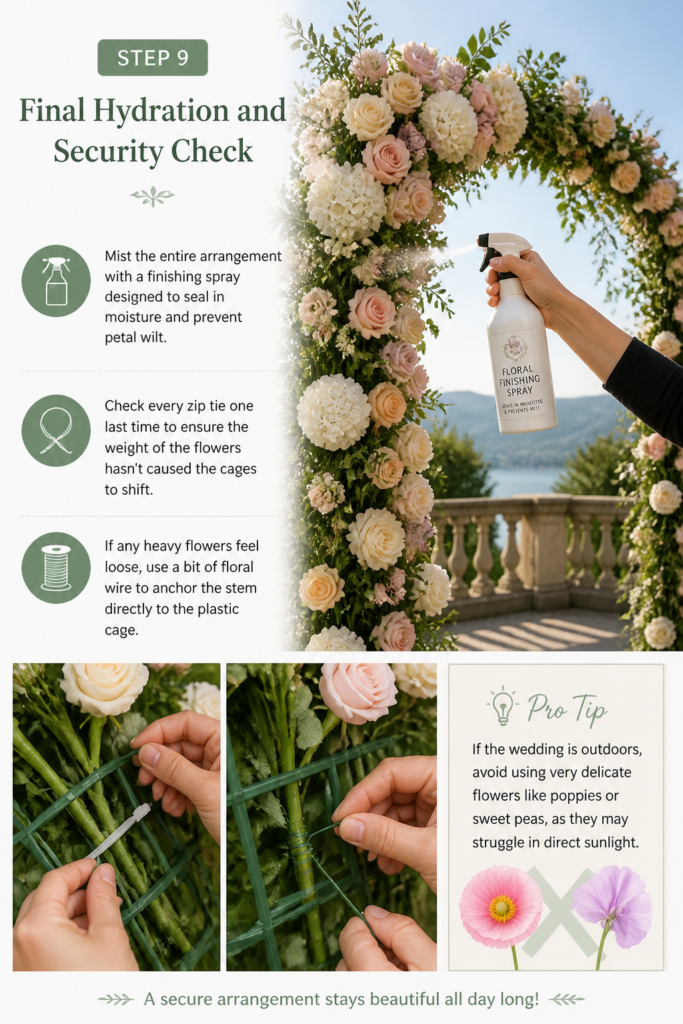
Check every zip tie one last time to ensure the weight of the flowers hasn’t caused the cages to shift.
If any heavy flowers feel loose, use a bit of floral wire to anchor the stem directly to the plastic cage.
Pro Tip: If the wedding is outdoors, avoid using very delicate flowers like poppies or sweet peas, as they may struggle in direct sunlight.
Common Mistakes to Avoid
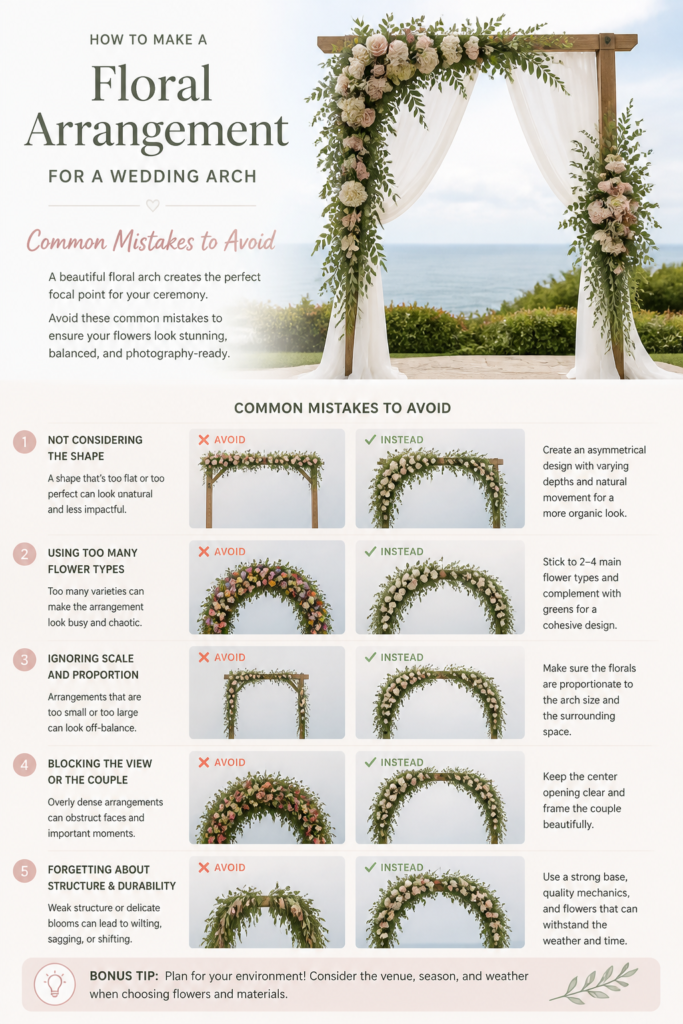
Ignoring the Weight of Water
A common error is underestimating how heavy floral foam becomes once it is fully saturated.
When you add the weight of several dozen flower stems, the entire unit can weigh five to ten pounds.
If your arch is lightweight or top-heavy, the arrangement might cause the entire structure to tip over mid-ceremony.
Always weigh down the base of your arch with sandbags or heavy decorative rocks to counteract the weight of the florals.
Creating a Flat Wall of Flowers
Beginners often place all their flower heads at the exact same height, resulting in a flat, two-dimensional look.
This makes the arrangement look artificial and prevents light from catching the different petals and textures.
Varying the stem lengths allows shadows to form within the arrangement, which provides the depth needed for beautiful photography.
Always remember to “recess” some flowers and “float” others above the greenery.
Visible Mechanics and Hardware
Nothing ruins the illusion of a floral arch faster than a glimpse of a green plastic cage or a white zip tie.
Designers sometimes forget to look at the arrangement from the side or from a seated perspective.
Use small bits of foliage or “filler” flowers to specifically cover the attachment points and the edges of the foam.
Ensure that even if a breeze moves the greenery, the underlying structure remains completely hidden.
Troubleshooting
Flowers Wilting in High Heat
If the wedding is taking place in direct sun, flowers can begin to droop before the ceremony even starts.
Keep a spray bottle of cool water and flower food nearby to mist the arrangement every thirty minutes.
For particularly sensitive blooms, you can briefly wrap the heads in damp paper towels until thirty minutes before the guests arrive.
Choosing “hardy” varieties like orchids, carnations, or tropical greenery can also mitigate this issue.
Stems Falling Out of the Foam
Sometimes a heavy flower head will pull its stem right out of the foam due to gravity.
This usually happens if the stem was inserted at an upward angle or if the hole in the foam has become too large.
To fix this, remove the stem, cut a fresh inch off the bottom, and insert it into a brand-new spot in the foam.
You can also use a “hairpin” made of floral wire to straddle the stem and pin it securely into the foam block.
Key Takeaways
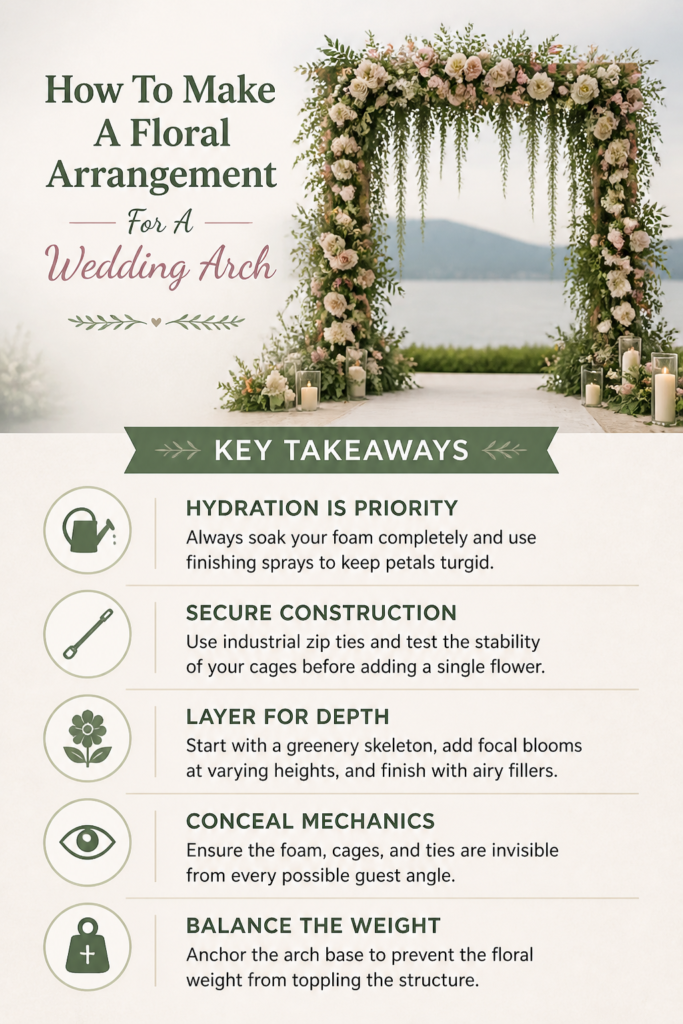
- Hydration is Priority: Always soak your foam completely and use finishing sprays to keep petals turgid.
- Secure Construction: Use industrial zip ties and test the stability of your cages before adding a single flower.
- Layer for Depth: Start with a greenery skeleton, add focal blooms at varying heights, and finish with airy fillers.
- Conceal Mechanics: Ensure the foam, cages, and ties are invisible from every possible guest angle.
- Balance the Weight: Anchor the arch base to prevent the floral weight from toppling the structure.
Frequently Asked Questions
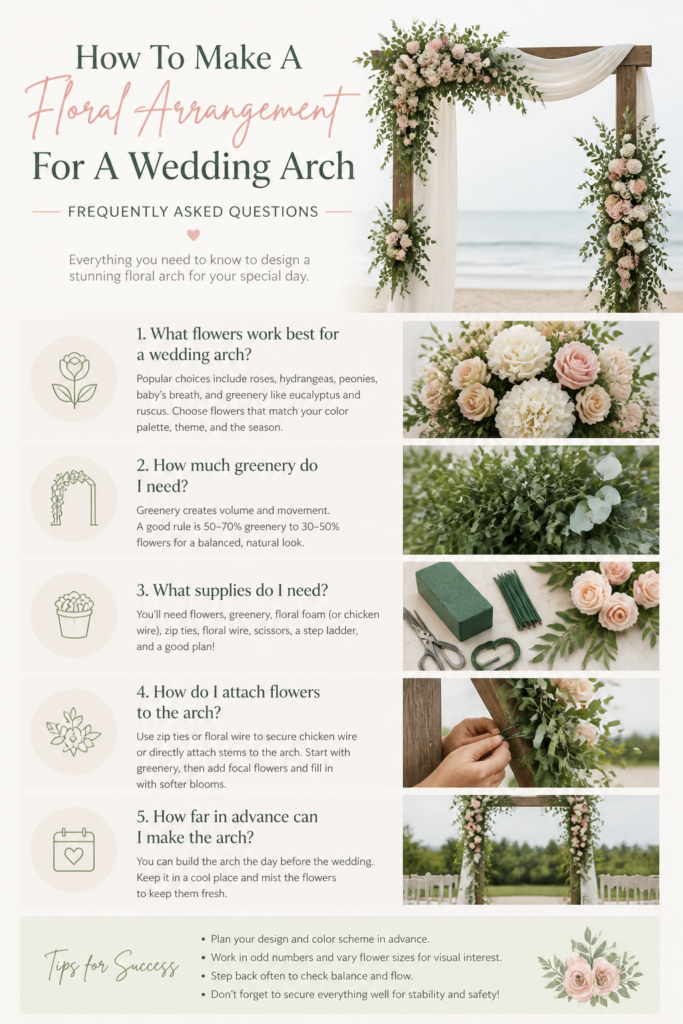
How long will a floral arch stay fresh?
If you use high-quality floral foam and keep it hydrated, an arch can stay beautiful for 24 to 48 hours. However, in extreme heat or direct sunlight, the lifespan may drop to 6 or 8 hours. It is always best to assemble the arch as close to the ceremony time as possible.
Can I make the floral arrangement ahead of time?
You can create the arrangements in the cages the day before if you have access to a large floral cooler. If you are working at room temperature, it is better to prep the greenery the night before and add the fresh flowers on the morning of the wedding. Transporting pre-made cages is possible, but you must secure them carefully in boxes so they don’t roll.
What are the best flowers for a wedding arch?
Roses, carnations, lilies, and orchids are legendary for their ability to withstand being out of a vase. Hydrangeas are beautiful but very temperamental and require a constant, heavy water source to avoid wilting. If you use hydrangeas, ensure they are pushed very deep into the wettest part of the foam.
How many flowers do I need for a standard arch?
A standard “corner” arrangement usually requires 2-3 bunches of greenery and 30-50 stems of mixed flowers. For a full arch that covers the entire top and sides, you may need 10-15 bunches of greenery and over 150 stems of flowers. Always order 10-15% more than you think you need to account for broken stems or unexpected gaps.
Our Top Recommended Finds
- Oasis Floral Foam Cages: These provide the necessary water reservoir and a sturdy plastic frame for easy attachment to any arch.
- Heavy-Duty 12-inch Zip Ties: These are essential for ensuring the heavy, wet foam stays exactly where you put it, even in windy conditions.
- Ergonomic Floral Shears: A sharp, clean cut is vital for water absorption, and ergonomic handles will save your hands during a long build.
Bringing Your Floral Vision To Life
Building a floral arch is one of the most rewarding tasks in wedding design.
Once you master the mechanics of foam and zip ties, the creative possibilities are endless.
Take a moment to stand back and admire the scale of what you have built before the guests arrive.
If you enjoyed this process, you might want to explore creating matching floral “nests” for the base of the arch or designing cohesive aisle markers.
Gather your supplies today and practice with a small cage to get a feel for how the stems interact with the foam.